The PetSafe Remote Trainer is a device designed to help pet owners train their dogs using a combination of tone, vibration, and static stimulation. It is suitable for off-lead walks and can be used in various ranges depending on the model.
Function Description
The PetSafe Remote Trainer allows owners to communicate with their dog through a remote control and a training collar. The system offers three training options: tone, vibration, and static stimulation. The tone option provides an audible signal, the vibration option delivers a gentle vibration, and the static stimulation option provides a mild static correction. These options are designed to help reinforce commands and modify unwanted behaviors. The device is waterproof and rechargeable, making it suitable for various training environments.
Important Technical Specifications
The PetSafe Remote Trainer comes in different models with varying ranges:
- 100 Metre Remote Trainer: Designed for shorter ranges.
- 300 Metre, 600 Metre, 900 Metre Remote Trainer: Designed for longer ranges, allowing for training over greater distances.
The system includes:
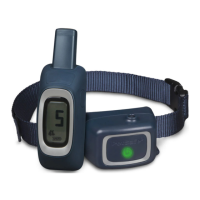
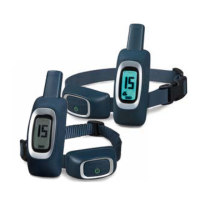
- Remote Trainer: The handheld device used by the owner to send commands.
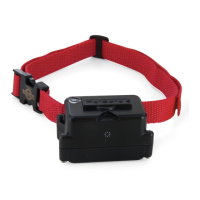
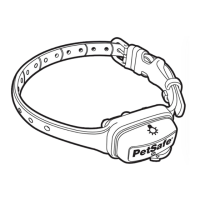
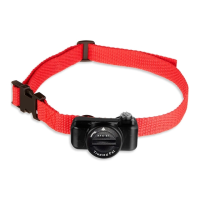
- Training Collar: Worn by the dog, it receives signals from the remote trainer and delivers the chosen stimulation.
- USB Charging Adaptor: For charging the 100-meter model.
- Charging Adaptor (300 m, 600 m and 900 m models only): For charging the longer-range models.
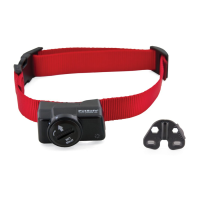
- Test Light Tool: Used to test the static stimulation function of the collar.
- Long Contact Points: These are interchangeable with short contact points to ensure proper contact with the dog's skin, especially for dogs with thicker coats.
The collar and remote trainer are rechargeable. The battery life can last up to 5 hours on a full charge. The display on the remote trainer indicates the battery level and the stimulation level.
Usage Features
Charging the Training Collar and Remote:
- Plug in and fully charge the remote and the training collar. A full charge takes up to 5 hours.
- The green LED on the collar will turn off, and the battery meter on the remote will appear full when fully charged.
- Replace rubber covers on the charging ports after charging.
Turning the Training Collar On/Off:
- Press and hold the on/off button until a high beep and the green LED appear, then release. The display will appear when the remote is on.
- To turn off, press and hold the on/off button until the collar beeps high to low, and then release. The red LED will be illuminated during the button press and will turn off when the collar turns off.
- Quick Tip: To preserve battery life, turn off the collar when not in use.
Testing the Remote Trainer:
- Place one finger over both contact points of the training collar.
- Hold your remote approximately 0.5 m from the training collar.
- Starting at level 0, press the vibration button continuously for 1 to 2 seconds. You should feel continuous vibration. This confirms one level of vibration.
- Increase the level to 1 for static stimulation. At this level, you may not feel the stimulation.
- Increase the level on the static level adjuster until the sensation begins to feel uncomfortable.
Tone Symbol (T): Delivers a tone with non-adjustable volume to the collar.
Vibration Symbol (V): Sends 1 non-adjustable level of vibration stimulation to the collar. Level 0 is vibration.
Static Symbol (S): Delivers up to 15 levels of static stimulation to the collar that can be adjusted with the level adjuster button. Levels 1-15 are static stimulation.
Lock Symbol: Indicates static stimulation levels 8-15 are locked.
Dog 1 / Dog 2: Indicates which training collar is active.
Battery Indicator: Indicates the amount of battery remaining in the remote.
Fitting the Training Collar:
- Start with the collar turned off and your dog standing comfortably, not sitting.
- Place the training collar on your pet so that the PetSafe® logo is right side up and the training collar is directly under your dog's chin.
- Center the contact points beneath your dog's neck, touching the skin.
- It is sometimes necessary to trim the hair around the contact points to make sure that contact is consistent.
- The collar should be snug but not constricting. You should be able to insert one finger between the end of a contact point and your dog's neck.
- Allow your dog to wear the training collar for several minutes, then recheck the fit.
- Trim the collar, mark it allowing room for growth or a winter coat. Remove it from your dog and cut. For nylon collars, use a lighter to seal the end.
Re-pairing the Collar or Pairing a Second Collar:
- If your training collar does not respond when a button is pressed, or if you get a second collar, follow these steps:
- Use the Dog 1 / Dog 2 button on the remote to select either Dog 1 or Dog 2. With the remote turned on and the collar turned off, press and hold the on/off button on the collar.
- After about 5 seconds the LED on collar will turn off indicating that it is ready for pairing. Press either of the top 2 stimulation buttons. The collar LED will blink 5 times to indicate successful pairing.
- Note: If you own a 300, 600, or 900 metre trainer and wish to add another training collar to the system, Add-A-Dog® collars are available from www.petsafe.com or by calling customer Care Centre.
Training Tips:
- If you're attempting to teach your dog a behaviour, make sure your dog understands what you want before introducing static stimulation.
- When Training Begins: Only begin using the training collar on dogs that are at least 6 months and that weigh at least 3.6 kg.
- Stopping Unwanted Behaviour: The level of stimulation should be enough to interrupt your dog and give you the ability to redirect your dog's attention to another behaviour.
- Collar Conditioning: You don't want your dog to only associate wearing the training collar with being corrected.
- Timing: For static training to work properly, timing is very important. You should apply the static stimulation immediately (within 2 seconds) of an undesirable behaviour.
Finding the Best Stimulation Level for Your Pet:
- The Remote Trainer has 1 tone, 1 vibration, and 15 static stimulation levels.
- You will have to choose the stimulation level that is best for your pet.
- We recommend training with tone and vibration, or the lower levels of static stimulation when needed.
- In most cases static levels 1-7 will be adequate for your training needs. Levels 8-15 are locked as a reminder that you are moving to higher stimulation levels.
- Once you have placed the training collar on your pet, it is time to find the "recognition level". The "recognition level" is the stimulation level that your dog begins to notice.
- You should NOT VOCALIZE OR PANIC WHEN RECEIVING STIMULATION. IF THIS HAPPENS, THE STIMULATION IS TOO HIGH AND YOU NEED TO GO BACK TO THE PREVIOUS LEVEL.
- It may also be an indication that the collar is too loose and is only making intermittent contact.
- Check the fit to ensure the contact points are touching your dog's skin but that there is still room for one finger to fit between the contact point and your dog's skin.
- Follow the steps below to find your pet's recognition level:
- Choose level 0, and press the upper right button continuously for 1 to 2 seconds. A slight change in your pet's behaviour, such as looking around in curiosity, scratching at his collar, or flicking his ears, indicates the recognition level that is best for him.
- If your pet shows no reaction, repeat this several times before moving to static stimulation.
- Choose level 1 and press the upper right button continuously for 1 to 2 seconds.
- If your pet shows no reaction, repeat this stimulation level several times before moving up to the next level.
- Move up through the static stimulation levels until your pet reliably responds to the stimulation.
- Note: The Remote Trainer is preset with levels 8-15 locked. To unlock, press and hold both the up and down buttons on the left simultaneously.
- If your pet continues to show no response at level 15, check the fit of the training collar. You might also want to test it on your hand at a lower level to ensure the collar is working.
- If you have tried all of these steps and your pet continues to show no reaction to the stimulation, please contact our Customer Care Centre.
Test Light Instructions:
- Turn the training collar on.
- Hold the test light contacts to the contact points.
- Press the stimulation button on your remote.
- The test light will flash. Note: At higher stimulation levels, the test light will flash brighter.
- Turn the training collar off.
- Save the test light for future testing.
- Note: If the test light does not flash, recharge the battery and re-test. If the test light still does not flash, contact the Customer Care Centre or visit our website.
- Important: The test light tool can be used to tighten the contact points. This training collar has special waterproof contact points that will crack if they are over-tightened. If your contact points ever become loose, do not turn them any more than one-quarter turn beyond finger tight.
Maintenance Features
Proper Collar Fit:
- A collar worn for too long or made too tight on the pet's neck may cause skin damage ranging from redness to pressure ulcers.
- Avoid leaving the collar on the dog for more than 12 hours per day.
- When possible reposition the collar on the pet's neck every 1 to 2 hours.
- Regularly recheck the fit to prevent excessive pressure.
- You may need to trim the hair in the area of the contact points.
- Never connect a lead to a collar with contact points; it will cause excessive pressure on the contact points.
- When connecting a lead to a separate collar, do not allow it to put pressure on the training collar.
- Wash the dog's neck area and the contacts of the collar weekly with a damp cloth.
- Examine the contact area daily for signs of a rash or a sore.
- If a rash or sore is found, discontinue use of the collar until the skin has healed.
- If the condition persists beyond 48 hours, see your veterinarian.
- For additional information on bed sores and pressure necrosis, please visit our website.
Important Recycling Advice:
- Please respect the Waste Electrical and Electronic Equipment regulations in your country.
- This equipment must be recycled.
- At the end of the product life, do not place it in the normal municipal waste system.
- Please check the regulations in your area or return it to where it was purchased so that it can be placed in our recycling system.
- If these options are not possible, please contact the Customer Care Centre for further information.
Battery Disposal:
- Separate collection of used batteries is required in many regions; check the regulations in your area before discarding used batteries.