EasyManua.ls Logo

Pfister 0X6-440R - User Manual

Pfister 0X6-440R
14 pages
Print Icon
To Next Page IconTo Next Page
Loading...
*OTUBMMBUJPO4VQQPSUs4PQPSUFEFJOTUBMBDJÑOs4VQQPSUEJOTUBMMBUJPO
*OTUBMMBUJPO7JEFPT"WBJMBCMF
7JEFPTEFJOTUBMBDJÑOBEJTQPTJDJÑO
7JEÈPTEJOTUBMMBUJPOEJTQPOJCMFT
Personal Assistance, Product Specs, &
“How-to” Questions:
"TJTUFODJBQFSTPOBMFTQFDJDBDJPOFTEFM
QSPEVDUPZQSFHVOUBTTPCSFhDÑNPIBDFSMPv
"JEFQFSTPOOFMMFTQÈDJŢJDBUJPOTEVQSPEVJU
FURVFTUJPOTiQSBUJDPQSBUJRVFTw
1800PFAUCET (7328238)
pisterfaucets.com/support
pisterfaucets.com/videos
386980200
May 3, 2011
4 Hole Roman Tub Valve
Válvula Romana De La Tina De 4 Agujeros
Valve de la Cuve de Bain Romain  4 Trous
EO7752BK
Quick Installation Guide
Guía de instalación rápida
Guide d’installation rapide
Additional Helpful Tools
Otras herramientas útiles
Outils supplémentaires utiles
0X6-440R
Required Tools
Herramientas necesarias
Outils nécessaires
Parts in the Box
s1JF[BTFOMBDBKBs1JËDFTEBOTMBCPÍUF
WARNING / AVERTENCIA / AVERTISSEMENT
5PSFEVDFUIFSJTLPGJOKVSZPSQSPQFSUZEBNBHFSFBEBMMJOTUSVDUJPOTCFGPSFJOTUBMMJOHQSPEVDU8FBSTBGFUZHPHHMFT1SPEVDUNVTUCFJOTUBMMFEJOBDDPSEBODFXJUIBMM
TUBUFMPDBMQMVNCJOHCVJMEJOHDPEFT$BMMBQSPGFTTJPOBMJGZPVBSFVODFSUBJOBCPVUJOTUBMMJOHUIJTQSPEVDU
'PSPQUJNVNQFSGPSNBODFPGZPVSOFX1ŢJTUFSGBVDFUBNJOJNVNXBUFSQSFTTVSFPG14*L1BJTSFDPNNFOEFE:PVSJOTUBMMBUJPOXJMMSFRVJSFTVQQMZUVCFT5P
QSFTFSWFUIFIJHIŢMPXDIBSBDUFSJTUJDTPGUIFTFWBMWFTJUJTOFDFTTBSZUPVTF
1
/
2
v*%
5
/
8
v0%$PQQFSUVCJOHPS1ŢJTUFS Quick Connect Hose Kit 971021$POTVMUUIFTUPSF
XIFSFZPVQVSDIBTFEZPVSGBVDFUGPSUIFSFDPNNFOEFEDPOOFDUJPOTUIBUZPVNBZSFRVJSFGPSZPVSBSFB
Para disminuir el riesgo de lesiones o daños a la propiedad, lea todas las instrucciones antes de instalar el producto. Utilice gafas de seguridad. El producto deberá instalarse de acuerdo con la normativa de
plomería y construcción estatal y local. Llame a un profesional si no está seguro sobre cómo instalar este producto.
Se recomienda una presión mínima de agua de 25 PSI (172 kPa) para obtener un óptimo rendimiento de su nuevo grifo Pister™. La instalación requerirá tubos de suministro. Para preservar las características
de lujo alto de estas válvulas, es necesario utilizar tubería de cobre de
1
/
2
pulg. de diámetro interior (
5
/
8
pulg. de diámetro exterior) o un juego de conexión rápida 971-021 de Pister. Consulte en la tienda
donde compró su grifo acerca de las conexiones recomendadas que podrían requerirse para su área.
Pour réduire le risque de blessures ou de dommages, lire toutes les instructions avant d’installer l’appareil. Porter des lunettes de sécurité. Il faut installer l’appareil en respectant tous les codes de construction
et de plomberie locaux et dÉtat. Appelez un professionnel si vous n’êtes pas certain de la façon d’installer cet appareil.
Pour optimiser le rendement de cet appareil Pister™, une pression d’eau d’au moins 172 kPa (25 PSI) est recommandée. Linstallation demande des tuyaux d’arrivée. Pour préserver les caractéristiques de haut
débit de cette robinetterie, il est nécessaire d’utiliser une tuyauterie en cuivre de 13 mm (
1
/
2
po) de diam. int. et 16 mm (
5
/
8
po) de diam. ext. ou un kit de lexibles à raccord lexible Pister™ 971-021. Consulter le
revendeur qui a vendu la robinetterie pour les raccordements qui peuvent être nécessaires localement.
PTFE plumber's tape
Cinta para plomería PTFE
Ruban PTFE de plombier
Propane Torch
Antorcha de Propano
Torche de Propane
Adjustable Wrench
Llave ajustable
Clé à mollette
Flashlight
Linterna
Lampe-torche
Cloth
Paño de limpieza
Chion
Safety Goggles
Anteojos de seguridad
Lunettes de sûreté
Hex Wrenche
Llave hexagonal
Clé hexagonale
A (x2) B (x4) H (x2)
C (x4)
D (x2)
EF G JK
L
PQN
M
2VJDL*OTUBMM
TM
Tool
Supplied with Trim Kit
)FSSBNJFOUBEFMBJOTUBMBDJÑO
Suministrado el kit de ajuste
0VUJMEgJOTUBMMBUJPO
Fourni avec la trousse de réglage
Question and Answer IconNeed help?

Do you have a question about the Pfister 0X6-440R and is the answer not in the manual?

Summary

General Safety Warnings

Installation Safety Precautions

Read all instructions before installing. Wear safety goggles and follow codes.

Required Tools

Additional Helpful Tools

Parts in the Box

Turn Off Water Supply

Shutting off water and cleaning surface

Locate and shut off water supply valves. Remove old unit and clean mounting surface.

Recommended Hole Locations

In-line Installation

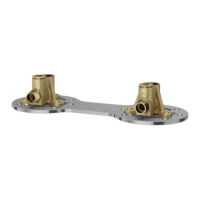
Standard hole placement for a 4-hole faucet installation.

Offset and Custom Installation Options

Alternative hole placement for custom faucet configurations.

Option 1: Install Faucet Onto Thin Finished Surface

Prepare Valves

Steps to prepare the hot and cold water supply valves for installation.

Disassemble Main Body

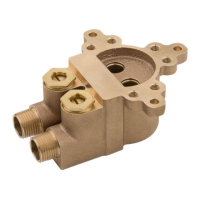
Instructions for taking apart the main faucet body.

Install Hose Guide & Spray Hose

Disassemble Hose Guide

Steps to take apart the hose guide assembly.

Connect Spray Hose and Guide

Detailed steps for connecting the spray hose to the guide.

Install Hoses

Connect Copper Tubing

Instructions for connecting copper supply lines to the faucet valves.

Connect Quick Connect Hose

Instructions for connecting the quick-connect supply hoses.

Connect Water Supply Lines

Connecting Hot and Cold Lines

Proper connection of hot and cold water supply lines to the valve inlets.

Apply Pressure Test

Performing the Pressure Test

Steps to run water and check for leaks according to pressure specifications.

Option 2: Install Faucet Onto Thick Unfinished Surface

Disassemble Valves

Steps to disassemble the hot and cold water supply valves.

Disassemble Main Body

Instructions for taking apart the main faucet body for thick surfaces.

Install Hose Guide & Spray Hose

Disassemble Hose Guide

Steps to take apart the hose guide assembly.

Connect Spray Hose and Guide

Detailed steps for connecting the spray hose to the guide, with tightening notes.

Install Hoses

Connect Copper Tubing

Instructions for connecting copper supply lines to the faucet valves.

Connect Quick Connect Hose

Instructions for connecting the quick-connect supply hoses.

Connect Water Supply Lines

Connecting Hot and Cold Lines

Proper connection of hot and cold water supply lines to the valve inlets.

Apply Pressure Test

Performing the Pressure Test

Steps to run water and check for leaks according to pressure specifications.

Pour in Wall Compound

Place Guards

Position protective guards before applying wall compound.

Pour in Wall Compound

Apply wall compound, ensuring correct thickness and surface adjustment.

Remove Guards

Remove protective guards after the compound has dried.

Preparing the Thick Surface

Adjust Components

Steps to loosen and adjust faucet components using the Quick Install Tool.

Slide Outlet Tube

Slide the outlet tube until flaps sit flat with the deck surface.

Secure Colet Nut

Tighten the colet nut securely using the narrow end of the Quick Install Tool.

Install Anchor

Position Anchor

Place the anchor with the set screw facing the tub.

Pfister 0X6-440R Specifications

General IconGeneral
BrandPfister
Model0X6-440R
CategoryPlumbing Product
LanguageEnglish

Related product manuals