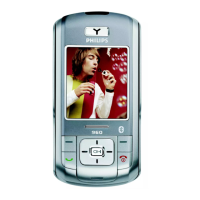
40 Camera
Within any menu, press
Back
softkey to cancel any
current action.
1.
Adjust your picture, activate the flashlight if
necessary, and press
C
to take the picture.
2.
Once the picture is taken, a view screen is
displayed with the following options:
If there is no action before the view screen time-out,
the picture is automatically saved.
Pictures are named with the date of the shot, e.g.
"0410_154157.jpg" for a picture taken on October 4,
at 15: 41:57.
The number of pictures you can save varies according
to the settings: the higher the resolution, the bigger
the file size is. A message will warn you if there isn’t
enough memory left. In this case, you must delete data
before storing a new picture.
Using the self-timer
1.
Press
r
to access the camera options, and
select
Self-timer
then
On
.
2.
Adjust your picture, and press
C
to launch the
countdown which starts at 10 seconds (this value
cannot be changed).
Press
l
to stop the timer and go back to preview
mode.
3.
A sound is played 3 seconds before the picture is
taken, then again when it’s actually shot.
4.
Once the picture is taken, follow the instructions
starting at point 2 described in “Taking
pictures”.
Activate/deactivate
the flashlight
Press the up volume key to
activate the flashlight; press the
down volume key to deactivate it.
Ta k e a p i c t u re
Press
C
.
Taking pictures
Discard
To ignore the picture and go back to
preview mode.
Save
To save the picture in
My photos
.
Send
To send the picture via
MMS
,
E-mail
or
Infrared
. A message will tell you to switch
to phone mode.