7EN
Cleaning the body of the air purier
Regularly clean the inside and outside of the air purier to prevent dust from
collecting�
1 Use a soft, dry cloth to clean both the interior and exterior of the air
purier�
2 The air outlet can also be cleaned with a dry, soft cloth�
Cleaning the air quality sensor
Clean the air quality sensor every two months for optimal functioning of the
appliance�
Note:
• If the air purier is used in a dusty environment, it may need to be cleaned
more often�
• If the humidity level in the room is very high, condensation may develop
on the air quality sensor and the air quality light may indicate a poorer air
quality even though the air quality is actually good� If this occurs, clean the
air quality sensor or use the air purier on a manual speed setting�
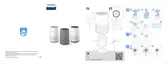
1 Switch o the air purier and unplug from the power socket�
2 Clean the inlet and outlet of the air quality sensor with a soft brush (g j)�
3 Open the air quality sensor cover (g k)�
4 Clean the air quality sensor, the dust inlet and the dust outlet with a damp
cotton swab (g l)�
5 Dry all parts thoroughly with a dry cotton swab�
6 Reattach the air quality sensor cover (g m)�
Cleaning the surface of the lter
Wipe the surface of the lter with soft wet cloth or clean the surface of the
lter with a vacuum cleaner (g n)�
Note:
• if you use a high power/ industrial vacuum cleaner, it may damage the lter�
 Loading...