1-8-1 E8A20DC
CABINET DISASSEMBLY INSTRUCTIONS
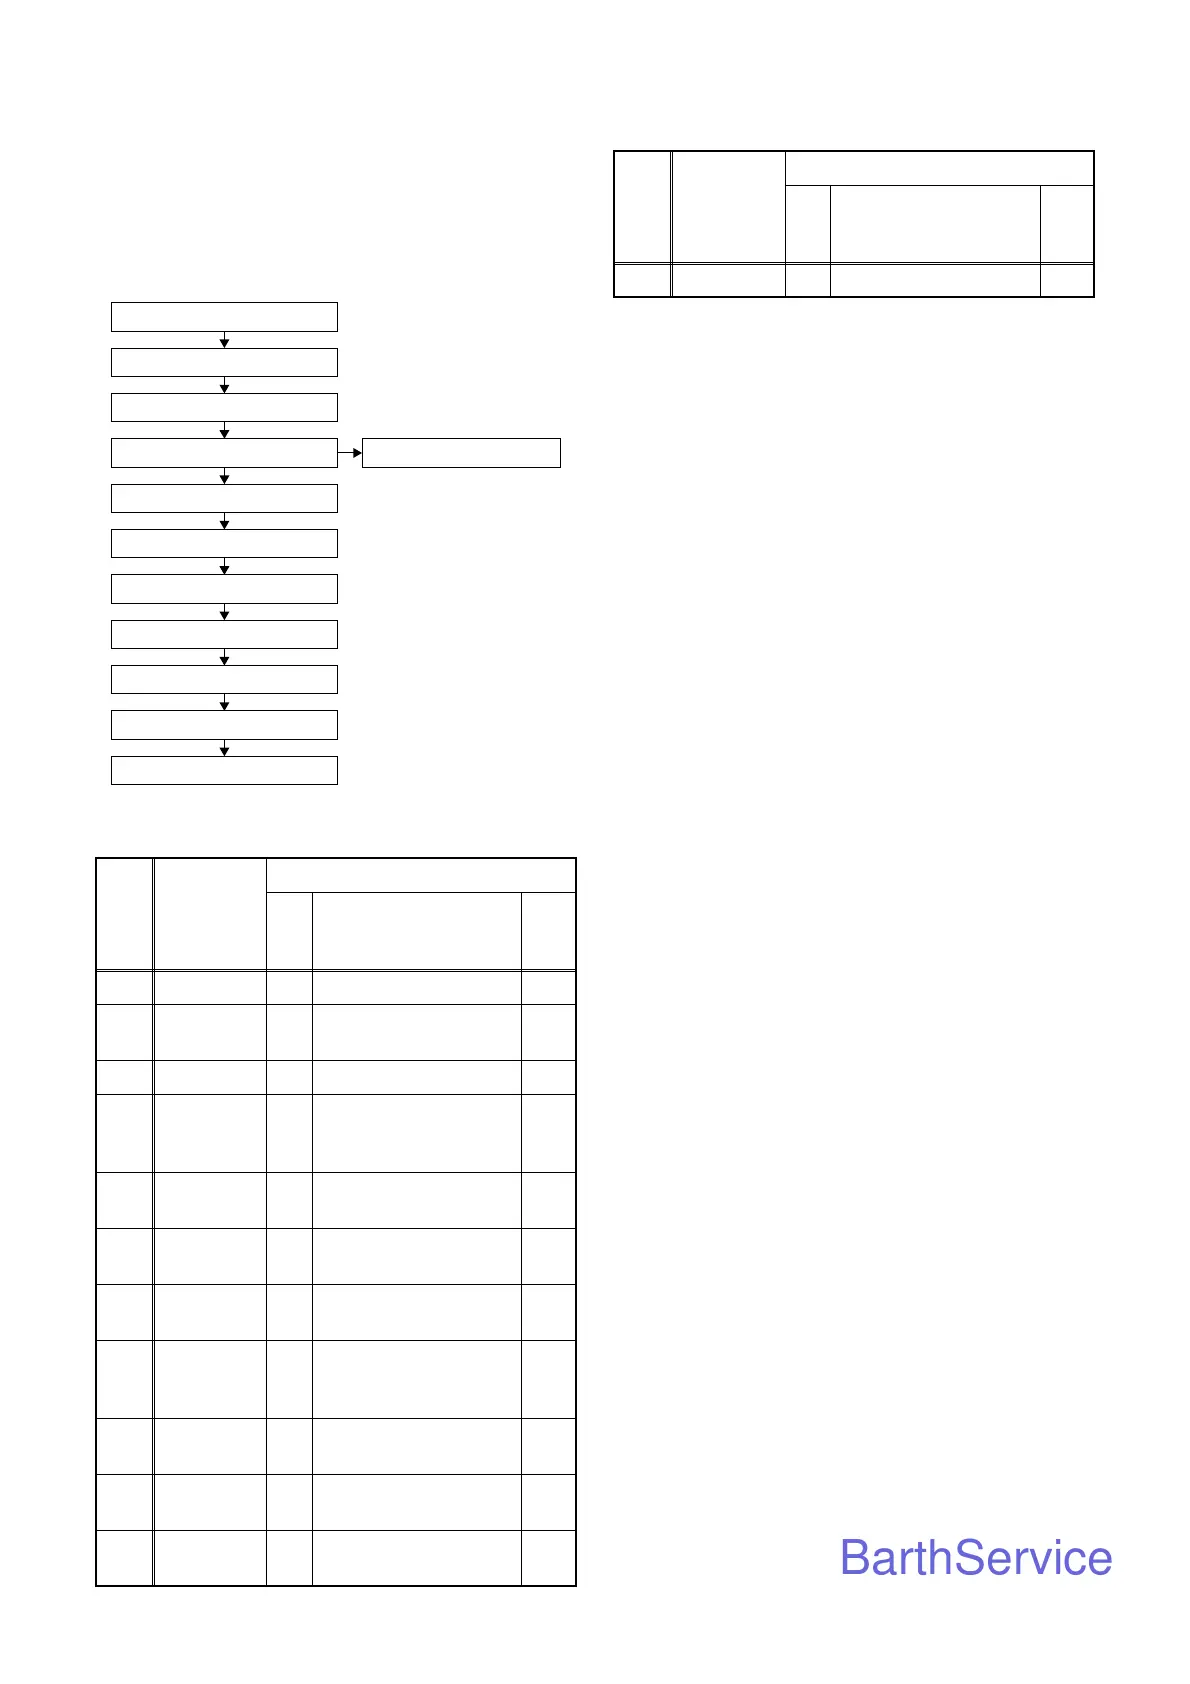
1. Disassembly Flowchart
This flowchart indicates the disassembly steps to gain
access to item(s) to be serviced. When reassembling,
follow the steps in reverse order. Bend, route, and
dress the cables as they were originally.
2. Disassembly Method
Note:
(1) Identification (location) No. of parts in the figures
(2) Name of the part
(3) Figure Number for reference
(4) Identification of parts to be removed, unhooked,
unlocked, released, unplugged, unclamped, or
desoldered.
P = Spring, L = Locking Tab, S = Screw,
CN = Connector
* = Unhook, Unlock, Release, Unplug, or Desolder
e.g. 2(S-2) = two Screws (S-2),
2(L-2) = two Locking Tabs (L-2)
(5) Refer to “Reference Notes.”
Reference Notes
1. CAUTION 1: Locking Tabs (L-1) and (L-2) are
fragile. Be careful not to break them.
1) Release three Locking Tabs (L-1).
2) Release three Locking Tabs (L-2), then remove
the Front Assembly.
2. CAUTION 2: Electrostatic breakdown of the laser
diode in the optical system block may occur as a
potential difference caused by electrostatic charge
accumulated on cloth, human body etc., during
unpacking or repair work.
To avoid damage of pickup follow next procedures.
1) Disconnect Connector (CN301). Remove
Screws (S-6) and lift the DVD Main CBA Unit.
(Fig. D4)
2) Short the three short lands of FPC cable with
solder before removing the FFC cable (CN201)
from it. If you disconnect the FFC cable
(CN201), the laser diode of pickup will be
destroyed. (Fig. D4)
3. CAUTION 3: When reassembling, confirm the
FFC cable (CN201) is connected completely. Then
remove the solder from the three short lands of
FPC cable. (Fig. D4)
4. When reassembling, solder wire jumpers as
shown in Fig. D6.
5. Before installing the Deck Assembly, be sure to
place the pin of LD-SW on Main CBA as shown in
Fig. D6. Then, install the Deck Assembly while
aligning the hole of Cam Gear with the pin of LD-
SW, the shaft of Cam Gear with the hole of LD-SW
as shown in Fig. D6.
ID/
Loc.
No.
Part
Removal
Fig.
No.
Remove/*Unhook/
Unlock/Release/
Unplug/Desolder
Note
[1] Top Case D1 4(S-1) ---
[2]
Front
Assembly
D2 *3(L-1), *3(L-2) 1
[3] Top Bracket D2 3(S-2) ---
[4]
DVD
Mechanism
Assembly
D3
4(S-3), *CN401,
*CN601
---
[5]
Partition
Plate
D3 2(S-4) ---
[6]
Loader
Holder
D3 2(S-5) ---
[7]
DVD Main
CBA Unit
D4
2(S-6), *CN201,
*CN301
2, 3
[8]
VCR
Chassis
Unit
D5 5(S-7), 2(S-8) ---
[9]
Deck
Assembly
D6
Desolder,
2(S-9), (S-10)
4,5
[10]
DVD Open/
Close CBA
D6 Desolder ---
[11]
Power SW
CBA
D6 Desolder ---
[1] Top Case
[2] Front Assembly
[3] Top Bracket
[4] DVD Mechanism Assembly
[7] DVD Main CBA Unit
[5] Partition Plate
[6] Loader Holder
[8] VCR Chassis Unit
[9] Deck Assembly
[10] DVD Open/Close CBA
[11] Power SW CBA
[12] Main CBA
[12] Main CBA D6 ---------- ---
↓
(1)
↓
(2)
↓
(3)
↓
(4)
↓
(5)
ID/
Loc.
No.
Part
Removal
Fig.
No.
Remove/*Unhook/
Unlock/Release/
Unplug/Desolder
Note



 To Next Page