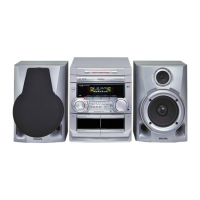
Controls
Notes for remote control:
– First select the source you wish to control
by pressing one of the source select ke ys on
the remote control (for example CD1/2/3,
TUNER).
– Then select the desired function (for
example
É
,
í
,
ë
).
%
Ta pe deck operation
A. REPLAY
–to select continuous playback in either AUTO
REPLAY or ONCE mode only.
RECORD
–to start recording on tape deck 2.
^
PROG
for CD.................to programme disc tracks.
for Tuner.............to programme preset radio
stations.
for Clock ............to select 12- or 24-hour clock
mode.
for Timer.............to select CD programme mode
as the wake up source.
&
CLOCK•TIMER
–to view the clock, set the clock or set the timer.
*
DIM
–to select different brightness for the display
screen : DIM 1, DIM 2, DIM 3 or DIM OFF.
(
n
–to connect headphones.
)
MASTER VOLUME (VOL +/-)
–to increase or decrease the volume.
¡
Display scr
een
–to view the current status of the system.
™
Disc tray
£
RE
PEAT
–to playback track(s)/disc(s)/programme
repeatedly.
SHUFFLE
–to playback all available discs and their tracks/
programme in random order.
MUTE
–to interrupt or resume sound reproduction.
§
SLEEP
–to activate/deactivate or set the sleep timer.
B
–to switch the system to standby mode.
–to switch the system to Eco Power standby
mode.
24
25
27
Important notes for users in the
U.K.
Mains plug
This apparatus is fitted with an approved 13
Amp plug. To change a fuse in this type of plug
proceed as follows:
1
Remove fuse cover and fuse.
2
Fix new fuse which should be a BS1362 5 Amp,
A.S.T.A. or BSI approved type.
3
Refit the fuse cover.
If the fitted plug is not suitable for your socket
outlets, it should be cut off and an appropriate
plug fitted in its place.
If the mains plug contains a fuse, this should
have a value of 5 Amp. If a plug without a fuse
is used, the fuse at the distribution board
should not be greater than 5 Amp.
Note: These vered plug must be disposed of to
avoid a possible shock hazard should it be
inserted into a 13 Amp socket else where.
How to connect a plug
The wires in the mains lead are coloured with
the following code: blue = neutral (N),
brown = live (L).
¶ As these colours ma y not cor respond with the
colour mar kings identifying the terminals in
your plug, proceed as follows:
– Connect the blue wire to the terminal
marked N or coloured black.
– Connect the brown wire to the terminal
marked L or coloured red.
– Do not connect either wire to the earth
terminal in the plug, marked E (or e) or
coloured green (or green and yellow).
Before replacing the plug cover, make certain
that the cord grip is clamped over the sheath
of the lead - not simply over the two wires.
Copyright in the U.K.
Recording and playback of material may
require consent. See Copyright Act 1956 and
The Performer’s Protection Acts 1958 to 1972.
Norge
Typeskilt finnes på apparatens underside.
Observer: Nettbryteren er sekundert
innkoplet. Den innebygde netdelen er
derfor ikke frakoplet nettet så lenge
apparatet er tilsluttet nettkontakten.
For å redusere faren for brann eller elektrisk
støt, skal apparatet ikke utsettes for regn eller
fuktighet.
Italia
DICHIARAZIONE DI CONFORMITA’
Si dichiara che l’apparecchio FW-C717 Philips
risponde alle prescrizioni dell’art. 2 comma 1
del D.M. 28 Agosto 1995 n. 548.
Fatto a Eindhoven
Philips Consumer Electronics
Philips, Glaslaan 2
5616 JB Eindhoven, The Netherlands
CAUTION
Use of controls or adjustments or
performance of procedures other than
herein may result in hazardous
radiation exposure or other unsafe
operation.