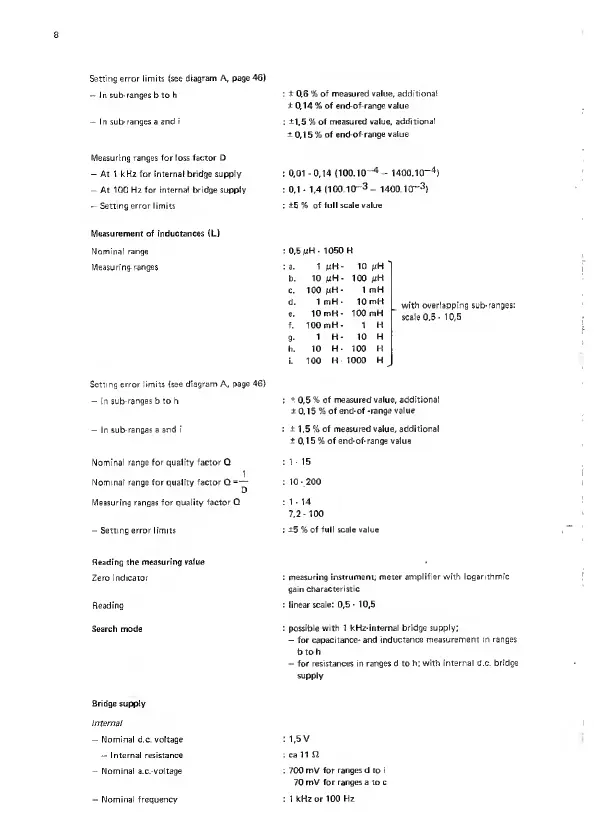
Setting error limits (see
diagram A, page 46)
—
In
sub-ranges
b to h
—
In sub-ranges a and
i
Measuring
ranges for loss factor D
—
At 1 kHz for internal bridge supply
—
At
100 Hz for internal bridge supply
—
Setting error limits
Measurement of inductances (L)
Nominal range
Measu ring-ranges
Setting error limits (see
diagram
A,
page 46)
—
In
sub-ranges
b to h
—
In sub-ranges a
and
i
Nominal
range
for
quality factor Q
1
Nominal range for quality factor Q
=—
Measuring ranges for quality
factor Q
—
Setting error limits
:
±
0,6 %
of measured value, additional
±
0,14 %
of end-of-range value
: ±1,5 %
of measured value,
additional
±0,15%
of
end-of-range value
: 0,01 -0,14
(100.10—
4
—
1
400.10—
4
)
:
0,1
-
1,4 (
1 00. 1
0—
3
—
1400.10—
3
)
: ±E
%
of full scale value
:
0,5
/nH
-
1050 H
:
a.
1 mH-
10
b. 10
/JH
-
100
mH
C.
100 mH-
1 mH
d. 1 mH
-
10
mH
e. 10
mH- 100 mH
f. 100 mH- 1
H
g.
1
H- 10 H
h. 10 H- 100
H
i. 100
H
-
1000 H
:
±
0,5 %
Of measured value, additional
±
0. 1 5 %
of end-of
-range value
: ±
1,5 %
of measured value, additional
±
0,15 %
of end-of-range value
: 1 15
:
10-200
: 1
-
14
7,2-100
: ±5
%
of full scale value
with overlapping sub-ranges:
scale 0,5
•
10,5
Reading the
measuring value
Zero indicator
Reading
Search mode
Bridge supply
Internal
—
Nominal d.c. voltage
—
Internal
resistance
—
Nominal a.c.-voltage
—
Nominal frequency
: measuring instrument;
meter amplifier with logarithmic
gain characteristic
: linear scale: 0,5
-
10,5
:
possible
with
1
kHz-internal bridge
supply;
—
for
capacitance- and
inductance measurement in ranges
b to
h
—
for resistances in ranges
d
to
h;
with
internal
d.c.
bridge
supply
: 1,5
V
: ca 11S2
: 700
mV for ranges d to
i
70 mV for ranges a to c
:
1
kHz or 100 Hz
 Loading...