6
www.UsePhoenix.com • sales@UsePhoenix.comToll-Free 1-800-533-7533
heater cutout has a higher temperature limit and only trips
if the automatically-resetting switch hasn’t opened. This
higher cutout will hold itself open (preventing the unit from
operating) until both cords are unplugged and the unit is
allowed to cool. The third cutout is located in the process
inlet and senses the air temperature of the air entering the
process side. If this temperature exceeds 140°F, the switch
opens and all loads are de-energized. The switch resets
(and all loads are re-energized) once the process inlet air
temperature drops to 100°F.
5.3 Normal Operation
1. The D385 is connected to two 110-120VAC branch
circuits
2. The power switch is turned on
3. The rotor motor, reactivation blower, process blower, hour
meter, indicator lamp, and both heating elements are
energized
4. If either cord is unplugged, all loads are de-energized
5. If any thermal cutout opens, all loads are de-energized
6. If the high heater cutout opens, all loads remain de-
energized until both cords are unplugged and the unit is
allowed to cool
5.4 Troubleshooting
Each cord must be plugged into a separate branch circuit.
Plugging both cords into the same circuit will likely cause the
branch circuit protector (e.g. fuse or breaker) to trip.
Neither blowers, rotor motor, nor heater operating
1. Cord(s) unplugged
2. Unit turned off
3. Thermal cutout(s) tripped. Unplug unit and allow to cool.
Identify and correct problem before plugging unit back in
4. Defective relay(s)
5. Wiring fault inside device
Blowers and heater operating, rotor not turning
1. Rotor unplugged
2. Belt broken or not properly tensioned. Adjust or replace
belt
3. Pulley not xed to driveshaft. Tighten or replace set
screw
4. Rotor is obstructed from rotating. Check bearings and
conrm rotor turns freely
5. Defective gear motor
Rotor motor and heater operating, blower(s) not
operating
1. Defective blower or blower capacitor
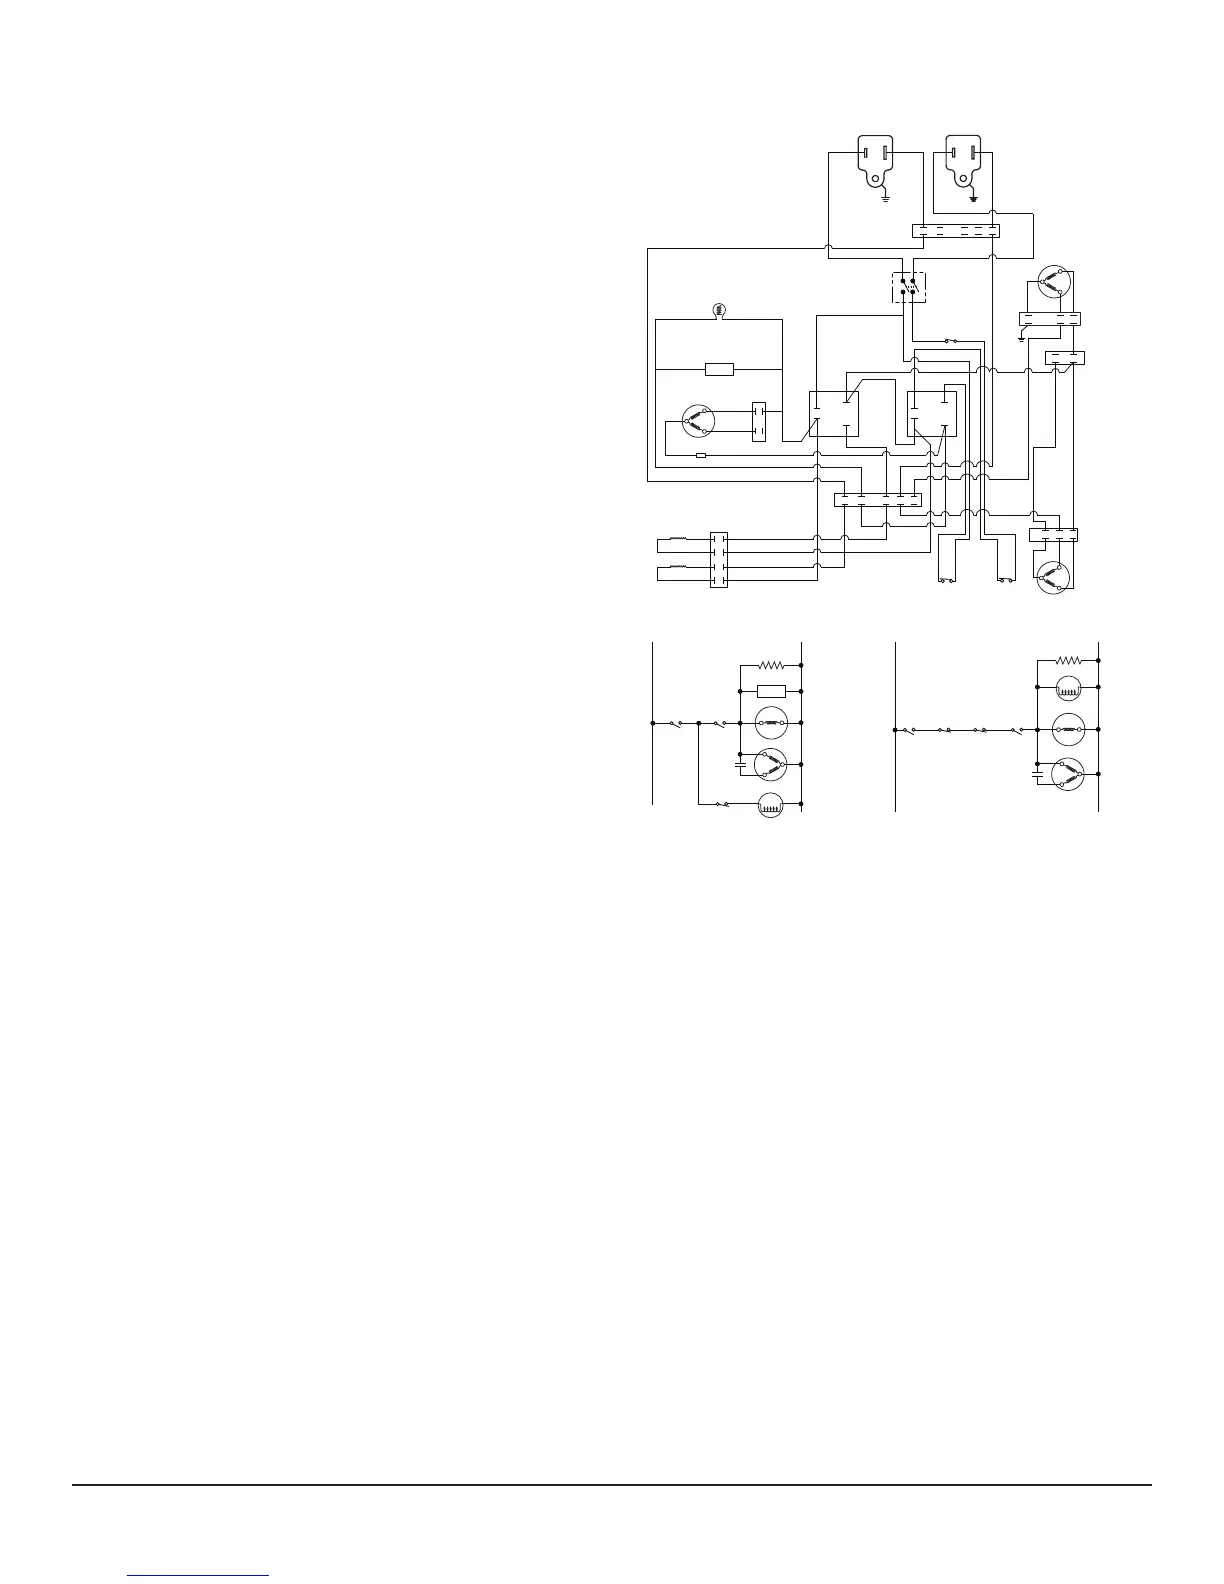
6 Wiring Diagram
PROCESS BLOWER
GRN 25
BLK 11
WHT 24
CORD 1 CORD 2
WHT WHTBLK
BLK
BLK
BRN
BLU 27
BLU
BLU
RED
RED
WHT 9
BLK 8
BLU 7
ORG 6
BLU
BLK
GRN
BLK
BLK
BLK
TERMINAL BLOCK
TERMINAL BLOCK
CIRCUIT 1 CIRCUIT 2
HEATER
THERM OL 1
176°F
HEATER
THERM OL 2
302°F
1360W
1270W
ROTOR MOTOR
1234
1234
REGEN CAPACITOR
REGEN BLOWER
PROC THERM
OL 140°F
MAIN POWER SWITCH
HOUR METER
PROC BLOWER PROC CAP
LIGHT
RELAY 1 RELAY 2
BLU 22
ORG 15
ORG 18
ORG 19BLU 21
BLU 20
ORG 6
ORG 15
ORG 12
ORG 28
BLK 1
ORG 14
BLK 17
BLK 11
BLK 10
BLK 10
BLU 27
WHT 4
BLK 8
BRN 5
BLK 3BLK
BLU
BRN
ORG 28
ORG 14
BLK 2
BLK 1
BLU 26
WHT 13
WHT 13
BLU 7
WHT 23
WHT 24
BLU 22
BLU 26
WHT 9
WHT 4
BLU 20
BLK 16BLK 3
BRN 5
BLK 2
WHT 23
1
2
3
4
LINE LINE
ROCKER
SWITCH POLE 1
ROCKER
SWITCH
POLE 2
NEUTRAL NEUTRAL
RELAY 1
CONTACT
1270W HEATER
1360W HEATER
HOUR METER
LAMP
HEATER
CUTOUT 1
RELAY 2 COIL
PROCESS
CAPACITOR
HEATER
CUTOUT 2
PROCESS
CUTOUT
RELAY 2
CONTACT
REGEN
CAPACITOR
RELAY 1 COIL
ROTOR MOTOR
REGEN BLOWER
BLU
BLK
BRN
BLU
BLK
BRN
Step 1: Remove three #10 screws holding reactivation duct in place
(1A, 1B, 1C) using 5/16” hex driver.
Push duct section (1D) in toward wheel
Step 2: Unplug wheel drive motor wires (2)
Step 3: Remove four ¼” screws holding cassette in place
(3A-3D) using #3 Phillips driver
Step 4: Remove eight #10 screws holding reactivation inlet cover in place
(4A-4H) using 5/16” hex driver. Remove reactivation inlet panel
Step 5: Lift cassette up and out of cabinet to avoid tearing
lower reactivation gasket
Step 6: Installation is reverse of removal
Cassette Removal Instructions
4 40 0
6 61 1