EasyManua.ls Logo

Phoenix DryMAX XL User Manual

Phoenix DryMAX XL
4 pages
To Next Page IconTo Next Page
Page #1 background imageLoading...
Page #1 background image
DryMAX XL LGR Dehumidifier
and DryMAX LGR Dehumidifier
QUICK START GUIDE
SETUP AND OPERATION
Thank you for purchasing a Phoenix DryMAX XL LGR Dehumidifier
or DryMAX LGR Dehumidifier.
For a complete DryMAX XL manual, visit
www.usephoenix.com/phoenix-dry-max-xl-lgr-dehumidifier/. Please
follow these steps to successfully setup and operate your new
DryMAX XL dehumidifier.
For a complete DryMAX manual, visit
www.usephoenix.com/phoenix-dry-max-lgr-dehumidifier/. Please
follow these steps to successfully setup and operate your new
DryMAX dehumidifier.
DOWNLOAD THE DryLINK
®
APP (optional)
Download the free DryLINK Mobile App for Apple or Android. Open the app and
login or create an account. Monitor and create your job’s progress using DryLINK.
Visit usephoenix.com for more information.
STEP 1
Plug your dehumidifier into a 110V outlet. The unit will enter “STAND BY” mode.
STEP 2
Connect your condensate hose to your dehumidifier and place the other end into
a drain, sink, etc.
For DryMAX XL only –
The condensate hose connects to the unit at the back of the storage pocket.
For DryMAX only –
The condensate hose connects under the label on the right side of the machine.
DryMAX XL Manual
DryMAX Manual
TS-1143 11/19 Rev A
USEPHOENIX.COM | 800-533-7533
Question and Answer IconNeed help?

Do you have a question about the Phoenix DryMAX XL and is the answer not in the manual?

Phoenix DryMAX XL Specifications

General IconGeneral
ModelDryMAX XL
RefrigerantR410A
Auto RestartYes
Continuous DrainageYes
Tank CapacityN/A (Continuous Drainage)
Drain Hose Length40 feet
Warranty2 years
Power115V

Summary

Setup and Operation

Step 1: Power Connection

Plug the dehumidifier into a 110V outlet to enter "STAND BY" mode.

Step 2: Condensate Hose Connection

Connect the condensate hose to the unit and place the other end into a drain or sink.

Operating the Dehumidifier

Step 3: Power On

Press the "POWER" button to start the dehumidifier.

Step 4: Compressor Activation

The compressor turns on after 60 seconds, indicated by a pulsing green status bar.

Step 5: Dehumidifying Status

The unit is dehumidifying when the light bar on the dashboard is solid green.

After the Job: Power Down

Press "POWER" and wait for the "POWERING DOWN" timer to finish.

Cord and Hose Storage

Store the power cord and condensate hose in the unit's storage pocket.

Safety Warnings

General Safety Precautions

Appliance not for use above 2,000m, must be used indoors, with GFCI in wet areas, and horizontally.

Servicing Hazards

Servicing involves high pressure refrigerant and voltage, requiring qualified personnel only.

Limited Warranty Information

Warranty Coverage Details

Covers defects in materials and workmanship for various periods; labor/transport charges may apply.

End-User Responsibilities

Requires authorized service, proof of purchase, and normal care; excludes misuse, abuse, and accidents.

Limitations and Exclusions

Excludes consequential damages, lost profits, and water damage; warranty duration may be extended.
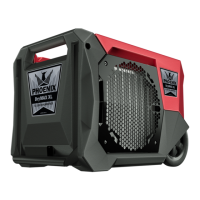
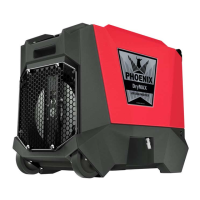
Related product manuals