X9 125-180 ce 4T4V
Maintenance
Mantenimiento
Manutenção
—•
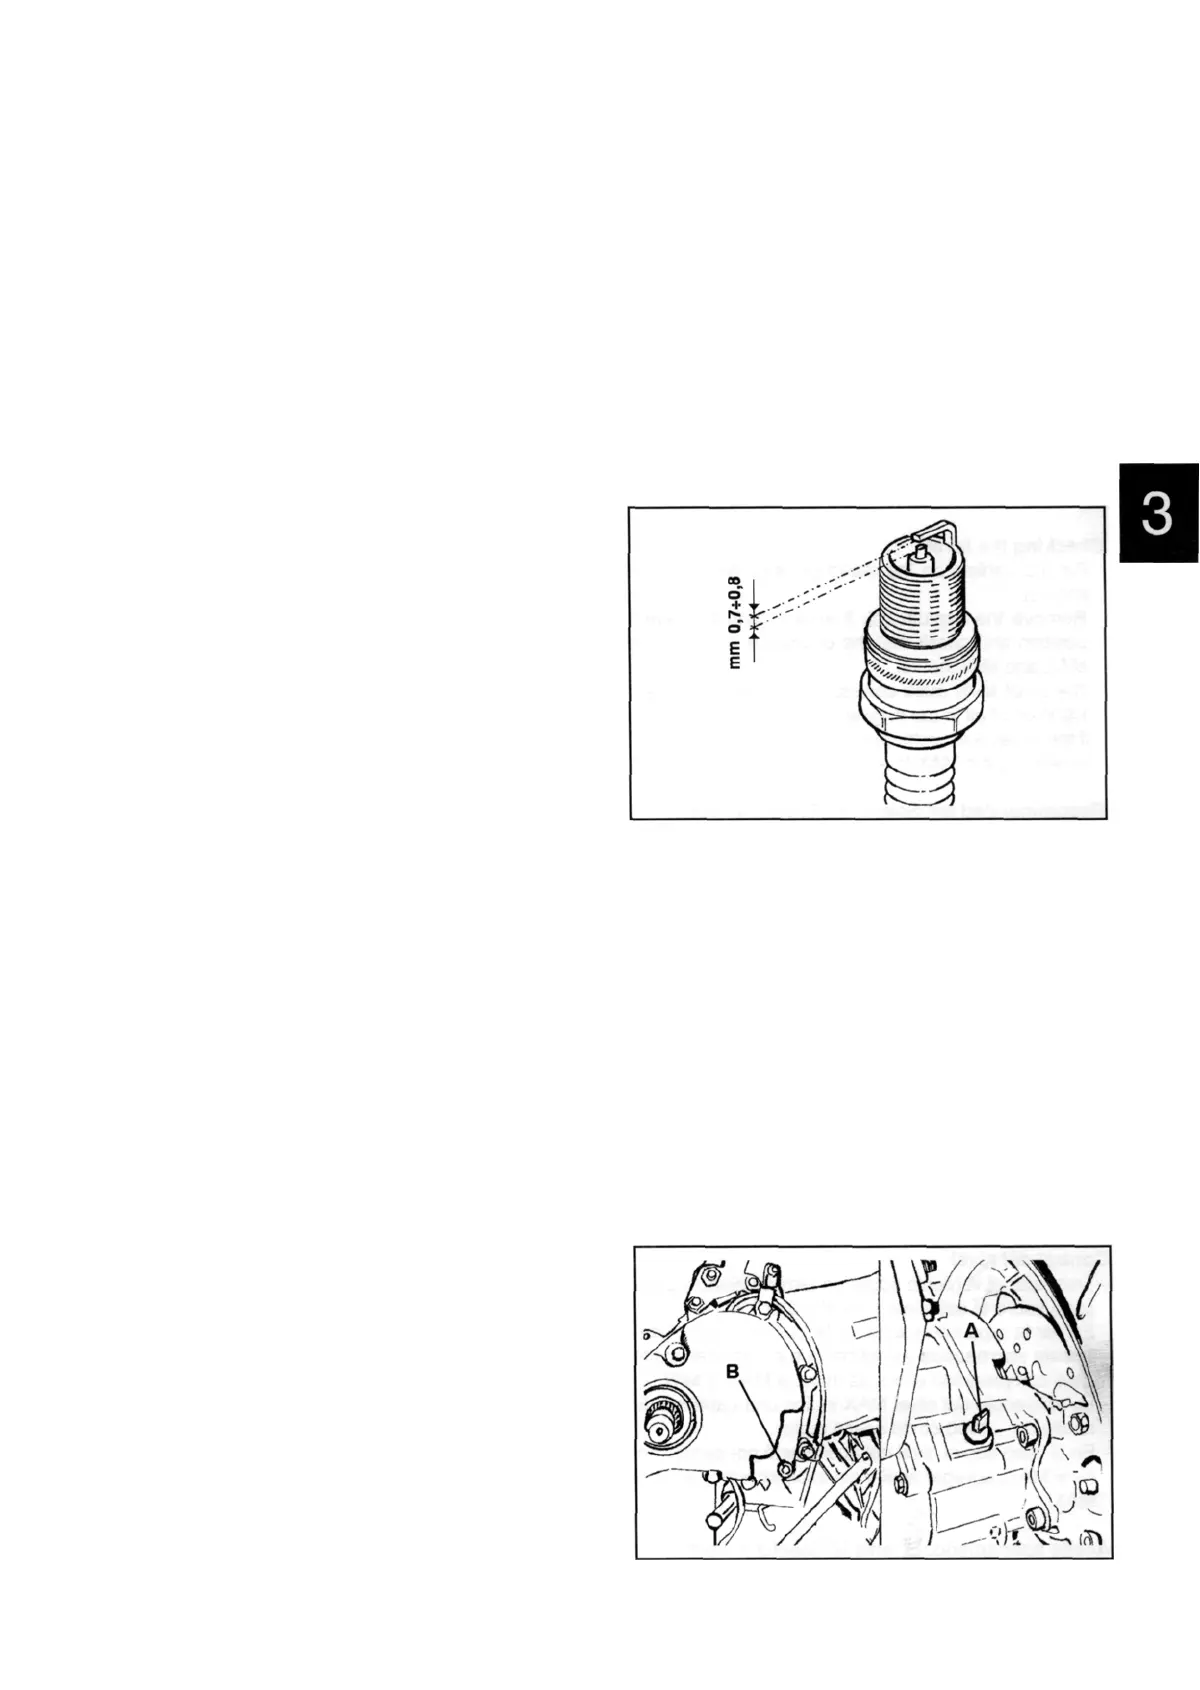
Sparking-plug
- Disconnect the cap and remove the spark plug.
- Inspect the plug and if the insulator is chipped or
damaged, renew it.
- Measure the spark plug gap with a feeler gauge. If
necessary adjust the gap by bending the outer elec-
trode.
- Make sure the washer is in good condition.
- Fit the spark plug, screwing it in first by hand and then
tighten it to the prescribed torque with a plug spanner.
Tightening torque 12-14 N-m
Electrode gap: 0.7 - 0.8 mm
Recommended type: NGK CR 8 EB
Bujía
- Desconectar la pipa de la bujía y sacar esta última.
- Examinarla cuidadosamente y, si el aislante resultara
mellado o estropeado, sustituirla.
- Medir la distancia entre los electrodos mediante un
calibre de espesor y si necesario ajustaría plegando
con cautela el electrodo exterior.
- Cerciorarse de que la arandela esté en buenas con-
diciones.
- Montar la bujía, atornillarla a mano y luego apretarla
con la llave al par prescrito.
Par de apriete 12 ÷14 N-m
Distancia de los electrodos: 0,7 ÷ 0,8 mm
Bujía aconsejada: NGK CR 8 EB
Vela
- Tirar o cachimbo e extrair a vela.
- Examiná-la com atenção e, verificando-se trincas ou
rupturas no isolador, proceder à sua substituição.
- Medir a distância entre os eléctrodos usando o medi-
dor de espessura e, se necessário, regular a distância
dobrando com atenção o eléctrodo exterior.
- Certificar-se de que a arruela de retenção esteja em
bom estado.
- Montar a vela apertando-a manualmente e depois
apertá-la com a chave adequada ao binário indicado.
Binário de aperto 12 ÷14 Nm
Distância eléctrodos: 0,7 ÷ 0,8 mm
Vela aconselhada: NGK CR 8 EB
03 002
c
Changing hub oil
- Remove the oil filler plug «A».
- Unscrew the drain plug «B» and allow the oil to drain
out.
- Retighten the drain plug and fill the hub with oil (about
150CC).
Checking hub oil level
- Position the vehicle on even ground and on its stand;
- Unscrew the oil dipstick, dry it with a clean cloth and
fit it back into place.
- Pull out the dipstick and check that the oil reaches the
second notch from the dipstick bottom.
- Refit the dipstick and tighten properly.
Recommended oil: TUTELA ZC 90
Drain plug tightening torque: 15-17 N-m
Substituição óleo cubo
- Retirar a tampa de enchimento óleo «A».
- Desapertar a tampa de drenagem óleo «B» e deixá-
lo sair completamente.
- Enroscar de novo a tampa de drenagem do óleo e
abastecer de novo o cubo com o óleo (cerca de 150 ce.)
Verificação do nivel óleo do cubo
- Posicionar o veículo em terreno plano e colocá-lo no
cavalete;
- Soltar a haste de óleo, secá-la com um pano limpo e
recolocá-la, rosqueando-a totalmente;
- Extrair a haste verificando que o nível do óleo atinja a
2° marca da haste, iniciando de baixo.
- Rosquear a haste verificando que esteja bloqueada.
Óleo aconselhado: TUTELA ZC 90
Conjugado de aperto da tampa de descarga: 15 ÷17 N-m
Sustitución Aceite Buje
- Extraer el tapón de llenado de aceite «A».
- Desenroscar el tapón de vaciado del aceite «B» y
dejar salir todo el aceite.
- Enroscar el tapón de vaciado y abastecer el cubo con
aceite (alrededor de 150 ce).
Verificación nivel aceite buje
- Colocar el vehículo sobre terreno plano y ponerlo
sobre el caballete;
- Desenroscar la varilla aceite, secarla con un paño limpio
y volverla a introducir, enroscándola completamente;
- Extaer la varilla verificando que el nivel del aceite roce
la 2° marca desde abajo hacia arriba de la varilla.
- Enroscar la varilla verificando su bloqueo.
Aceite aconsejado: TUTELA ZC 90
Par de apriete tapón de vaciado 15÷ 17 N-m
03 004
1st Update to part no. 594599 X9 125-180 cc 4T 4V 3 - 37
Primera actualización dib. 594599 X9 125-180 cc 4T 4V
1
s
Atualização Des. 594599 X9 125-180 cc 4T 4V
 Loading...