- 10 -
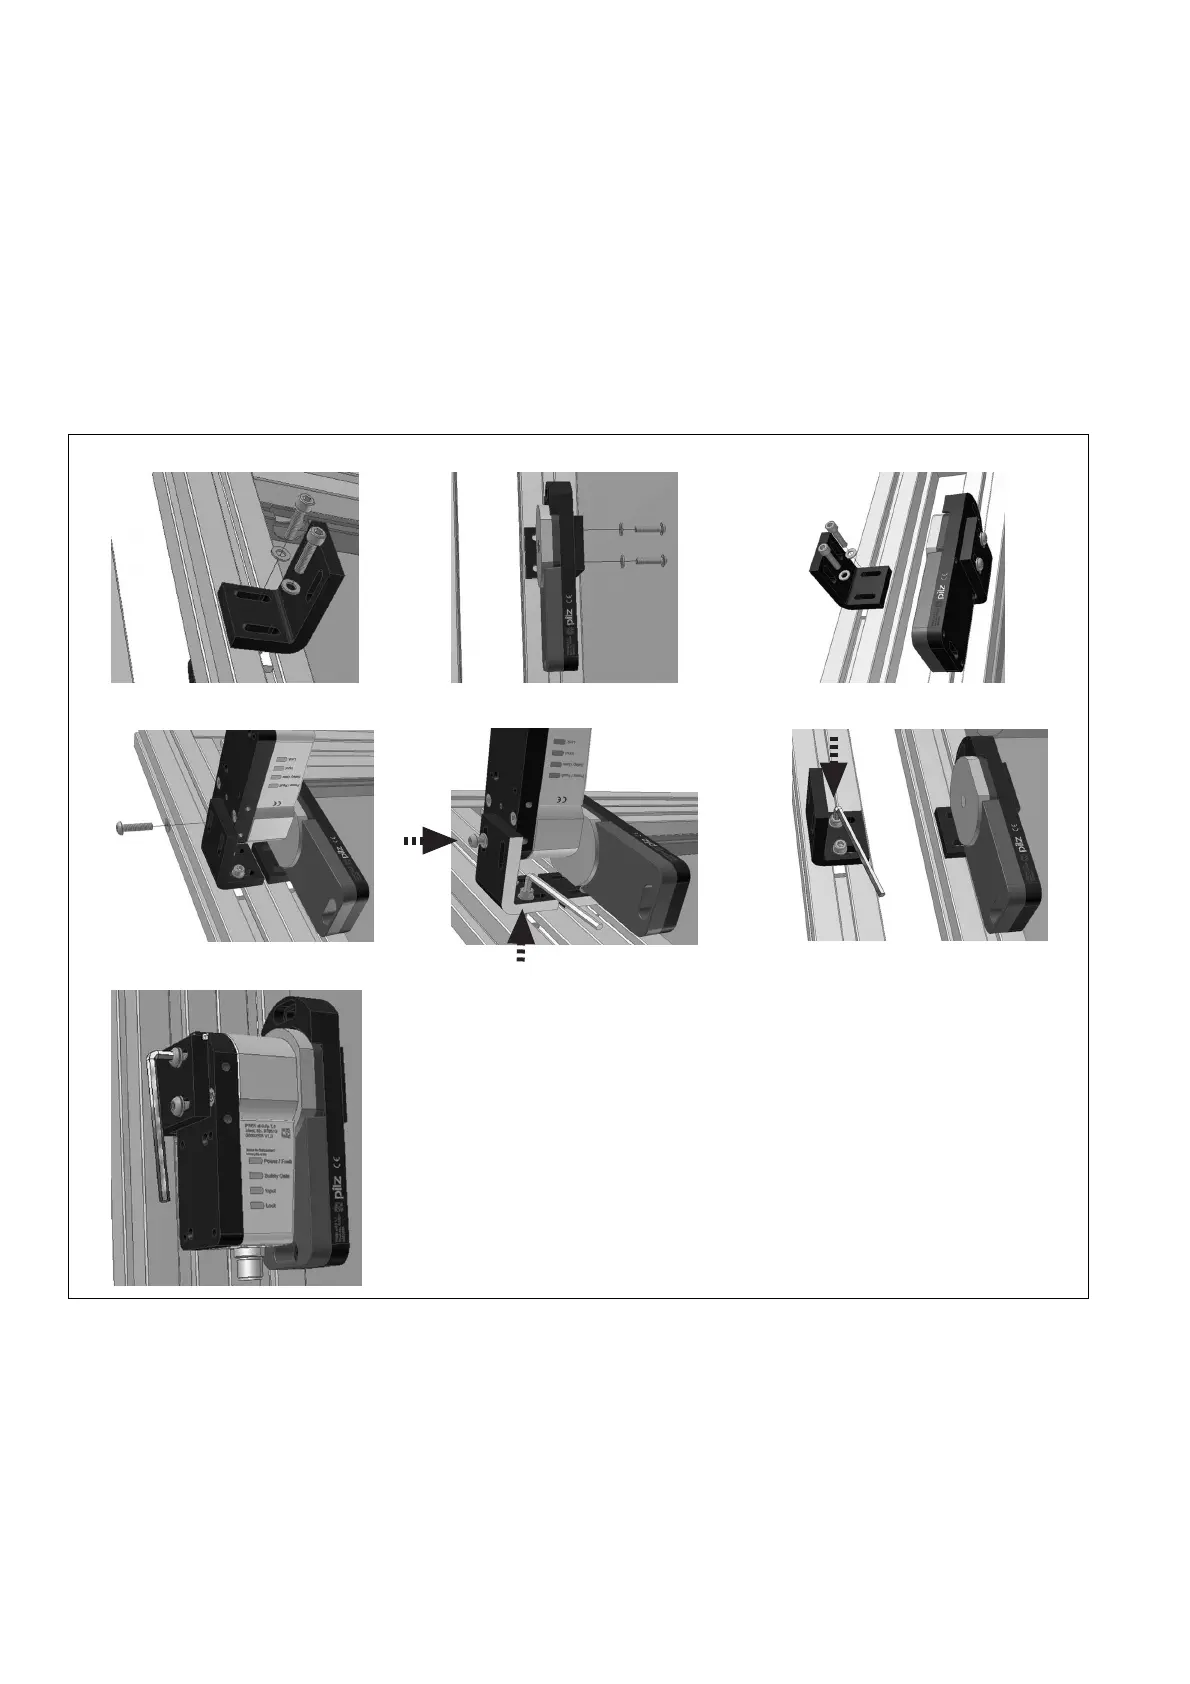
An Schiebetüre montieren
1048678411
` 1. Montagewinkel für Betätiger an Schiebe-
türe bündig ausrichten und Schrauben fest-
ziehen.
` 2. Betätiger auf gewünschte Höhe montie-
ren.
` 3. Montagewinkel für Sensor am Rahmen
bündig ausrichten und mit Schrauben befe-
stigen. (Wichtig: Schrauben nicht fest anzie-
hen)
` 4. Sensor mit einer Schraube (a) aufgestellt
fixieren, Türe schließen.
` 5. Montagewinkel zueinander ausrichten,
fest gegeneinander drücken und Schraube
(b) festziehen.
` 6. Sensor entfernen und Schraube (c) festzie-
hen.
` 7. Sensor zu Betätiger ausrichten und
Schrauben festziehen.
Installing at sliding gate
` 1. Align mounting bracket for actuator at the
sliding gate and tighten screws.
` 2. Install actuator at the required height.
` 3. Align mounting bracket at the frame, and
fix it with screws. (Important: Do not tighten
screws)
` 4. Fix sensor upright with a screw (a), close
door.
` 5. Align mounting brackets, press firmly
against each other and tighten screw (b).
` 6. Remove sensor and tighten screw (c).
` 7. Align sensor to actuator and tighten
screws.
Montage sur porte coulissante
` 1. Aligner l'équerre de montage de l'action-
neur sur le bord de la porte coulissante et
serrer les vis à fond.
` 2. Monter l'actionneur à la hauteur voulue.
` 3. Aligner l'équerre de montage du capteur
sur le bord du cadre et fixer avec des vis.
(Important : ne pas serrer les vis à fond)
` 4. Fixer le capteur en position relevée à l'aide
d'une vis (a), fermer la porte.
` 5. Aligner les équerres de montage l'une
avec l'autre, les presser fermement l'une
contre l'autre et serrer la vis (b) à fond.
` 6. Retirer le capteur et serrer la vis (c) à fond.
` 7. Aligner le capteur sur l'actionner et serrer
les vis à fond.
Justage
814438667
Die angegebenen Schaltabstände (siehe tech-
nische Daten) gelten nur, wenn Sicherheits-
schalter und Betätiger parallel
gegenüberliegend montiert sind. Andere An-
ordnungen können zu abweichenden Schaltab-
ständen führen. Beachten Sie den maximal
zulässigen Seiten- und Höhenversatz (siehe
„Schaltabstände“ und „Max. Seiten- und Hö-
henversatz“).
Adjustment
The stated operating distances (see Technical
details) only apply when the safety switch and
actuator are installed facing each other in par-
allel. Operating distances may deviate if other
arrangements are used. Note the maximum
permitted lateral and vertical offset (see "Oper-
ating distances" and "Max. lateral and vertical
offset").
Ajustement
Les distances de commutation mentionnées
dans les caractéristiques techniques sont vala-
bles uniquement lorsque le capteur de sécurité
et l'actionneur sont montés l'un en face de
l'autre de manière parallèle. D'autres montages
peuvent conduire à des distances de commu-
tation divergentes. Respectez le décalage laté-
ral et vertical maximal autorisé (voir "Distances
de commutation" et "Décalage latéral et verti-
cal maximum").
1
3
2
4
6
5
7
(a)
(b)
(c)

 Loading...