EasyManua.ls Logo

Pioneer CT-W103 - User Manual

Pioneer CT-W103
12 pages
Print Icon
To Next Page IconTo Next Page
Loading...
STEREO
DOUBLE
CASSETTE
DECK
Operating
Instructions
T-W103
Anankivousfor
buying
this
MONEER
product:
;
WARNING:
+o
prevent
Fike
oR
SHOCK
HAZARD,
Please
read
through
these
operating
instructions
so
you
will
know
DO
NOT
EXPOSE
THIS
APPLIANCE
TO
RAIN
OR
MOISTURE.
how
to
operate
your
model
properly.
After
you
have
finished
*
reading
the
instructions,
put
them
away
in
a
safe
place
for
future
jarorene
:
:
IMPORTANT
NOTICE
The
serial
number
for
this
equipment
is
located
on
the
rear
panel.
Please
write
this
serial
number
on
your
enclosed
warranty
card
and
keep
it
in
a
secure
area.
This
is
for
your
security.
In
some
countries
or
regions,
the
shape
of
the
power
plug
and
power
outlet
may
sometimes
differ
from
that
shown
in
the
explanatory
drawings.
However,
the
method
of
connecting
and
operating
the
unit
is
the
same.
Information
to
user
Alteration
or
modifications
carried
out
without
appropriate
authorization
may
invalidate
the
users
right
to
operate
the
equipment.
This
equipment
has
been
tested
and
found
to
comply
with
the
limits
for
a
Class
B
digital
device,
pursuant
to
Part
15 of
the
FCC
Rules.
These
limits
are
designed
to
provide
reasonable
protection
against
harmful
interference
in
a
residential
installation.
This
equipment
generates,
uses,
and
can
radiate
radio
frequency
energy
and,
if
not
installed
and
used
in
accordance
with
the
instructions,
may
cause
harmful
interference
to
radio
communications.
However,
there
is
no
guarantee
that
interference
will
not
occur
ina
particular
installation.
!f
this
equipment
does
cause
harmful
interference
to
radio
or
television
reception,
which
can
be
determined
by
turning
the
equipment
off
and
on,
the
user
is
encouraged
to
try
to
correct
the
interference
by
one
or
more
of
the
following
measures:
~
Reorient
or
relocate
the
receiving
antenna.
~
Increase
the
separation
between
the
equipment
and
receiver.
-
Connect
the
equipment
into
an
outiet
on
a
circuit
different
from
that
to
which
the
receiver
is
connected.
;
~
Consult
the
dealer
or
an
experienced
radio/TV
technician
for
help.
©
PIONEER’
The
Art
of
Entertainment

Other manuals for Pioneer CT-W103

Question and Answer IconNeed help?

Do you have a question about the Pioneer CT-W103 and is the answer not in the manual?

Summary

Safety Instructions

Installation

Maintenance

Cleaning Heads, Pinch Rollers and Capstans

Instructions for cleaning the heads, pinch rollers, and capstans to maintain sound quality.

Demagnetizing the Heads

Procedure for demagnetizing tape heads to prevent loss of high frequencies.

Connections

Connecting the Power Cord

Instructions for connecting the power cord to the unit and power outlet.

Playback

Recording

Tape Copying (From Deck I to Deck II)

Procedure for copying tapes from Deck I to Deck II at normal or high speed.

Troubleshooting

Specifications

Overview

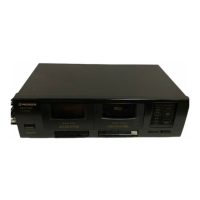
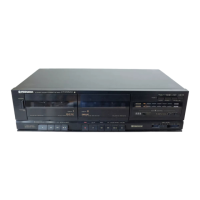
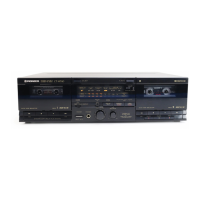
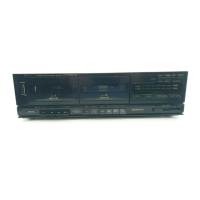
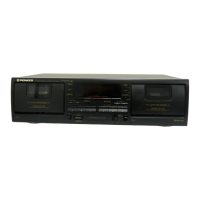
This document describes the Pioneer CT-W103 Stereo Double Cassette Deck, a device designed for recording and playing back audio on cassette tapes. It features two cassette decks, allowing for various playback and recording functionalities, including tape copying.

Function Description

The Pioneer CT-W103 is a stereo double cassette deck, meaning it has two independent cassette mechanisms, typically referred to as Deck I and Deck II. This configuration enables several key functions:

  • Single Playback: Users can play prerecorded tapes on either Deck I or Deck II independently. To initiate playback, a tape is loaded into the desired deck, the DOLBY NR switch is set to the appropriate position (matching the recording setting), the stereo amplifier is configured for tape playback, and the PLAY button of the chosen deck is pressed. Playback can be temporarily paused using the PAUSE button and resumed by releasing it. To stop playback, the STOP/EJECT button is used.

  • Relay Playback: This feature allows for continuous playback from two tapes. When selected, Deck II plays first, and once it reaches the end and stops, Deck I automatically begins playback. To set up relay playback, prerecorded tapes are loaded into both Deck I and Deck II, ensuring both tapes were recorded with the same Dolby NR setting. The DOLBY NR switch is set accordingly, and the stereo amplifier is prepared for tape playback. The process involves pressing PAUSE and PLAY on Deck II, then PAUSE and PLAY on Deck I, and finally releasing PAUSE on Deck II to start the continuous playback. Temporary pausing and stopping functions are similar to single playback.

  • Recording (Deck II only): The CT-W103 allows recording onto tapes loaded in Deck II. Before recording, a blank tape is loaded into Deck II, and the DOLBY NR switch is set. The audio source (e.g., from a stereo amplifier) is prepared for playback. Recording begins by pressing the REC button. The deck features an automatic level control, but if distortion occurs, the REC LEVEL ATT button can be set to ON to attenuate the level. Recording can be temporarily paused and stopped using the PAUSE and STOP/EJECT buttons, respectively. An important safety feature is the erasure prevention tabs on cassette tapes; if these tabs are broken off, recording on that side of the tape is prevented.

  • Tape Copying (From Deck I to Deck II): This is a core function of a double cassette deck, allowing users to duplicate tapes from Deck I to Deck II. The CT-W103 offers two copying speeds:

    • Normal Speed: Copies the tape at its regular playback speed, allowing the user to listen to the playback during the copying process.
    • High Speed: Copies the tape at twice the normal playback speed, significantly reducing copying time. The HIGH SPEED indicator lights up when this mode is active, and playback is still audible. To perform a copy, a prerecorded tape is loaded into Deck I and a blank tape into Deck II. The COPY SPEED button is used to select the desired speed. The process involves setting Deck I to playback standby mode (PAUSE then PLAY), and then pressing REC on Deck II. Deck I will then begin playback, and Deck II will simultaneously begin recording. To stop copying, the STOP/EJECT button on both decks is pressed.
  • Dolby NR System: The deck incorporates Dolby Noise Reduction (NR) systems, designed to reduce tape hiss, particularly in the treble frequencies. During recording, high-pitched sounds are boosted, and during playback, these boosted sections are attenuated, returning the sound to normal while reducing noise. It's crucial to ensure the DOLBY NR switch is set to the ON position during playback if the tape was recorded using the Dolby NR system. The deck also features a level meter with a reference level indicated for the Dolby NR system.

  • Automatic Tape Selector Function: This deck is equipped with an automatic tape selector that uses sensor holes on the cassette tape to identify the tape type (e.g., TYPE II HIGH/CrO2). The deck then automatically adjusts its recording bias and equalization to match the tape, ensuring optimal recording quality. It's important that the sensor holes are not blocked for this function to work correctly. The deck is not designed for TYPE III (FeCr) or TYPE IV (METAL) tapes for recording.

Usage Features

The CT-W103 is designed with user convenience and sound quality in mind, incorporating several features to enhance the recording and playback experience:

  • Power (STANDBY/ON) Switch: This switch activates the secondary transformer. Even in the STANDBY position, a power flow to the deck's circuits exists as long as the power cord is connected to an outlet.
  • REC LEVEL ATT Button: This button can be set to ON during recording to attenuate the input level and reduce distortion, especially if the sound appears distorted.
  • COPY SPEED Button: This button allows users to choose between NORMAL SPEED and HIGH SPEED for tape copying, providing flexibility based on time constraints and desired monitoring.
  • Indicators: The deck includes a REC/COPY indicator that lights up during recording or copying, and an ATTENUATOR/HIGH SPEED indicator that lights up when the REC LEVEL ATT switch is ON or during high-speed copying.
  • Cassette Tape Handling: The manual provides essential tips for handling cassette tapes, such as removing tape slack with a pencil, ensuring erasure prevention tabs are intact (or covering the hole with tape for re-recording), and avoiding C-120 tapes due to their thinness and potential for jamming. It also advises against leaving tapes exposed to the environment and recommends storing them in their cases to prevent dust and slack.

Maintenance Features

Proper maintenance is crucial for the longevity and optimal performance of the cassette deck. The manual outlines several key maintenance procedures:

  • Cleaning the Heads, Pinch Rollers, and Capstans: These components are prone to getting dirty, which can lead to a deterioration of sound quality, particularly affecting high-frequency components and stereo balance. Regular cleaning is recommended. The process involves setting the POWER switch to STANDBY, opening the cassette door, and using a cleaning swab dipped in cleaning fluid to wipe the heads, capstans, and pinch rollers. It's important to allow the cleaning fluid to dry completely before loading a tape.
  • Demagnetizing the Heads: Over time, the heads can become magnetized, which can result in the loss of high-frequency sounds during recording or playback and the introduction of interference noise. This can also happen if magnetized objects are brought too close to the heads. Periodic use of a cassette-type head demagnetizer (available from dealers) is recommended. When demagnetizing, the deck's POWER switch should be ON, the amplifier's volume control turned to its lowest position, and headphones disconnected.
  • Cleaning the Front Panel: The front panel should be cleaned regularly with a soft, dry cloth. If soiled, a soft cloth moistened with a weak solution of neutral detergent (diluted in water) can be used, followed by wiping clean. Volatile cleaners like thinners, benzine, or alcohol should be avoided as they can damage the panel finish.
  • Installation Considerations: To prevent malfunctions and damage, the cassette deck should be installed in a well-ventilated location, away from direct sunlight, heat sources, excessive humidity, dust, oily smoke, and strong magnetic fields (like those from a television set). Blocking ventilation slots should also be avoided.
  • Condensation Prevention: If the deck is moved from a cold to a warm location, or if the room temperature changes suddenly, condensation may form on internal mechanical parts. In such cases, it's advised to wait for about an hour for the deck to adjust to the room temperature before use.
  • Troubleshooting Guide: The manual includes a comprehensive troubleshooting section to help users identify and resolve common issues, such as power problems, cassette door issues, playback and recording errors, poor sound quality (unstable sound, lack of high frequencies, distortion, noise), and abnormal sound. This guide helps users check for simple causes like unplugged cords, incorrect settings, dirty heads, or faulty connections before seeking professional service.

Pioneer CT-W103 Specifications

Power IconPower
power consumption15 W
power requirements (Australian model)AC 230 ~ 240 V, 50/60 Hz
power requirements (U.S. model)AC 120 V, 60 Hz
Audio IconAudio
wow and flutter0.15% (WRMS, JIS)
frequency response (TYPE II tape)30 to 16, 000 Hz
frequency response (TYPE I tape)30 to 16, 000 Hz
signal-to-noise ratio (Dolby NR OFF)More than 56 dB
noise reduction effect (Dolby NR ON)More than 10 dB (at 5 kHz)
harmonic distortionNo more than 1.0%
input sensitivity (LINE INPUT)112 mV (Input impedance 24 kΩ)
output (LINE OUTPUT)0.5 V (Output impedance 1.9 kΩ)
Weight and Dimensions IconWeight and Dimensions
weight4.2 kg
width420 mm
height130 mm
depth250 mm

Related product manuals