EasyManua.ls Logo

Pioneer CT-W503R User Manual

Pioneer CT-W503R
19 pages
To Next Page IconTo Next Page
Page #1 background imageLoading...
Page #1 background image
Operating
Instructions
STEREO
DOUBLE
CASSETTE
DECK
_
CT-W503R
CT-W403R
SPAaE
ae
CT-W203
~~,
aS
canis
ASTER
©
The
above
illustration
shows
CT-W503R.
@
For
the
demo
function,
refer
to
back
cover
of
these
operating
instructions.
Thank
you
for
buying
this
Pioneer
product.
Please
read
through
these
operating
instructions
so
you
will
know
how
to
operate
your
unit
properiy.
After
you
have
finished
reading
the
instructions,
keep
the
manual
in
a
safe
place
for
future
ref-
erence,
In
some
countries
or
regions,
the
shape
of
the
power
plug
and
power
outlet
may
sometimes
differ
from
that
shown
in
the
expla-
natory
drawings.
However,
the
method
of
connecting
and
opera-
ting
the
unit
is
the
same.
WARNING:
to
prevent
FIRE
OR
SHOCK
HAZARD,
DO
NOT
EXPOSE
THIS
APPLIANCE
TO
RAIN
OR
MOISTURE.
IMPORTANT
NOTICE
The
serial
number
for
this
equipment
is
located
on
the
rear
panel.
Please
write
this
serial
number
on
your
enclosed
war-
ranty
card
and
keep
it
in
a
secure
area.
This
is
for
your
security.
:
[For
Canadian
model]
CAUTION:10
prevent
eLectric
SHOCK
DO
NOT
USE
THIS
(POLARIZED)
PLUG
WITH
AN
EXTENSION
CORD,
RECEPTACLE
OR
OTHER
OUTLET
UNLESS
THE
BLADES
CAN
BE
FULLY
INSERTED
TO
PREVENT
‘BLADE
EXPOSURE.
ATTENTION:rour
preveniR
LES
cHocs
ELECTRIQUES
NE
PAS
UTILISER
CETTE FICHE
POLARISEE
AVEC
UN
PROLONGATEUR
UNE
PRISE
DE
COURANT
OU
UNE
AUTRE
SORTIE
DE
COURANT,
SAUF
Si
LES
LAMES
PEUVENT
ETRE
INSEREES
A
FOND
SANS
EN-LAISSER
AUCUNE
PARTIE
A
DECOUVERT.
f
“This
product
complies
with
the
Radio
Interference
require-
|
ments
of
the
EC
(European
Community}
Directive
87/308/EEC.”
The
fightaang
hash
with
arrowhead.
within
an
equilateral
thangie,
1s
intended
to alert
the
uses
tc
the
presence
of
uninsulates
“Gangerous
vottage”’
wnttin
the
product's
enciosure
that
may
De
of
sufficient
magneuge
to
Constitute
a
Sk
Of
Biectne
snotk
te
persons
|
IMPORTANT
1
RISK
OF
ELECTRIC
SHOCK
DD-NOT
OPEN
CAUTION:
TO
PREVENT
THE
RISK
OF
ELECTRIC
SHOCK,
DO
NOT
REMOVE
COVER
{OR
BACK).
NO
USER-
SERVICEABLE
PARTS
INSIDE.
REFER
SERVICING
TO.
QUALIFIED
SERVICE
PERSONNEL.
The
exclamation
point
within
an
equilateral
triangle
1s.
intendec
to
aiert
the
user
to
the
presence
of
mportant
operating
ano
mamtenance
(servicing!
instructions
in
the
literature
accompanying
the
appliance.
YQ
PIONEER’
The
Art
of
Entertainment

Other manuals for Pioneer CT-W503R

Question and Answer IconNeed help?

Do you have a question about the Pioneer CT-W503R and is the answer not in the manual?

Pioneer CT-W503R Specifications

General IconGeneral
Track System4-track, 2-channel stereo
Total Harmonic Distortion0.8%
Output0.5V (line)
TypeDouble Cassette Deck
MotorDC Servo Motor

Summary

Important Notice

Serial Number Information

The serial number is on the rear panel and should be recorded for security.

Important Safety Precautions (Page 1)

Safety Symbols Explained

Explains the lightning flash with arrowhead and exclamation point symbols for user safety.

Maintenance

Cleaning Heads, Pinch Rollers, and Capstans

Regular cleaning of heads, pinch rollers, and capstans is recommended for optimal sound reproduction.

Demagnetizing the Heads

Heads can become magnetized, losing high-frequency sounds; periodic demagnetization is advised.

Cleaning the Front Panel

The front panel can be cleaned with a soft cloth, possibly dampened with neutral detergent.

Handling Cassette Tapes

Cassette Inspection Before Use

Essential checks before loading a cassette tape include tape slack and intactness of accidental erasure prevention tabs.

Automatic Tape Selector Function

The deck uses sensor holes on cassettes to automatically set tape bias and equalization for optimal recording.

Cassette Tape Usage Tips

Advice includes leader tape usage, proper storage, avoiding C-120 tapes, and checking tape winding.

Connections

Connecting Audio and Playback Cords

Connect the TAPE jacks of the amplifier to the LINE jacks of the cassette deck for recording and playback.

CD Deck Synchro Recording

Enables synchronized recording from a Pioneer CD player using a dedicated control cord.

Pioneer System Remote Control

Connects to compatible Pioneer components for system-wide remote operation.

Connecting the Power Cord

Connect the power cord to an AC outlet, either on an amplifier or a household outlet.

Front Panel Facilities - Controls and Indicators

Power Standby/On Switch and Indicator

Controls power to the deck; standby mode maintains a low power flow.

Deck I Eject Button

Button to open the cassette door; requires stopping tape movement first.

Deck I Operation Buttons

Includes playback, reverse playback, fast forward/rewind, and stop for Deck I.

Headphones Jack (PHONES)

Jack for connecting headphones, allowing private listening.

Recording Level Control (REC LEVEL)

Adjusts the input signal level for recording to prevent distortion or low output.

Deck II Operation Buttons

Controls for playback, reverse playback, fast forward/rewind, recording mute, and pause for Deck II.

Deck II Eject Button

Button to open the cassette door for Deck II; requires stopping tape movement.

Front Panel Facilities - Mode Switches and Functions

Reverse Mode Switch (REV MODE)

Selects playback mode: one-way, two-way, or repeat/relay playback.

Repeat Mode Function

Enables continuous playback or recording of both sides of a tape.

Rewind Autoplay Function

Automatically rewinds and plays back a tape after it reaches the end.

Auto-NR System

Automatically selects the best Dolby NR system for playback of tapes with unclear recording conditions.

FLEX (1/f) System

Expands high and low frequency levels to improve sound quality on tapes with poor recordings.

Front Panel Facilities - Display and Noise Reduction

Function Display Indicators

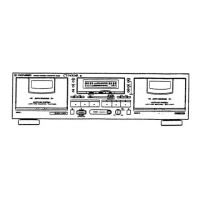
Explains the various indicators on the front panel, such as tape counter, Dolby NR, and FLEX status.

Dolby NR and Dolby HX PRO

Details Dolby NR for noise reduction and HX PRO for improved recording headroom.

Front Panel Facilities - Tape Transport and Counters

Tape Transportation Mode Indicators

Displays the current tape transport mode for both decks, including playback, rewind, and search.

Two Modes Counter Function

Explains the tape counter and time counter functions and how to reset them.

Playback Operations

Single Playback Operation

Describes how to play back a prerecorded tape on either deck individually.

Relay Playback Function

Allows continuous playback by automatically switching between DECK I and DECK II.

Blank Skip Function

Skips unrecorded portions of a tape during playback.

Playback Operations (Continued)

Playback Sequence Settings

Details playback sequences based on REV MODE switch settings and button presses.

Music Search Function

Allows skipping forward or backward to find desired selections based on blank spaces.

Recording

Recording Process (Deck II)

Step-by-step guide for recording audio onto a tape in Deck II.

Recording Mute Function

Creates short blank spaces required for the music search function.

Erasing a Tape

Instructions on how to erase recorded content from a tape.

Adjusting Recording Level

Guidance on setting the optimal recording level for good signal-to-noise ratio and dynamic range.

Recording (Continued)

CD Deck Synchro Recording

Describes synchronized recording from a CD player to a cassette deck.

Tape Copying

Troubleshooting

Troubleshooting Power Issues

Troubleshooting steps for issues related to the power not turning on.

Troubleshooting Cassette Door Problems

Solutions for problems with the cassette door not opening or closing properly.

Troubleshooting Playback Issues

Troubleshooting for playback issues like stopping immediately or no sound.

Troubleshooting Recording Issues

Solutions for recording indicator not lighting up or level meter not working.

Troubleshooting (Continued)

Troubleshooting Poor Sound Quality

Addresses issues like unstable sound, no high frequencies, or distorted sound.

Troubleshooting Other Issues

Solutions for music search, remote control, CD DECK SYNCHRO, and CD SYNC indicator issues.

Specifications

System Specifications

Technical specifications for the system, heads, motor, and performance metrics.

Miscellaneous Specifications

Covers power requirements, consumption, dimensions, weight, accessories, and notes.

Subfunctions List

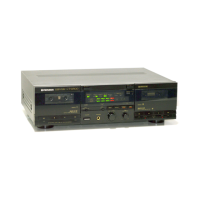
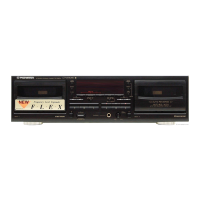
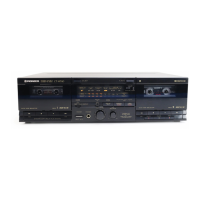
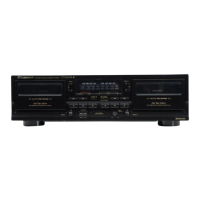
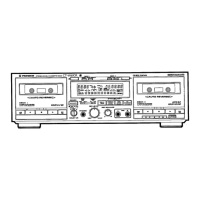
Lists the various functions and features of the cassette deck.

About the Demo Mode

Demo Mode Setup (CT-W503R/CT-W203)

Instructions for setting the demonstration mode on specific models.

Demo Mode Setup (CT-W403R)

Instructions for setting the demonstration mode on a specific model.

Related product manuals