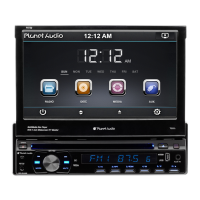
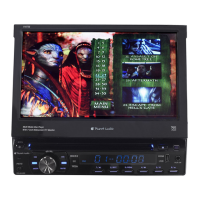
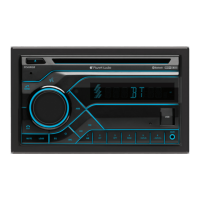
This document describes the Planet Audio P9756, a One Din In-Dash AM/FM DVD/MP3/CD Receiver with a 7" (178mm) Widescreen Touchscreen TFT Digital Monitor, featuring dual (front and rear) USB and SD Memory card ports, and an AUX Input.
Function Description:
The P9756 is a versatile multimedia disc player designed for in-dash installation. It supports various audio and video formats from DVDs, CDs, MP3s, and MPEG4s, as well as files from USB devices and SD cards. It also includes an AM/FM radio tuner. The device features a motorized 7-inch widescreen touchscreen TFT digital monitor for intuitive control and display.
Panel Introduction and Basic Functions:
The front panel includes several key controls:
- OPEN Button (1): Opens/closes the screen. A short press turns the power on, and a long press turns it off.
- SEEK Knob (2): In radio mode, rotates to select stations (up/backward) or long press for auto scan. In playback mode, rotates to select songs (up/backward) or long press for fast forward/backward.
- RELEASE Button (3): Releases the panel.
- MODE Button (4): Switches between different function modes (RADIO, DVD, USB, SD, AUX). The system automatically skips modes if no disc or device is connected.
- (VOL/SEL) Volume Adjustment Mode (5): Repeatedly pressing this button cycles through VOL, BAS, TRE, BAL, FAD adjustment modes. Rotating the knob adjusts the selected parameter.
- MUTE Button (6): Short press mutes/unmutes sound. Long press turns the TFT LCD display on/off.
- Number Buttons 1-6 (7-12):
- 1/ (7): Radio preset / Disc Play/Pause.
- 2/RPT (8): Radio preset / Repeat current track.
- 3/RDM (9): Radio preset / Play tracks in random order.
- 4/ (10): Radio preset / Stop playback.
- 5/▼ (11): Adjusts screen angle (playback mode).
- 6/▲ (12): Adjusts screen angle (playback mode).
- Dual (front and rear) AUX Input (13): For external audio input. Warning: Use either front or rear AUX at a time; never connect both simultaneously to avoid malfunctions.
- Dual (front and rear) USB Ports (14): For reading audio/video files from USB devices. Warning: Use either front or rear USB at a time; never connect both simultaneously to avoid malfunctions.
- IR (15): Infrared receiver for the remote control.
- Eject Button (16): Ejects a disc from the unit.
- SD Memory Card Port (17): Inserts SD card for automatic file playback.
- RESET Button (18): Restores the unit to its initial state.
Remote Control Operation:
The remote control offers comprehensive control over the device's functions:
- POWER ON/OFF (1): Toggles power.
- MUTE (2): Toggles audio mute.
- SOURCE (3): Changes mode.
- EQ (4): Selects sound equalization presets (POP, ROCK, CLASSIC, EQ off).
- SEEK+ (►) / SEEK-() (5): Skips to previous/next song (MP3, USB, SD) or seeks radio stations.
- VOL+ (►)/ VOL-() (6): Adjusts volume.
- SEL (7): Selects sound features.
- LOUD (8): Activates Loudness function.
- BAND-P/N (9): Selects radio band (FM1, FM2, FM3, AM1, AM2) or video system (PAL, AUTO, NTSC) in VCD/DVD mode.
- LOC/RDM (10): Toggles between local/distance search (radio) or random play (VCD/CD).
- STOP (11): Stops playback.
- PLAY/PAUSE (12): Toggles play/pause.
- ST/PROG (13): Selects stereo/mono station (radio) or programmed play (audio).
- 0-10+ (14): Selects desired song, section, or preset stations using decimal numbers.
- AMS/RPT (15): Browses stored stations (radio) or repeats playback (audio).
- TITLE (16): Returns to disc's top menu (DVD).
- AUDIO (17): Switches dialogue language (DVD) or selects left/right track/stereo (VCD).
- GO TO (18): Defines playing time (DVD).
- SUBTITLE (19): Switches subtitle language (DVD).
- PBC (20): Displays song menus (VCD) for selection with number buttons.
- UP, DOWN, LEFT, RIGHT, ENTER (21): Navigates menus and confirms selections.
- SLOW (22): Slow backward/forward playback (audio).
- ANGLE (23): Changes play angle (DVD).
- SETUP (24): Accesses different set items (audio).
- OSD Display (25): Displays title chapter and remaining time.
- ZOOM (26): Zooms in (DVD/VCD).
- MENU (27): Returns to main menu.
- DSP (28): Shows time.
Battery Change:
If remote control distance shortens or functions fail, replace the battery, ensuring correct polarity.
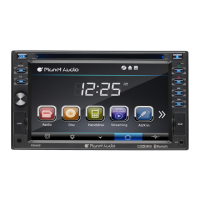
Turn On/Off and Main Interface Access:
The unit powers on when the ignition is in ACC or ON position by pressing the power button. A 3-second long press turns it off. The main interface displays icons for various functions, which can be accessed by touching them or by sliding a finger across the screen.
USB/SD Card Operation:
The unit plays audio/video/image files from connected USB devices or SD cards.
- Insert/Eject USB: Connect a U-disc via a USB cable. Eject by exiting playback screen and removing the device.
- Insert/Eject SD Card: Insert an SD card until it locks. Eject by exiting playback, pressing the card, and allowing it to pop out.
- Enter/Exit: Inserting a USB or SD card automatically starts playback. If already connected, touch the [USB] or [SD] icon in the multimedia interface. During playback, touch the top center of the screen to access the touch menu for controls.
Radio Operation:
- Enter/Exit: Touch [Radio] icon to enter. Touch to return to main interface.
- MUTE on/off: Click icon.
- Loudness on/off: Click icon.
- Search/Save Stations: Short press to browse stored stations. FM band saves 18 stations (3 banks of 6), AM band saves 12 stations (2 banks of 6).
- Band Selection: Click icon to switch among FM1, FM2, FM3, AM1, AM2.
- Long/Short-range (LOC/DX): Click icon to switch between local (strong signals only) and remote (weak signals) search. LOC is for good reception, DX enables reception of weaker signals. (Available only in FM band).
- Stereo on/off: Click icon when receiving stereo signals.
- TA (Traffic Information): When ON, the radio searches for traffic stations, displaying "TP". After information is broadcast, it switches back to the previous mode. Repress [TA] to close.
- AF (Alternative Frequencies): When ON, the radio fine-tunes to other frequencies if the signal becomes weak. Displays warning for emergency announcements.
- PTY (Program Type): Displays program types for station search. (Note: Requires RDS function).
Disc Operation:
- Play/Eject Disc: Insert disc with printing surface up for automatic playback. Eject by clicking the [▲] button. If not removed within 15 seconds, the disc is re-inserted but not played. Do not insert two or more discs.
- DVD/VCD/CD Playback: During playback, touch the lower middle area of the screen to pop up the touch menu for controls. CD playback starts immediately upon insertion.
- MP3/JPEG/MPEG4 Playback: Files are automatically read and played. Touch the screen area for the touch menu.
- Touch Menu Functions:
- MUTE: Toggles mute.
- Play/Pause: Toggles play/pause.
- Stop: Enters pre-stop status.
- Fast forward/backward: Selects speed.
- Previous/Next Song: Selects track.
- Access Next Menu: Accesses next menu interface.
- Disc: Ejects disc.
- Stereo on/off: Toggles stereo.
- Return to Root Menu: Returns to DVD root menu or VCD PBC menu. Displays chapters for direct selection.
- Access Title Menu: Returns to disc title menu.
- Repeat Play: Cycles through Chapter repeat → Title repeat → Repeat All → Off. (VCD only works when PBC is off).
- Language Selection: Selects language.
- Digit Keyboard: Appears for direct track selection.
- Switch Play Order: Switches play order.
- Zoom in/Zoom out Image: Zooms image. (Volume adjustment also displays a picture in the screen center).
- Setting: Enters setting interface.
- EQ: Displays EQ modes (EQ OFF, POP, ROCK, CLASS).
ST. Wheel Setting:
- Click the [SWC] icon in the main interface.
- Connect vehicle control lines (positive/negative) to machine control lines.
- Click SWC buttons to assign operations.
- Save settings by clicking the [Confirm] icon.
To modify, repeat steps 3-4. To reset, click [Reset] icon and repeat steps 3-4.
Connect video and audio input plugs to external jacks. Touch [AUX-IN] icon to access the interface.
- Audio: Adjust volume, bass, pitch, front/back, left/right speaker balance.
- Video: Adjust brightness, contrast, saturation, hue, and video standard mode.
Rear View Function:
Automatically switches to reverse video when reversing the car and returns to the initial state afterward.
Warning: Do not rely solely on the CCD system; use direct eyesight while driving. The system assists but has limited range.
Calendar:
Touch the [Calendar] icon to view the calendar.
Calculator:
Touch the [Calculator] icon to access the calculator for basic operations (+/-/x/÷).
Access Setup Interface:
Click [Setting] icon on the main interface.
- General Setting:
- Wallpapers: Preview and set favorite wallpapers.
- Key Beep: On/Off.
- CIRT: On/Off.
- RDS Setting: On/Off.
- Audio Setting: Turn on/off existing functions and adjust rearview volume.
- Video Setting: Adjust brightness, contrast, saturation, and hue.
- Language Setting: Select preferred language for menus.
- Time Setting: Set Time mode, Year, Month, Date, Hour, Minute.
- Version: Check software version numbers (DISC/MCU/TFT).
- Touch Calibration: If touch position is biased, touch [Calibrate] and follow instructions to recalibrate using a touch pen.
Troubleshooting:
- Cannot power on: Check fuse, MPU wrong operation. Solution: Change fuse, press RES button.
- Setting information lost after ignition off: Cause: Battery or fuse change. Solution: Reset information and save.
- Poor radio performance: Cause: Weak signal. Solution: Move car, research.
- Cannot load disk: Cause: Disk inside, scratched. Solution: Remove disc, change new disc.
- Cannot play disc: Cause: Wrong side, dirty lens. Solution: Insert with sign side up, clean lens.
- Cannot switch language/subtitle: Cause: Only one language/subtitle, MPU wrong operation. Solution: If disc is single language, cannot switch. Press RES button.
- No image: Cause: Other MPU wrong operation. Solution: Press RES button.
- Cannot watch image during driving: Cause: Not allowed for safety. Solution: Park in safe place, put car in "P" position, pull up hand brake, parking brake wire must be grounded.
Important Technical Specifications:
- Power Supply: DC 12V
- Power Range: 10.8-16.0V DC
- Max Current Consumption: 15A
- Ground System: Negative ground
- Power Output: 85 Watts x 4 Channels
- FM Tuner:
- US Frequency Range: 87.5-107.9MHz
- European Frequency Range: 87.5-108MHz
- Signal/Noise Ratio: 55dB
- Stereo Separation: 30dB
- Search Station Volt: 20-30dBuv
- AM Tuner:
- US Frequency Range: 530-1710KHz
- European Frequency Range: 522-1620KHz
- Limit Noise Sensitivity: 32dB
- DVD Player:
- S/N Ratio: 70dB
- Frequency Response: 20Hz-20KHz
Accessory:
- Wire: 1PC
- USB Cable: 1PC
- Remote Controller: 1PC
- Warranty Card: 2PCS
DVD Parental Control Function:
The default setting for DVD parental control is #8 adult, allowing all grades of DVD to be read without a password. To change the default grade, access the SETUP menu, select password, enter 0000, and choose the desired DVD grade.