31
3.1 Desktop Installation
To install the 802.3at PoE+ Switch on desktop, simply follow the following steps:
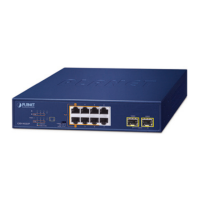
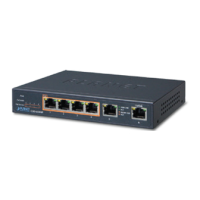
Step 1: Attach the rubber feet to the recessed areas on the bottom of the
802.3at PoE+ Ethernet Switch, as shown in Figure 3-1.
4 6 82
1 3 5 7
12 14 1610
9 11 13 15
20 22 2418
17 19 21 23
Menu (5 sec)
Enter
Back
SFP
17
18
1
PWR
Up
Down
5 9 13 17 21
3 7 11 15 19 23
PoE
2 6 10 14 18 22
4 8 12 16 20 24
PoE
PoE In-Use
ACTLNK1000
ACTLNK10/100
ACT
LNK
SFP
25 26
GSW-2620VHP
Figure 3-1: Attaching the Rubber Feet to the 802.3at PoE+ Switch
Step 2: Place the 802.3at PoE+ Switch on desktop near an AC power source.
Step 3: Keep enough ventilation space between the 802.3at PoE+ Switch and the
surrounding objects.
Note
When choosing a location, please keep in mind the environmental
restrictions discussed in Chapter 1, Section 4, under Specifications.
Step 4: Connect your 802.3at PoE+ Switch to 802.3af/802.3at complied power
devices (PDs) and other network devices.
A. Connect one end of a standard network cable to the
10/100/1000BASE-T RJ45 ports on the front panel of the 802.3at
PoE+ Switch.
B. Connect the other end of the cable to the network devices such as
printer servers, workstations or routers, etc.
Note
Connection to the Switch requires UTP Category 5, 5e, 6 network
cabling with RJ45 tips. For more information, please see the
Cabling Specification in Appendix A.
Step 5: Supply power to the 802.3at PoE+ Switch.
A. Connect one end of the power cable to the 802.3at PoE+ Switch.
B. Connect the power plug of the power cable to a standard wall outlet.
When the 802.3at PoE+ Switch receives power, the Power LED should remain solid
Green.

 Loading...