Usando detergente ligero, lave la tierra y sarro del armazón,
enjuague con agua fresca. No se recomienda el uso de brochas
de alambre. Si se daña el acabado o nota corrosión, repare el área
como lo indica la sección de retocar.
Inserte la ranura del filtro nuevo en la parte de abajo del armazón
empujuelo hasta que se detenga. Con cuiado empuje la parte
superior del filtro hacia adentro del armazón. Inserte el pedazo de
filtro de 1” entre la canaleta y el filtro largo. Ahora inserte el
retenedor del filtro en las cejas del aramzón.
Pre-remoje el filtro (esto ayudará el que el filtro se humedezca al
comenzar) instale el filtro en la unidad.
Cambiando el filtro (Modelo HE2913)
PRECAUCION: Desconecte toda la corriente eléctrica
del enfriador antes de intentar instalar, abrir, o darle
servicio a su enfriador.
Los filtros de su enfriador se deben revisar una vez por año.....de
preferencia al principio de la temporada. O cuando los filtros
requieran revisarse más frecuentemente, de acuerdo con el aire y las
condiciones del agua local. Por ejemplo, en áreas donde el contenido
de minerales del agua es alto o el aire es sucio, depósitos se
acumulan en los filtros, restringiendo el flujo del aire. Reemplace los
filtros como sigue:
Remueva el armazón del gabinete.
Coloque el armazón del filtro en una superficie lisa con los
retenedores hacia arriba. Observe como los removió / para
instalarlos de nuevo. Remueva el retenedor deslizándolo bajo la
ceja del armazón. Cuidadosamente remueva y deseche el filtro
usado.
Cambiando el filtro (Modelo WH2906)
PRECAUCION: Desconecte toda la corriente eléctrica
del enfriador antes de intentar instalar, abrir, o darle
servicio a su enfriador.
El filtro de su enfriador se deben cambiar dos veces por año.....al
principio y a la mitad de la temporada. O cuando el filtro requieran
cambiarse más frecuentemente, de acuerdo con el aire y las
condiciones del agua local. Por ejemplo, en áreas donde el contenido
de minerales del agua es alto, depósitos se acumulan en el filtro,
restringiendo el flujo del aire.
Reemplace el filtro como sigue:
Remueva el armazón del gabinete.
Remueva el retenedor de alambre, usando precaución ya que
pueden resortear. Cuidadosamente remueva la paja de el
retenedor. Remueva y deseche el filtro viejo.
Usando detergente ligero, lave la tierra y sarro del armazón,
enjuague con agua fresca. No se recomienda el uso de brochas de
alambre. Si se daña el acabado o nota corrosión, repare el área
como lo indica la sección de retocar.
Ponga el filtro nuevo en el armazón, empezando por el lado de la
canaleta, que ajuste con la canaleta y las orillas de los lados sin
espacios de aire, el filtro debe llenar el armazón o aire caliente
entrará al edificio.
El grosor del filtro debe estar uniforme a través del armazón.
Reinstale el retenedor de alambre y asegúrelos alrededor del
armazón. Puntos filosos metidos en el armazón (detiene el filtro en
su lugar y previene que se afloje)
Pre-remoje el filtro y revise si quedaron aberturas a lo largo de las
orillas, reinstale el filtro en la unidad.
Enfriador Evaporativo de Ventana - Maunal de Uso y Cuidado 5
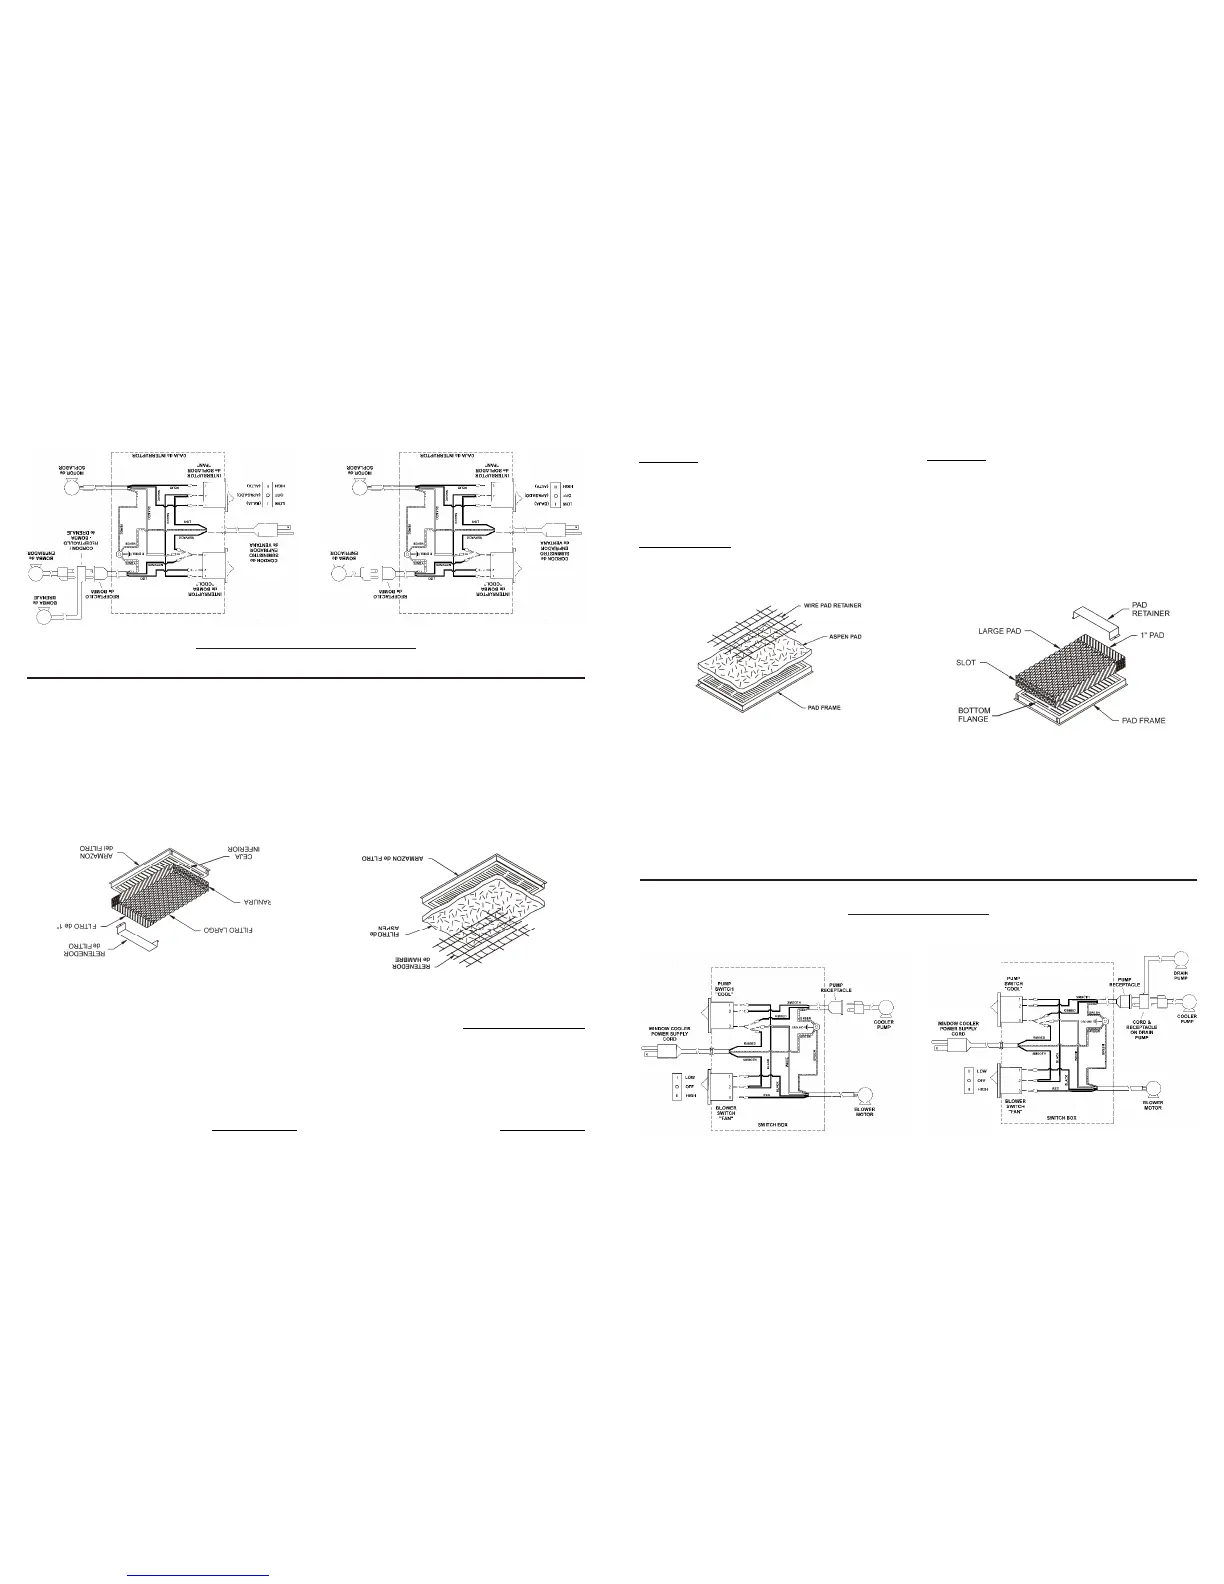
DIAGRAMA de ALAMBRADO
MODELO WH2906 MODELO HE2913
Changing Cooler Pad (Model HE2913)
CAUTION: Disconnect all electrical power to the cooler
before attempting to install, open, or service your cooler.
The condition of your cooler pad should be checked at least once a
year; at the beginning of the season is best. However, your pad may
need to be checked more frequently, depending on local air and water
conditions. For instance, in areas where mineral content of the water
is high or the air is dusty, deposits may build up in the cooler pad,
restricting airflow. Clean or replace pad as follows:
Remove pad frame assembly from cabinet.
Lay pad frame on smooth, flat surface with pad retainer up.
Observe the location / placement of the pad retainer. Remove
retainer by sliding it out from under the pad frame flange. Carefully
remove and discard old pad.
Using a mild detergent, wash dirt and scale from pad frame and
rinse with fresh water. Check slots at top of pad frame to be sure
they are open and clear. Wire brushing is not recommended. If
finish is damaged or rusting is noted, repair area as noted in the
“Touch-Up” section.
Place the slot in the end of the new pad over the bottom flange of
the pad frame and push the pad down against the flange until it
stops. Gently push the top of the pad into the pad frame. Slide the
1” thick pad on top of the large pad already in place. Replace the
pad retainer by sliding the retainer under the pad frame flanges .
Pre-soak pad (this will help with the wetting of the pad on start-up) .
Reinstall pad frame assembly into unit.
Changing Cooler Pad (Model WH2906)
CAUTION: Disconnect all electrical power to the cooler
before attempting to install, open, or service your cooler.
Your cooler pad should be changed at least twice a year… at the
beginning of and midway through a season . However, your pad may
need to be changed more frequently, depending on local air and water
conditions. For instance, in areas where mineral content of the water
is high, deposits may build up in the cooler pad, restricting airflow.
Replace pad as follows:
Remove pad frame assembly from cabinet.
Remove pad retainer from frame, using caution as retainer can
spring back. Carefully remove all aspen from pad frame. Remove
and discard old pad.
Using a mild detergent, wash dirt and scale from pad frame and
rinse with fresh water. Wire brushing is not recommended. If finish
is damaged or rusting is noted, repair area as noted in the “Touch-
Up” section.
Lay new pad in frame, starting at trough end, making sure pad is
snug against trough and outer edges with no air spaces. Pad must
completely fill frame (no gaps) or hot air may enter building.
Pad thickness should be uniform across the frame.
Replace pad retainer and lock under edge of frame. Sharp points
must be buried into pad (they hold pad in place and prevent
sagging).
Pre-soak pad and check for air gaps along edges, reinstall pad
frame assembly into unit.
Evaporative Window Cooler - Use and Care Manual 5
WIRING DIAGRAM
MODEL WH2906
MODEL HE2913


 To Next Page
 Loading...
