Page 39
I
I
I
Coil & ignition assembly - The coil and ignition assembly are a one piece unit and have no serviceable parts. One two conductor
lead is connected to the stator assembly for power and timing signal. One lead goes to ground through the kill switch to stop the
motor. The ignition lead goes to the sparkplug. If there is no spark, disconnect kill switch lead and recheck for spark using a new or
known good plug with proper gap. Replace kill switch as required. If there is still no spark, or spark is weak, remove coil assembly
and make sure there is no paint on at least one of the frame mounting tabs and that there is no corrosion preventing the coil from
grounding to the frame. This is the most common cause of weak or no spark. If still no spark, check ignition assembly with an ohm-
meter.
To test, disconnect the plug located on the front frame rail next to the left radiator. Measure the resistance from the male terminal
on the wire leading to the coil assembly and the metal portion of the ignition coil. The resistance should measure approximately 47
kilo-ohms. Next, measure the resistance from the spark plug terminal in the coil wire to the metal portion of the ignition coil. The
resistance should measure approximately 5 kilo-ohms. If these measurements check out, check the stator assembly as described
above.
21. Final Drive
Chain adjustment & lubrication - The chain is a highly stressed component and requires frequent inspection, adjustment and lubrica-
tion. It is important not to tighten the chain too much, or it will bind—possibly resulting in the chain snapping and/or damage to the
transmission, chain roller, and sprockets. If the chain is too loose, it will cause rapid chain and sprocket wear, it may slip on the sprock-
ets or come off the sprockets resulting in damage to the motorcycle anywhere it hits in addition to transmission and/or case damage.
Lubricate chain frequently using a motorcycle chain lubricant to reduce chain and sprocket wear. Most lubricants should be applied
after riding while the chain is warm so they penetrate better and have a chance to “set” before riding next, which will reduce oil fling-
ing off.
To lubricate chain, first use a brush or rag to remove heavy deposits of dirt. Put the motorcycle on a stand with the rear wheel off the
ground or lean the bike against the kickstand to pull the rear wheel off the ground. Spray the oil on the lower section of chain between
the footpeg and chain guide. Try and keep any overspray off the wheel and spokes. Turn the rear wheel by hand while spraying oil,
make sure to coat the top and sides of the chain well. Lubricate until the chain is coated with oil. Allow to sit a few minutes for the oil
to soak in and thicken. Note that o-ring chains are rarely used on mini’s because of the horsepower they consume, so regular chain
maintenance is required.
Check chain adjustment frequently when chain is new, it will stretch initially, then much more slowly for most of its useful life.
Replace chain when it appears loose, the links bind, or the chain can be lifted away from the teeth at the middle of the rear sprocket.
Replace chain as needed to prevent breakage and costly damage. Do not use a new chain on worn sprockets, or a worn chain on new
sprocket(s) or rapid wear and breakage will result.
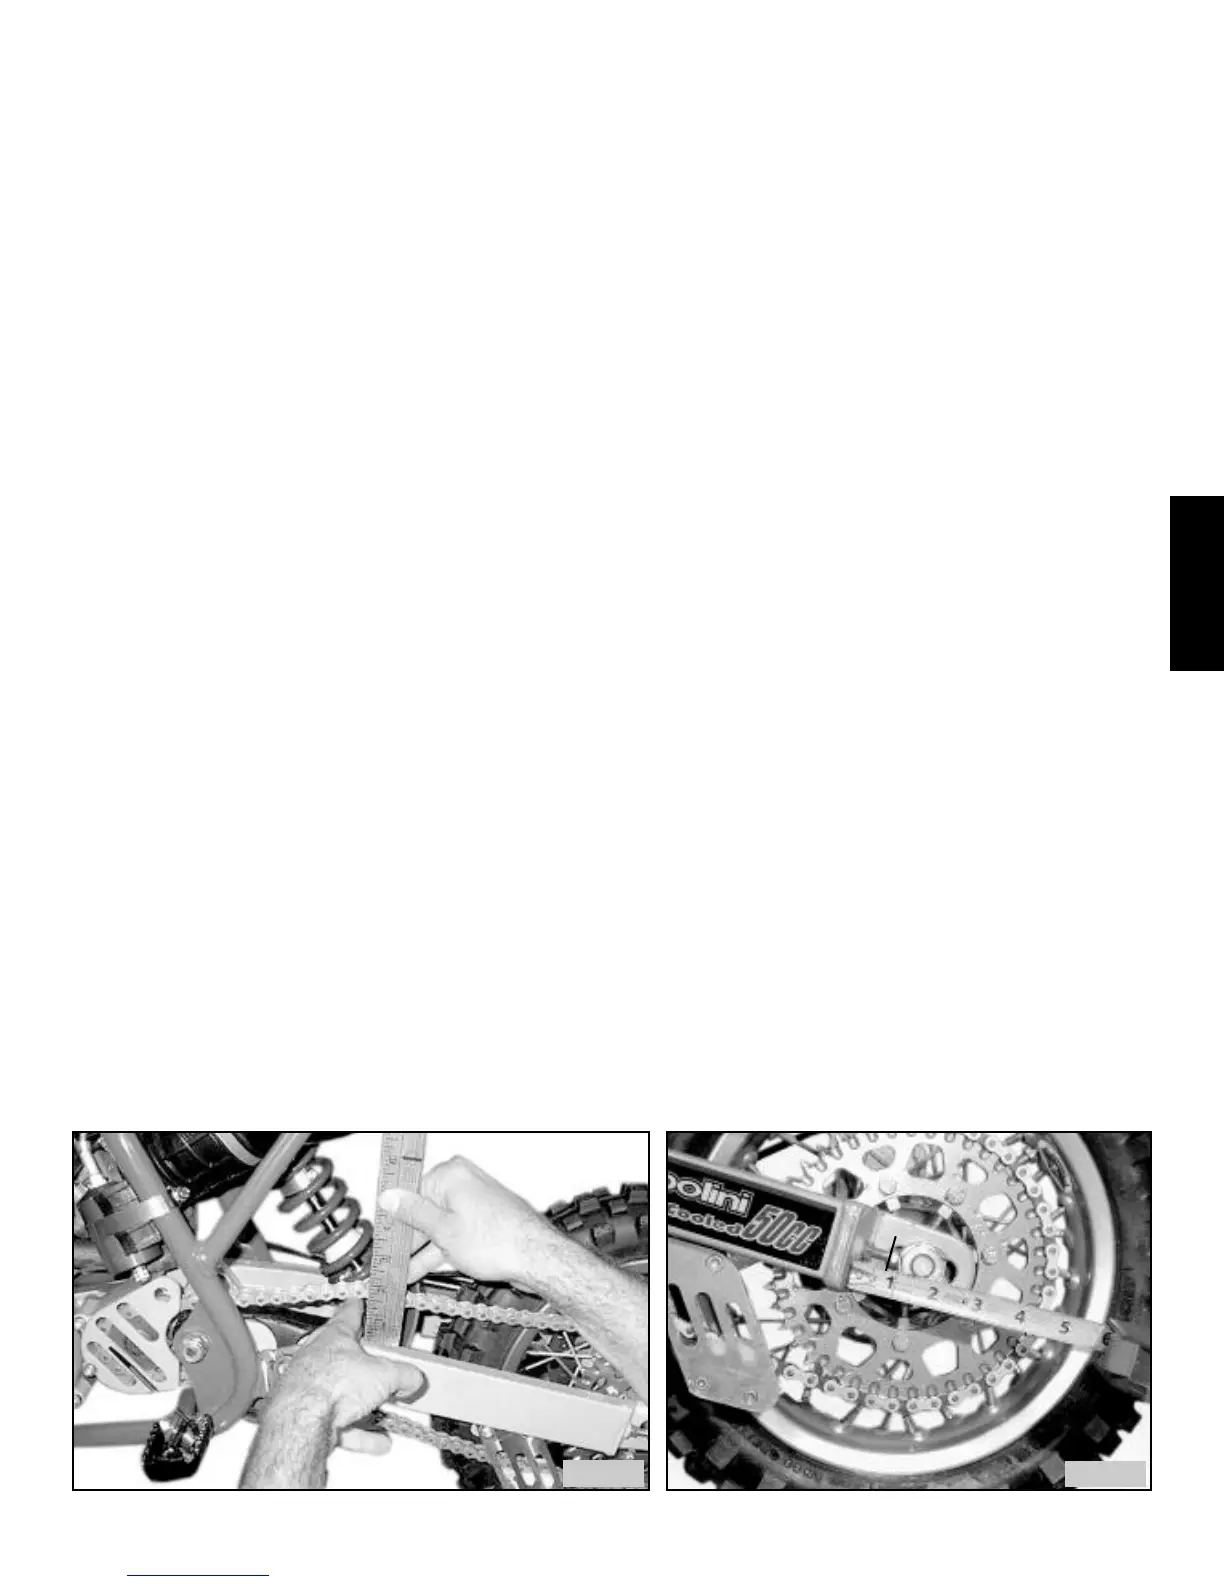
To check chain adjustment, the motorcycle must be sitting on a centerstand with the rear wheel off the ground. You should have
about 30mm (1
3
⁄16˝)of free play. See illustration III-70. Adjust chain to this free play if needed. Muddy conditions may require a slightly
looser adjustment to prevent binding when mud coats the sprockets.
To adjust chain, loosen rear axle nut until wheel is free to move. Loosen lock nut on the chain adjustment bolts, then screw bolts in
or out to obtain proper chain adjustment. Make sure both bolts are adjusted to the same position by using a ruler to measure from weld
on swingarm to end of adjusting bolt. See Photo III.71. When adjustment is correct, hold head of adjusting bolt with wrench and snug
locking nut securely. Push rear wheel forwards to push axle against adjusting bolts and tighten rear axle nut to 37 ft/lbs. Double check
adjustment by pushing down rear of bike until swingarm is level and checking to see that chain still has a small amount of play.
Note: remove and grease axle adjusting bolts when the bike is new and periodically thereafter to prevent them from snapping off in
the swingarm if they become corroded.
Use ruler as shown to check slack, 1
3
⁄16 is optimal.
Make sure axle is same distance on each side.
III
III
.70
.70
III
III
.71
.71