10
Before You Begin
Qty.
1
1
1
1
1
1
1
1
1
2
2
1
1
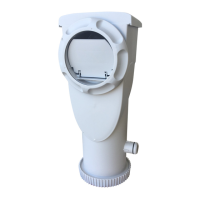
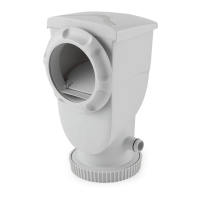
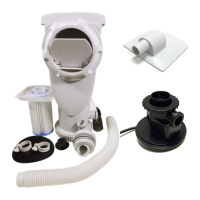
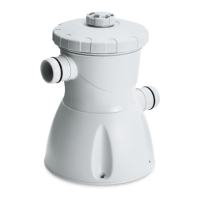
Parts Name
Motor Seal Nut
Rubber Nozzle
Pump Motor Assembly
Canister Gasket / Motor Seal
Top Cover
Weir Foam
Type D Filter Cartridge (SFX600 only)
Type A/C Filter Cartridge (SFX1000 or SFX1500)
Weir
Skimmer Canister
Hose Connection O-Ring
Hose Clamp
Return Hose
90° Elbow
Qty.
1
1
1
1
1
1
1
1
1
1
1
1
1
Parts Name
RF Nut
Thrust Washer
Pool Wall (for reference only)
Gasket
Return Fitting (RF), threaded
RF Diverter
RF Locking Ring, threaded
Service Plug
Skimmer Seal Ring
Water Stopper
SFX Skimmer Strainer Basket
Skimmer Gasket Rubber Seal
Power Cord Set
Items Items
1
2
3
4
5
6
7
8
9
Model
SFX600
SFX1000
SFX1500
Voltage & Frequency
120V~ 60Hz
120V~ 60Hz
120V~ 60Hz
Amperage
1.7 Amps
1.4 Amps
3.1 Amps
Before assembling your filter pump, check the contents and become familiar with all the parts. Review all the
following warnings, guidelines and tips before proceeding with setup:
Preliminary Steps
• READ ALL INSTRUCTIONS CAREFULLY and get a thorough understanding of what is required to
assemble your Filter Pump.
• It is recommended to have some petroleum jelly (not included) for lubricating the gaskets and
o-rings.
IMPORTANT:
•
The installer shall follow the written instructions provided for the operation of the filter pump system.
• All electrical components shall be installed in accordance with Article 680 of the 2017 National
Electrical Code® (NEC®) or its latest approved edition.
• DO NOT use this product to dispense powdered chlorine, shock treatment, or any other types of
chemicals as this will damage the pump, filter cartridge and pool.
• This Filter Pump is manufactured by Polygroup® and ETL control number 4000608 and 4006317 –
double insulated and grounded – 120VAC 60Hz. All units must have a minimum of 105VAC to start
and run properly.
Filter Pump Power Specifications
Parts List
Without GFCIWith GFCI
or
j j
g
7
5
8
d
h
6
1
2
t
y
u
3
4
q
w
e
q
r
w
i
o
p
a
s
9
Pool Exterior
Pool Interior
f

 Loading...