16
STEP 1: Install the Skimmer
STEP 2: Install the Return Fitting
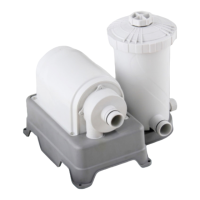
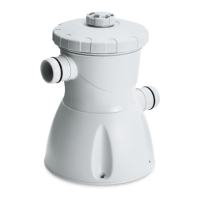
Setting Up the Filter Pump
1. Set up your pool following the instructions in
the Pool User Guide. DO NOT fill with water until
the Filter Pump is properly installed. Locate the
Skimmer Opening on the pool wall.
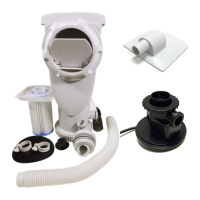
1. Assemble the Return Fitting
o
as
indicated below.
1. From inside the Skimmer Canister
9
, snap the pins of the Weir
8
into the pivot slots,
one after another. The Weir should now stand upright but not stuck.
STEP 3: Replace or Reassemble the Pump
Pump Motor Care
“RESET” button:
• When the display screen shows a number between "01” to “10", but the pump is not
operating (e.g. the "TEST" button is pressed while the pump is working), press the
"RESET" button to restore the pump to work.
• When the display screen shows "0" and the pump has stopped working, pressing the
"RESET" button will have no action.
“TEST” button:
•
To test the GFCI’s leakage protection function: Plug the GFCI power cord set into the
power outlet, make sure the pump is in working mode (i.e. display screen of the GFCI
plug IS NOT showing “0”). Push the “TEST” button, the power to the pump should be
interrupted by the GFCI and the pump will stop working.
• When the display screen shows "0" and the pump has stopped working, pressing the
"TEST" button will have no action.
“SET” button:
•
Press the "SET" button to select the desired operating time of the pump between
1 to 10 hours, with each press adjusts the time by 1 hour.
• If the display screen shows "0", press the "SET" button will restart the pump. In this
case, the pre-set operating time will be adjusted by 1 hour from the previous setting.
NOTE: If you find the time interval available for selection is less than 10 hours, it could
be the memory setting from the previous cycle. Disconnect the power supply of the
GFCI plug and reconnect again, and it will revert back to the default 10 hours range.
Display Screen:
•
Shows “01”, “02”…to “10” to represent the pre-set working time when the GFCI power
cord set is plugged into a power outlet.
• Shows "0” when the pump is in off mode.
Description of GFCI Plug with Timer Function
TEST
SET
RESET
IMPORTANT! This Skimmer Filter Pump is protected by a thermal switch, a safety device that stops the pump
from running when it is overheated, to prevent damage to the pump and prolong its service life. If your pump
turns off automatically, it is likely that the pool water temperature is too high or the water flow through the
pump is insufficient for cooling down the pump. Check and correct the water flow, and let the motor cool
down for at least 15 minutes. The pump will restart automatically after the motor is completely cooled down.
If the display screen of the GFCI plug shows "0", press the "SET" button to restart the pump. You could also
operate the pump at night when the temperature is lower. If the pump turns off automatically again, inspect
if the rotor is blocked by dirt.
Maintaining the Pump
Caring for Your Pool
1. Turn off the Pump, and unplug it from the power outlet.
2. Disassemble the return fittings
w
-
a
:
a. Loosen the Hose Clamps
w
, detach the Hose
e
, and drain any remaining water.
b. Remove, clean and dry all the parts. Liberally lubricate the Gasket
i
with petroleum jelly.
Then snap all the parts together in sequence.
3. Disassemble the Pump:
a. Slide open the Top Cover
5
, take out the Strainer Basket
g
, Filter Cartridge
7
and detach the
Weir
8
. Clean and dry all the parts, and liberally lubricate the Skimmer Gasket Rubber Seal
h
with petroleum jelly. Then reassemble them back onto the Skimmer Canister
9
.
b. Remove the Motor Assembly
3
by turning open the Motor Seal Nut
1
. Clean and dry completely
the Pump. Then see STEP 3: Replace or Reassemble the Pump (p. 21) to reassemble the Motor
into the Canister.
4. Store all the parts in a dry place that remains above 32°F (0°C) at all times.
Disassembling & Storing Pump
STEP 2: Inspect or Replace the Rotor
The Pump
3
consists of a Rotor Assembly
k
and its related parts. If the Rotor and/or its parts is/are
broken, or the Rotor, even in perfect condition, is not seated in place between the Volute Cover
l
and
Pump Body
x
, the Pump will not function properly.
1. Loosen the Volute Cover Lock Nut
;
or Bolts
z
(depends on the pump model), and remove the
Volute Cover
l
.
2. Pull the Rotor Assembly
k
out from the Pump Body
x
.
Inspect the Rotor (see image below) to make sure that the Rotor Shaft, Magnet Axle, Impeller and
other parts are intact. If either of them is broken, you can purchase a new Rotor Assembly at
funsicle.com without having to replace the whole Pump.
3. Once the inspection or replacement is done, carefully insert the Rotor Assembly
k
back into the
Pump Body
x
. The force of the magnet will pull the Rotor down in place.
4. Align the Volute Cover
l
with the top Shaft End Cap, then tighten with the Volute Cover Lock Nut
;
or Bolts
z
(depends on the pump model).
5. Attach the Rubber Nozzle
2
to the outlet of the Pump Body
x
.
For more details, please see Pool Support – Filtration System Troubleshooting at funsicle.com/support.
1.
Lubricate the Canister Gasket
4
,
then insert it
back into the groove (inner groove for
SFX600/SFX1000)
at the bottom of the
Skimmer Canister
9
.
1. Turn the Pump off, and unplug it from the power outlet.
2. Slide open the Skimmer Top Cover
5
, remove the Strainer Basket and the Filter Cartridge.
3. At the Return Fitting
o
:
a. Unscrew and remove the RF Locking Ring and RF Diverter. Then insert the Service Plug to block
the water flow.
b. Loosen the Hose Clamp attaching to the 90° Elbow
r
. Carefully detach the Hose, and let the
water drain from the Hose and the Canister.
NOTE:
You may also detach the other end of Hose attaching to the Canister, but it is not required.
4. Unscrew the Skimmer Seal Ring
d
to remove the entire filtration system from the pool.
5. Flip the Canister upside down. Unscrew the Motor Seal Nut
1
and take out the Motor Assembly.
2. Now the Pump should be installed outside
the pool wall as below.
Make sure the Hose Clamps
w
seals tightly over both the
Return Hose
e
and O-Rings
q
.
STEP 3: Install the Pump
2. Slide close the Top Cover
5
onto the
Skimmer Canister
9
.
3. You can now fill the pool with water up to
between the MIN and MAX markings on the
inside of Skimmer Canister
9
.
2. Turn counterclockwise to remove the
Skimmer Seal Ring
d
. Make sure the
Skimmer Gasket Rubber Seal
h
is in the
correct position.
3. Insert the threaded part of the Skimmer Canister
9
through the Skimmer Opening, and then
secure with the Skimmer Seal Ring
d
.
To optimize water
circulation, twist
the RF Diverter
p
so that it faces up
and away from the
Skimmer Opening.
IF YOU PREFER TO LEAVE THE SYSTEM ATTACHED TO THE POOL,
follow the process below instead.
CAUTION: You will need two people for some of the steps. Incorrect handling may cause damages
resulting in leaks between the Skimmer Canister
9
and the pool wall.
3. Put a water container (not included) under the Skimmer to collect water. Slide open the
Top Cover
5
, and take out the Strainer Basket
g
and Filter Cartridge
7
.
4. Have one person holding the Water Stopper and Skimmer Canister
9
, while the other person
unscrews the Motor Seal Nut
1
.
CAUTION: DO NOT PUSH OR PULL THE CANISTER as this may cause damage between the Canister
and pool liner.
1. Turn the Pump off, then unplug it from the power outlet.
2. Block the water flow:
a. Unscrew and remove the RF Locking Ring
a
and RF Diverter
p
.
Then insert the Service Plug
s
to block the water flow.
b. Push the Water Stopper
f
tightly into the Skimmer Seal Ring
d
.
5. Slowly take out the Motor Assembly
3
. Be careful not to lose the Rubber Nozzle
2
or Canister Gasket
4
.
2a. If your Pump is removed from the pool,
slowly insert the Motor Assembly back into
the upside-down Canister. There's an
indent on the inside of Canister (only visible
from bottom), which needs to be aligned
with an indent at the bottom of the Motor
(marked "ALIGN"); to this end, make sure that
the arrow of the "ALIGN" mark is pointing to
the Canister indent.
3. Once the Motor is correctly aligned, match the threads of the Motor Seal Nut
1
to that of the
Canister, and tighten by twisting the Nut counterclockwise.
IMPORTANT: Make sure the Nut and Canister are not cross-threaded; otherwise leaks may occur.
2b. If your Pump is left attached to the pool,
reach in through the Canister to pull the
Motor Assembly up and insert it back into
the Canister. Make sure that the key of the
Canister is slotted into the notch on the
Pump to align the Rubber Nozzle
2
with the
hose opening of the Canister; otherwise the
Pump may leak even already locked in place.
Problem Cause Solution
1. Pump Motor
3
doesn’t start,
or kicks on
and off
2. No or slow water
flow from the
Return Fitting
o
A. Pump not plugged in
B. Power Cord Set
(with GFCI)
j
and/or
circuit breaker tripped
C. Low Voltage
A. Low pool water level
B. Clogged water inlet/outlet
D. Motor Rotor block by dirt
C. The Filter Cartridge
7
is too dirty
4. Water leakage at
B. Bottom of Canister
9
C. Between Canister
9
and pool wall
A. Inadequate chlorine level
C. The Filter Cartridge
7
is too dirty
B. Inadequate pH level
D. The Filter Cartridge
7
is damaged
E. Water flow is slow
F. Other chemicals required
G. Pool water is too dirty
A. Hose
e
– Hose connections
with Skimmer Canister
9
and/or 90° Elbow
r
are not
secured
3. Pump is not
cleaning the pool
properly e.g.
cloudy/green
water
A. Plug the Power Cord Set
j
to a grounded power outlet. For Power
Cord Set (with GFCI), press the RESET button to start the Pump.
B. Reset your circuit breaker on the electrical panel. If problem
persists, have the circuit checked by a qualified electrician.
C. Check and make sure the line voltage is between 105VAC
and 125VAC.
B. See STEP 3: Replace or Reassemble the Pump, p. 21:
B1. The Canister Gasket
4
must sit in the groove (inner
groove for SFX600/SFX1000) on the bottom of the Canister
before installing the pump.
B2. Check Pump alignment. The arrow of the Pump indent
(marked "ALIGN") MUST point to the Canister indent
(only visible from bottom).
B3. Make sure the Motor Seal Nut
1
is not cross-threaded.
C. Make sure the Skimmer Gasket Rubber Seal
h
is installed
properly. See STEP 1: Install the Skimmer (2) & (3), p. 12:
- The two keys of the Gasket should be at the top.
- The pool liner is not trapped in the threads.
- No gaps between the Gasket and the Canister.
- The Skimmer Seal Ring
d
is firmly tightened onto the Canister.
A. Water level must be between the MIN and MAX lines on
the inside of Skimmer Canister
9
.
B. Check for obstructions at the Strainer Basket
g
,
Filter Cartridge
7
, Hose
e
and Return Fitting
o
.
C. Clean or replace the Cartridge following the steps of
Best Practices for Using Filter Cartridge (p. 16).
D. Refer to the "Servicing the Pump (p. 18)" section to clean dirt.
A. Maintain the chlorine level between 1.0 and 1.6 ppm.
C. Clean or replace the Cartridge following the steps of
Best Practices for Using Filter Cartridge (p. 16).
B. Maintain the pH level between 7.3 and 7.8
D. Inspect the Cartridge for holes or tears. If it’s visibly
damaged, replace it with a new one.
E. Check for obstructions at the Strainer Basket
g
,
Filter Cartridge
7
, Hose
e
and Return Fitting
o
.
G. Chemicals are essential to keep the pool water clean.
Clean the pool and filter more often.
F. Have your pool water sample tested by a pool supplies store.
You may need to add other chemicals since water quality
varies in different localities.
A. Check that the Hose Clamps
w
are properly tightened over
both the Hose and the Hose Connection O-Rings
q
; adjust
and retighten if necessary. Also, check the Hose for cracks or
holes and replace as needed.
IMPORTANT: Make sure that the cord of
the Motor Assembly
3
is placed through
the Motor Seal Nut
1
BEFORE replacing
the Pump.
WARNING: Climbing hazard! Please prevent children from climbing on the filter
canister to gain access to the pool.
Best Practices for Using Filter Cartridge
1. To clean the Filter Cartridge
7
:
a. Turn off and unplug the Pump.
Slide open the Top Cover
5
, and
take out the Strainer Basket
g
and
Filter Cartridge.
b. Pressure wash the Cartridge thoroughly
(including between the pleats) with a garden
hose to remove larger debris. Then allow the
Cartridge to dry, and carefully brush away smaller
and fine particles of dirt. Do NOT scrub the pleats,
or the Cartridge will wear out faster than it should.
c. To ensure pool water stays clean, please clean the
filter cartridge every day and change when required.
d. Reassemble the parts in reverse order. Then you can restart
the Pump.
2. You may need to clean or replace the Filter Cartridge when it’s
dirty, or before the correct chlorine and pH levels are attained.
Therefore, it’s recommended to keep at least one spare cartridge
on hand at all times. A clean, well-maintained cartridge assures
that your pump will always be ready to operate at peak efficiency.
3. Suntan oils, body oils and algae can quickly build up and clog the
pleats of the Cartridge, reducing the filtration efficiency. Therefore,
it is imperative to remove such films of oils and/or algae.
To remove oils: mix 1 pound of tri-sodium phosphate (TSP, or any
other strong detergent) and 5 gallons of water, and soak the
Cartridge for 12 hours.
To remove oils AND algae: same as above, and add ½ pint of pool chlorine or 1 pint of liquid
household bleach to the solution ONE HOUR BEFORE removing the Cartridge from the solution.
Thoroughly rinse the Cartridge before reusing it.
4. Excessive calcium and/or mineral deposits may also build up in the Cartridge, and it requires to
be handled differently. Contact and consult your local pool supplies store for solutions/treatment,
and maintain an adequate pH level of pool water (see Caring for Your Pool, p. 17).
5. Dispose of any used filter media in accordance with applicable regulations/legislation.
6. Always use genuine Funsicle Filter Cartridges; they are available at where you purchased your
pool or from funsicle.com.
The most efficient way to troubleshoot or replace the Pump is to disassemble the entire filtration system.
Please drain the water level to below the pool’s Skimmer Opening, then disassemble the system following
the steps below.
CAUTION:
• You may get wet.
• Please read and follow the instructions carefully. Incorrect handling may cause damages resulting
in leaks between the Skimmer Canister
9
and the pool wall.
• REMEMBER TO KEEP ALL THE PARTS IN A SAFE PLACE FOR REASSEMBLY LATER.
Troubleshooting Guide
STEP 1: Remove the Motor Assembly
Servicing the Pump
5. From inside the pool, check if the water flow from the RF Diverter
p
is correct. It should feel like a
solid stream of water returning to the pool. If not, or if you feel a reduction in flow, refer to
Problem 2 of the Troubleshooting Guide (p. 23) for possible solutions.
6. IMPORTANT: Check and adjust the pH and chlorine levels daily. FILTER PUMP ALONE WILL NOT
PREVENT ALGAE FROM GROWING IN POOL WATER; THIS CAN ONLY BE DONE BY MAINTAINING PROPER
CHLORINE AND pH LEVELS AT ALL TIMES. For details, see Caring for Your Pool (p. 17).
Using the Pump
1. Locate a grounded receptacle at least 15 feet (4.5 m) away from the pool.
2a. If your pump includes a Power cord set without GFCI
j
, simply plug in the
power cord set
j
to the power outlet to turn on the Pump. Then continue
with Steps 5 and 6.
2b. If your pump includes a Power cord set with GFCI
j
, plug in the power cord
set with GFCI
j
to the power outlet to turn on the Pump. Then follow Steps 3
to 6 to operate.
3. The GFCI power cord set
j
comes with a pre-set timer function.
a. Default timer setting:
When the power is on, the display screen shows “10”,
indicating that the default operating time of the pump is 10 hours.
The pump will automatically turn off after the 10 hours and will remain off
for 14 hours. This is based on a 24-hour cycle. This cycle will then continue as long as the power
is on.
b. Time adjustment: Press the "SET" button to set the desired operating time of the pump between
1 to 10 hours, with each press adjusts the time by 1 hour. For example, when the display screen on
the plug shows “05”, the pump will work for 5 hours and restart after a 19 hours break.
c. If the display screen shows "0", it indicates that the pre-set working time has ended and the
pump is currently off.
d. To restart the pump earlier than the pre-set time, press the “SET” button. In this case, the pre-set
working time will adjust by 1 hour from the previous setting.
4. To turn off the pump, press the “TEST” button of the GFCI Plug, and unplug it from the power outlet.
If you accidentally press the “TEST” button while the pump is working, you can press the “RESET”
button to restore the pump to work.
GFCI Plug with
Timer Function
*Do not connect to
another timer device
j
• Check the pump output daily. If water flow reduces, see Problem 2 of
Troubleshooting Guide (p. 23).
• Check the Pump, Hoses and Fittings for leaks. If a leak is found, see Problem 4 of
Troubleshooting Guide (p. 23).
• It’s essential to replace any damaged parts as soon as possible. Use only spare parts from
approved, reliable dealers, or from funsicle.com
• Inspect the filter and all filter media regularly to ensure that there’s no build-up of detritus that
prevents good filtration. See Best Practices for Using Filter Cartridge.
• Run the Pump for the recommended number of hours daily. If you are unsure of the time frame,
please see Pump Operation Hours at funsicle.com/support.
•
The following items are required to get your pool ready for use. They are available at funsicle.com
or your local pool supplies stores:
a. Test kit – for checking the chlorine and pH levels of the pool water
b. Floating chlorine dispenser (not included) and chlorine tablet – for water disinfection and
prevention of the growth of algae
c. pH control chemicals – for adjusting the pH level up (soda ash) or down (acid)
d. Algaecides – to eliminate algae
e. Superchlorinator – to destroy (“shock”) the combined chlorine, ammonia, nitrogen, and organic
compounds that build up in pool water over time and with extended use
f. Leaf net with handle – for removing leaves, trash, insects, etc. from the pool
• IMPORTANT: it is a MUST to maintain the chlorine and pH levels at all times:
a. Check and adjust the pH and chlorine levels daily. FILTER PUMP ALONE WILL NOT PREVENT ALGAE
FROM GROWING IN POOL WATER; THIS CAN ONLY BE DONE BY MAINTAINING PROPER CHLORINE AND
pH LEVELS AT ALL TIMES.
b. Recommended pH level: between 7.3 and 7.8
c. Recommended chlorine level: between 1.0 and 1.6 ppm
d. Superchlorinate your pool at least every other week.
e. Hot weather and heavy use may require the pH and chlorine levels to be maintained on the
upper side of the scale as well as a weekly superchlorination.
f. Using a pool and/or solar cover will help maintain the pH and chlorine levels by reducing
evaporation of pool water.
g. CAUTION: High chlorine concentration and low pH level will damage the pool/pool liner.
You must follow the instructions on quantity and safe usage of the pool chemicals you use.
NEVER drop lumps or pellets of chemicals into the pool – this may present a hazard to the
swimmers and/or damage your pool liner.
• Clean your pool regularly using a maintenance kit with vacuum. You can get the kit from
funsicle.com
•
Using a foot bath prior to entering the pool will help keep the pool clean.
• Avoid using well water. If you must use well water, always seek professional advice from your local
pool chemical suppliers before adding ANY chemicals into it.
• Find out the water capacity (in gallon) of your pool. You will need it to determine the amount of
chemicals required, or when you contact a pool supplies expert for water testing and advice on
safe use of chemicals.
NOTE: Always follow the manufacturer label directions of the chemicals you choose to use.
Skimmer Opening
Pool Inlet
h
No gap here
d
Pool Exterior
Pool Interior
Thread slots
Make sure that the pool liner is
placed tight on the Gasket
h
and is NOT trapped in the threads;
otherwise leaks may occur.
e
w
q
Pool Interior
t
y
r
w
q
p
a
i
o
e
Pool Interior
Weir installation finished.
a) Insert one Weir pin
into one hole.
b) Push to secure
the connection.
Push here
Push in
8
9
c) Repeat for
another pin.
5
9
Pool Interior
Pool Interior
Max. Level
Min. Level
The water level should
be between the min
and max markers
located inside the
Skimmer Canister.
g
7
5
1
9
4
2
3
2
2
k
x
l
z
k
x
l
;
Rotor Assembly Parts
Shaft End Cap
Washer
Impeller
Magnet Axle
Rotor Shaft
(This shaft should go
through all the parts
and into both Shaft
End Caps)
Washer
Shaft End Cap
SFX600 & SFX1000
SFX1500
You may need to reach inside the
Canister to free the Pump Motor.
Outlet of Canister and Rubber Nozzle
2
on the pump should be aligned.
TOP VIEW
Make sure that the key of
the Canister is slotted into
the notch on the Pump
BOTTOM VIEW OF PUMP & CANISTER
ALIGN

 Loading...