Before assembling your product, please take afew minutes to check the contents and become familiar with all the parts.
1.
Select alevel area, and completely remove all debris, twigs, stones, etc. DO NOT select an area under overhead electrical lines, trees, or within 15 feet of a house,
building, etc.
2.
The pool shall be located aminimum distance of 6ft (1.83m) from any electrical receptacle.
3.
All 220-240 volt, 15 and 20 ampere receptacles located within 20ft (6.0m) of the pool shall be protected by aresidual current device (RCD).
The 20ft (6m) distance is measured via the shortest straight line distance the supply cord would follow without piercing afloor, wall, ceiling, doorway, window, or
other permanent barrier.
4.
Contact your local utilities, checking that no underground cables, telephone lines, gas lines, etc. run beneath the area you have selected.
Setup Instructions
1.
Locate a level and flat area to set up the pool. Make sure the ground is free from sharp objects, as they may puncture the pool.
2.
LIFT the pool liner across the ground. DO NOT drag the liner from one location to another location.
3.
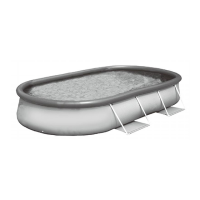
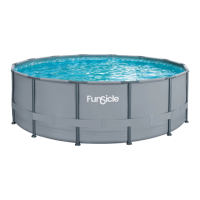
Carefully unfold the Quick Set
®
pool and inspect seams for manufacturing defects. With the inflatable ring on the top side, lay out the pool in the area selected,
making sure the pool bottom is both flat and oval-shaped. Pull out the four rectangular flaps of wall material from the base of the pool, used for the
frame (two on each side).
4.
Locate the four metal pipe (Horizontal Beams) for the left and right support frame sections of the pool. Also locate the
4
four U-Shape Pipe frames. Each end of the U-Shape pipe will have a Cap to be installed. Locate the 8 Pipe Caps and
install, push the buttons in as you insert the Cap onto the pipe end. Look through the holes in the Cap as you install it
and slightly rotate the Cap until the buttons align with the holes and pop up, locking the Cap onto the pipes end. FIG. 1
Now place two of the U-Shape pipes on each side of pool near the rectangular flaps.
5
5.
Now, take two Horizontal Beams (different parts), then slide them together, depress the button as you insert them together and slightly rotate them until the button
aligns with the hole and pops up. Now install the plastic Beam Plugs in both ends lightly tapping them into place. Now slide this Horizontal Beam assembly through
the sleeve stitched along the long sides of the pool, under the ring on both sides. FIG. 2. Make certain that the holes for the U-Shape Pipe frame are facing out.
FIG. 2
7
Insert Horizontal
Beam Assembly Into
Sleeve As Shown
WARNING
-DO NOT overfill the pool and /or allow people to lay over or sit on pool wall -DOING SO CAN CAUSE PERMANENT INJURY!
DRAIN pool to the proper level after a heavy rain.
TIP:
It will be much easier to install your pool if you unfold it and let it lay in direct sunlight for about 2 hours prior to installation. This will help to insure a
wrinkle -free fit because the pool material will be more pliable allowing ittoform into shape during installation.
WARNING
- VERY IMPORTANT! SITE MUST BE LEVEL, STABLE, COMPACTED SOIL.
•
The pool must be assembled on a smooth and level site of firm soil that is free of stones, gravel, sticks, blacktop, or other oil base compounds.
Do not install pool on a wooden deck or any type of wooden surface. You cannot use sand and/or uncompacted soil to provide a level surface for this pool;
itwill only wash out.
• FAILURE TO FOLLOW THE INSTRUCTIONS BELOW WILL CAUSE POOL TO COLLAPSE AND WILL VOID THE WARRANTY!