I. Product introduction 2
II. List of accessories 2
III. Details of acessories 3
VI. Charging using the cigarette lighter plug or adapter 5
VII. Ination Operation 6
VIII. Deatation Operation 7
IX. Precautions 7
X. Fault Handling 10
XI. Maintenance and storage 14
XII. Warranty / Garantie 14
I. PRODUCT INTRODUCTION
value, the pump will automatically stop inating.
storage.
II. LIST OF ACCESSORIES
(Figure 7)
(Figure 5) (Figure 6)
VII.Inflation Operation
VIII. Deflation operation
Connect the end with flexible conduit adaptor (5)of the hose with the air pump
inflation inlet (5), and twist clockwise to tighten it, as Figure 5.
Connect the other end of the hose with the air nozzle that matches the air bag,
and insert the inflation valve of the air bag. Turn it clockwise to fix it as shown in
Figure 6.
Press the pressure unit switching button and select the unit you need.
Press the pressure increase button or pressure reduction button
to set the desired pressure value. The pressure range is from 0 to 20 PSI
(1 PSI = 0.0689 bar = 6.89KPA).
Upon the completion of the above steps, press the power on/off button
to start inflation.
In the process of inflation, you can press the pressure increase button
or the pressure reduction button to increase or decrease the pressure value.
Press the pressure unit switching button to switch between the units, and
press the power on/off button to stop.
When the pressure reaches the set value, the air pump will stop working automatically.
Upon the completion of inflation, it will turn off automatically without other operations
within 2 minutes.
After pulling out the DC plug, please take down the hose from the air pump and air bag
and store it.
Notice: The factory set pressure value of the air pump is 10PSI (10PSI=0.689BAR),
and at the time of the secondary use, the set pressure value for the last time use
will be displayed by default.
Notice: After powered on, if there is no operation within 2 minutes, the air pump will
enter standby mode, and the machine can be initiated by pressing the power switch
button
Remove the hose from the inflation inlet, Connect the end with flexible conduit
adaptor (6)of the hose with the air pump deflation outlet (7), and twist clockwise
to tighten it, as Figure 3,and the other end shall still be to the airbag.
Press the button of the power switch of air pump, and start the deflation until
all the gas is discharged, then the power can be turned off to stop the deflation.
4 1
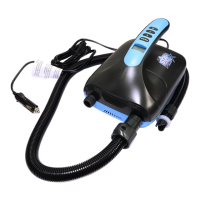
HT-790 DC12V
Charg
Inflation inlet
Deflation outlet
DC plug
Pressure value LCD screen
Pressure unit toggle button
Hose
Air tap
Flexible conduit adaptor
4
5
6
7
8
USB 1A, 2A charging output port
Charging input port
LED light button
Pressurizing button
Decompressing button
On/off button
Charg
DC plug storage place
LED light
1
2
3
4
8
5
6
7
11
10
12
9
13
14
15
16
17
1
3
2
11
12
13
14
15
16
17
10
9
0000
..
100%
PSI BAR
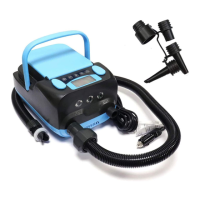
I. Product Introduction
Thank you for purchasing this product, HT-790 is an intelligent DC electric
pump with the preset pressure LCD screen, which can be used for inflatable
tent, SUP, etc. Thanks to the intelligent pressure system, for example, if a
pressure value is preset, when the pressure reaches the preset pressure
value, the pump will automatically stop inflating.
This product also can deflation, and when the inflatable product is not used,
you can use the air pump to empty the air inside for folding and storage.
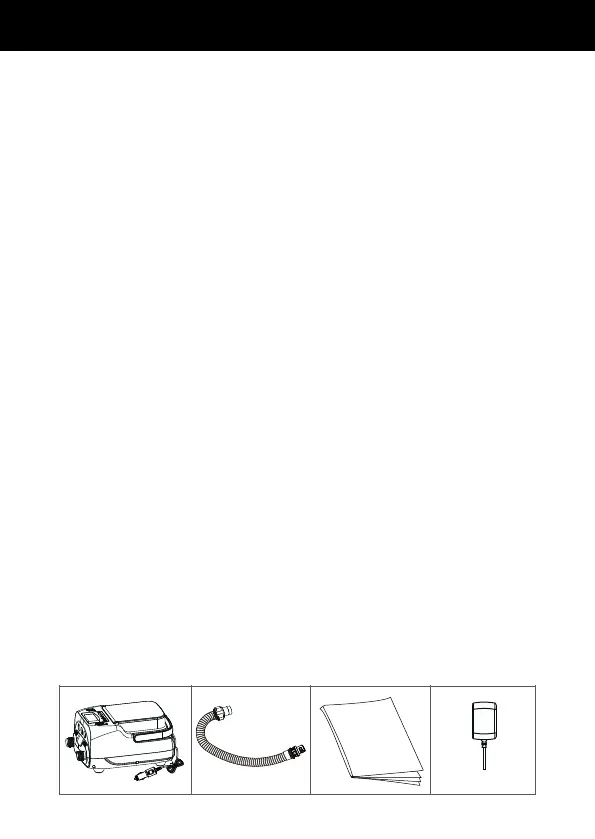
II. List of Accessories
Please make sure that the following accessories are in the box before using
it, if any missing, please contact with the local service agents
SUP ELECTRIE AIR PUMP
Air pump Hose Instruction Book
III. Details of Accessories
 Loading...