EasyManua.ls Logo

Pottery Barn Chloe - User Manual

Pottery Barn Chloe
5 pages
Print Icon
To Next Page IconTo Next Page
Loading...
1/5
Chloe Side Table
Assembly Instructions
Pre-Assembly:
Please read all instructions carefully before
beginning assembly
This table requires two people to do the assembly.
Do not fully tighten all bolts until all parts are in
place. Failure to follow these instructions may
cause the bolts to misalign or may cause difficulty
during assembly.
Use the parts and hardware lists to identify and
separate each of the components included.
Save all packing materials until the table is fully
assembled to avoid accidentally discarding any
small parts or hardware.
Parts Included:
(1) Tabletop -A (1) Shelf -B (4) Legs -C
Hardware Included:
(12) Flat Washer - D (12) Lock Washer - E (8) Allen Head Bolt
(M6 x 50 mm) - F
(1) Allen Key - G
(4) Fitting - H (4) Nut - I
(1) Allen Wrench (3mm
thickness) - J
Question and Answer IconNeed help?

Do you have a question about the Pottery Barn Chloe and is the answer not in the manual?

Summary

Pre-Assembly and Parts Identification

Pre-Assembly Guidelines

Read all instructions, ensure two people, and do not fully tighten bolts initially during assembly.

Parts and Hardware Lists

Identify and separate all included components and hardware before beginning assembly.

Chloe Side Table Assembly Steps

Attach First Leg to Tabletop

Connect one leg to the tabletop using Allen bolts and washers, tightening partially.

Connect Shelf to Leg

Attach the shelf to the pre-attached bolt on the lower part of the leg.

Attach Remaining Legs

Attach the remaining legs to the tabletop and shelf, ensuring partial tightening.

Secure Tabletop to Legs

Insert Allen bolts with washers through the tabletop apron into the legs, tightening partially.

Secure Shelf Fittings

Insert fittings, washers, and nuts onto the shelf's hanger bolts, tightening with the Allen wrench.

Final Tightening and Uprighting

Secure all connections, grip the table, and carefully turn it upright.

Assembly Completion

Confirm the assembly is complete and the table is ready for use.

Care and Maintenance

Daily Cleaning and Spill Management

Wipe with a soft damp cloth for daily cleaning and wipe up spills immediately.

Chemical Cleaning Restrictions

Avoid the use of chemicals and harsh cleaning agents for cleaning the table.

Tabletop Surface Protection

Use of trivets and coasters is recommended to protect the tabletop.

Overview

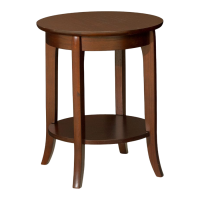
The provided document describes the assembly instructions for the Pottery Barn Chloe Side Table. This is a piece of furniture designed to serve as a side table, likely for use in living rooms, bedrooms, or other areas where a compact surface and storage are desired.

Function Description

The Chloe Side Table is a multi-component furniture item that, once assembled, provides a stable tabletop surface and an additional lower shelf for storage or display. Its primary function is to offer a convenient surface next to seating areas or beds for items like drinks, books, lamps, or decorative objects. The lower shelf enhances its utility by providing extra space, helping to keep the main tabletop clear and organized. The design appears to be a classic, round side table with three or four legs, supporting both the tabletop and the lower shelf.

Important Technical Specifications

Based on the "Parts Included" section, the table consists of the following main components:

  • (1) Tabletop - A: This is the primary flat surface of the table.
  • (1) Shelf - B: A secondary, lower flat surface for additional storage.
  • (4) Legs - C: These provide structural support, connecting the tabletop to the shelf and the floor.

The hardware required for assembly includes:

  • (12) Flat Washer - D
  • (12) Lock Washer - E
  • (8) Allen Head Bolt (M6 x 50 mm) - F: These are the main fasteners for connecting the legs to the tabletop. The specification "M6 x 50 mm" indicates a metric bolt with a 6mm diameter and 50mm length.
  • (1) Allen Key - G: A tool specifically for tightening the Allen Head Bolts.
  • (4) Fitting - H: These components are used to secure the shelf to the legs.
  • (4) Nut - I: Used in conjunction with the fittings to secure the shelf.
  • (1) Allen Wrench (3mm thickness) - J: A tool for tightening the nuts. The 3mm thickness suggests the size of the wrench opening.

The assembly process involves connecting the tabletop, legs, and shelf using these specific bolts, washers, fittings, and nuts. The use of both flat and lock washers indicates an intention to create secure connections that resist loosening over time due to vibration or movement. The requirement for an Allen key and an Allen wrench suggests that the fasteners are internal hex drive bolts and nuts, respectively.

Usage Features

The assembly instructions highlight several important usage features related to the construction and stability of the table:

  • Two-Person Assembly: The instructions explicitly state, "This table requires two people to do the assembly." This indicates that the components might be cumbersome or require simultaneous handling for proper alignment, making it difficult for a single person to assemble efficiently or safely.
  • Gradual Tightening: A crucial instruction is "Do not fully tighten all bolts until all parts are in place." This is a common practice in furniture assembly to allow for minor adjustments and alignment of components before final securing. Fully tightening prematurely can lead to misaligned holes, stress on parts, or difficulty in fitting subsequent components. The instructions repeatedly emphasize this, stating "DO NOT FULLY TIGHTEN AT THIS TIME" in steps 2 and 5.
  • Hand-Tightening First: For initial connections, users are instructed to "Use hand to screw half way then use the Allen key (G) to continue tightening." This ensures that bolts are started correctly without cross-threading and provides initial stability before full tightening.
  • Scratch-Free Work Surface: The first step advises placing the tabletop "upside down on a carpeted or scratch-free work surface." This protects the tabletop's finish during assembly.
  • Secure Connections: The final step, "Tighten and secure all connections," ensures the table's stability and durability. The instruction to "Grip the table on both ends and carefully turn upright" suggests that the table might be assembled upside down or on its side, requiring a careful flip once all connections are secure.
  • Dual-Level Storage: The presence of both a tabletop and a shelf provides versatile storage and display options, enhancing the table's functionality in various settings.

Maintenance Features

The "Care Instructions" section provides clear guidelines for maintaining the Chloe Side Table, focusing on preserving its appearance and longevity:

  • Daily Cleaning: "For daily cleaning, wipe with a soft damp cloth." This suggests a simple, non-abrasive cleaning method suitable for routine dust and light grime.
  • Immediate Spill Cleanup: "Wipe up spills immediately." This is critical for preventing stains, especially if the table's surface is made of wood or a material susceptible to liquid damage.
  • Avoid Harsh Chemicals: "Avoid the use of chemicals and harsh cleaning agents." This warns against products that could damage the finish, discolor the material, or leave residues.
  • Protection from Heat and Moisture: "The use of trivets and coasters is recommended to protect the tabletop." This is a standard recommendation for furniture to prevent damage from hot items, condensation from drinks, or scratches, indicating that the tabletop, while functional, benefits from protective measures against direct contact with extreme temperatures or moisture.

In summary, the Pottery Barn Chloe Side Table is a thoughtfully designed piece of furniture, emphasizing ease of assembly (with two people), structural integrity through specific hardware and tightening procedures, and straightforward maintenance for long-term enjoyment.

Pottery Barn Chloe Specifications

General IconGeneral
BrandPottery Barn
ModelChloe
CategoryIndoor Furnishing
LanguageEnglish

Related product manuals