The PowerSmart Electric Chipper Shredder, Model # PS12, is a robust tool designed for processing garden waste and other organic materials, turning them into mulch or compost. This instruction manual provides comprehensive details on its safe operation, assembly, maintenance, and troubleshooting.
Function Description
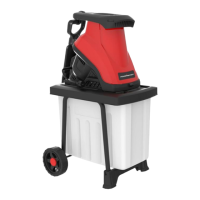
The electric chipper shredder is primarily used to reduce the volume of organic garden waste, such as branches, leaves, and other plant material. It features a loading funnel where material is fed into a cutting mechanism that shreds and chips it into smaller pieces. The processed material is then discharged into a trash can, making it easier to manage for composting or disposal. The machine is designed to handle various types of organic debris, contributing to efficient garden clean-up and waste management.
Important Technical Specifications
- Model #: PS12
- Motor: 120 V, 60 Hz, 15 A
- No load speed: 4100 RPM
- Branch diameter: 1-5/8" (45mm)
- Wheel size: 6.5" (165mm)
- Package dimensions (L x W x H): 23x15.6x19.3 inches
- Weight: 33.3 lbs
The device is a Class II construction, double-insulated tool, which means it does not require a grounded outlet. However, for safety, it is recommended to use only three-wire extension cords with 3-pronged plugs and outlets that accept the tool's plug, ensuring proper grounding.
Usage Features
The chipper shredder is equipped with several features to ensure safe and efficient operation:
- On/Off Switch: A clearly marked switch for easy control of the machine.
- Prodder: A tool supplied to safely push items into the hopper, preventing hands from coming into contact with the cutting mechanism.
- Loading Funnel: Designed for feeding organic material into the shredder. The funnel inlet should be kept clear before starting the machine.
- Discharge Chute: Where the processed material exits the machine. Users are advised to stand clear of this zone during operation and ensure it does not become clogged.
- Overload Protection: The machine is equipped with an overload switch that trips if the motor is overloaded, preventing damage. To reset, the On/Off switch must be set to "I".
- Safety Switch: Located in the motor housing, this switch prevents the motor from working if the loading funnel is not perfectly positioned or pressed against the motor housing. This ensures that the cutting mechanism is only accessible when the machine is off and unplugged.
- Wheels and Transport Handle: For easy mobility and transport of the unit around the garden.
- Trash Can: A container designed to collect the shredded material, fitting securely into the chassis.
Safety Guidelines for Usage:
- Always wear work gloves, goggles, and ear protection.
- Keep hands, feet, body, and clothing away from the hopper and discharge chute.
- Never force objects larger than the recommended diameter (1-5/8") into the hopper.
- Ensure proper balance and footing at all times; do not overreach.
- Remove any metal, rocks, bottles, cans, or other foreign objects from the material before feeding it into the shredder to prevent damage to the blades.
- If the cutting mechanism strikes a foreign object or if unusual noise/vibration occurs, turn off the machine, disconnect it from the power supply, and inspect for damage.
- Never reach into the hopper or discharge chute while the shredder is running or before it has come to a complete stop and is unplugged. The blades continue to rotate for a few seconds after being turned off.
- Do not operate on paved or gravel surfaces where ejected material could cause injury.
- Turn off and disconnect the machine when leaving the work area.
- Do not tilt the chipper shredder while it is running.
- Alternate between withered, damp material and branches to prevent clogging.
- Avoid shredding soft waste (e.g., kitchen waste) and entangled branches/leaves without prior shredding.
- Do not cover ventilation slits.
- Use the prodder to remove jammed objects from the funnel inlet. For jammed objects in the ejector opening, use a hook.
- To clear blockages, open the loading funnel by opening the release screw and remove it.
Maintenance Features
Regular maintenance ensures the longevity and optimal performance of the chipper shredder:
- Cleaning:
- Keep vent slots clean.
- Clean the plastic body and other plastic parts with a mild household cleaning agent and a damp cloth. Avoid aggressive agents or solvents.
- Never spray the shredder with water; prevent water from entering the machine.
- After use, pull the loading funnel forwards and clean the inside. Use a brush to remove deposits from metal parts.
- Apply a thin coating of oil to the cleaned blade plate and blades.
- Ensure the safety switch and release screw are clean when closing the loading funnel.
- Blade Replacement/Sharpening:
- The blades on the blade plate are replaceable. Only genuine blades should be used.
- For safety, sharpening and blade replacement should be carried out by a specialist workshop.
- Always wear heavy-duty working gloves during blade maintenance.
- To access the blades:
- Open the loading funnel by opening the release screw (Fig.13) and remove it.
- Undo the six Philips screws and remove the cover plate (Fig.14).
- Secure the rotary disk to prevent rotation (e.g., by jamming it with a screwdriver, Fig.15).
- Undo the four blade screws and remove the blades.
- Each blade can be turned once as they are ground sharp on both ends. After both ends are worn, new blades must be installed.
- Reassemble in reverse order.
- Power Cable Replacement: If the power cable is damaged, it must be replaced by the manufacturer, its after-sales service, or similarly trained personnel to avoid danger.
- Storage:
- If not used for a long period, protect it from corrosion with environmentally friendly oil.
- Store the device in a dry room, out of reach of children.
- Chassis Screws: Periodically check and tighten the chassis securing screws.
Troubleshooting
The manual includes a troubleshooting guide for common issues:
- Motor does not run:
- Possible Cause: Power failure/unit not plugged in; overload protection responded; hopper is opened.
- Solution: Check power outlet; press overload switch; ensure hopper is secured and lock knob tightened.
- Material not pulled in:
- Possible Cause: Material jammed in feed inlet; cutting blade blocked.
- Solution: Disconnect power, open hopper, remove material; disconnect power, open blade cover, remove blocked material.
- Shredding performance unsatisfactory:
- Possible Cause: Discharge chute blocked; blades worn.
- Solution: Disconnect power, open discharge chute, clear material; turn, sharpen, or replace blades.
Warranty
PowerSmart offers a Two (2) Years Limited Warranty, covering defects in material or workmanship for a period of two years from the date of purchase. This warranty is extended to the original purchaser only and applies to products used for professional or commercial use. The warranty does not cover parts subject to normal wear and tear or damage from misuse. For warranty claims or technical support, customers are advised to contact the customer service department via the provided toll-free number or email.
This comprehensive manual ensures that users can effectively and safely operate and maintain their PowerSmart Electric Chipper Shredder, maximizing its performance and lifespan.