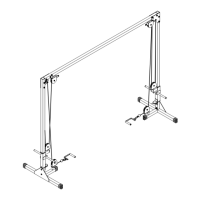
PCCO90X
STEP 1
BE CAREFUL TO ASSEMBLE ALL COMPONENTS
IN THE SEQUENCE THAT THEY ARE PRESENTED.
NOTE:
finger tighten all hardware first in this step. wrench tighten at the
end of this step. some components may be PRE-ASSEMBLED.
nylon lock nuts will not fully screw onto bolts, must wrench tighten.
1A. insert a foot cap onto each end of both base
frames (B) using a total of
6 - (#13) 50X50mm foot cap
1B. attach a pulley holder (I) to each base frame (B)
using a total of:
2 - (#7) 1/2” nylon lock nut
1C. insert a nylon bushing into the top and bottom
openings of both weight frames (D) using a total of:
4 - (#10) 60X50mm nylon bushing
1D. insert a end cap into the front openings of both
weight frames (D) using a total of
2 - (#9) 50X50mm end cap
1E. insert a round end cap into the left and right
openings of both weight frames (D) using a total of:
4 - (#11) 1” round end cap
1F. insert rubber cushion onto the lower lip of both
weight frames (D) using a total of:
2 - (#15) 50mm rubber cushion
1G. attach a mid pulley holder (H) to each weight
frame (D) using a total of:
2 - (#7) 1/2” nylon lock nut
12