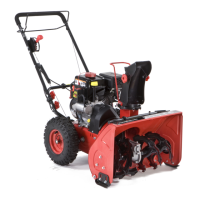
KNOW YOUR SNOW THROWER
8
A. Upper handle
B. Auger control
The auger control is adjacent to the upper handle. Squeeze the auger control against the upper
handle to engage the augers; release to disengage the augers.
WARNING: Never make adjustments to the chute assembly unless both auger and drive controls
are disengaged and the operator is standing beside the unit.
IMPORTANT: Refer to the Auger Control information in the Assembly Your Snow Blower section prior
to operating your snow thrower. Read and follow all instructions carefully and perform all adjustments
to verify your snow thrower is operating safely and properly.
C. Drive control
Located on the underside of the upper handle, the drive control is used to engage/disengage wheels.
Squeeze the drive control against the upper handle to engage the wheels; release to disengage.
D. Shift lever
The shift lever is located in the right handle and is used to determine both ground speed and direction
of travel. It can be moved into any of six positions.
Forward
Your snow blower has four forward (F) speeds, with position number one (1) being the slowest speed.
You are advised to throw snow with the slowest speed.
Reverse
Your snow blower has two reverse (R) speeds, with position number one (1) being the slowest speed.
IMPORTANT: Always releases drive control before changing speeds.
E. Lower handle
F. Chute handle
The direction of snow throwing corresponds to the direction of the chute opening. Use the chute
handle to turn the chute assembly in the direction you wish to throw the snow.
G. Chute deflector
H. Chute knob
The distance snow is thrown can be adjusted by either raising or lowering the upper chute. Loosen
the chute knob on the side of the upper chute to adjust. Pivot the upper chute to desired position, and
retighten the chute knob.
I. Clean-out tool
WARNING: Never use your hands to clear a clogged chute assembly. Shut off engine and remain
behind handles until all moving parts have stopped before unclogging.
The chute clean-out tool is conveniently fastened to the rear of the auger housing with a mounting clip.
Should snow and ice become lodged in the chute assembly during operation, proceed as follows to
safely clean the chute assembly and chute opening: