EasyManua.ls Logo

PowerTech MP-3750 - User Manual

Default Icon
2 pages
Print Icon
To Next Page IconTo Next Page
Loading...
1 2
Solar Charge Controller with 2 USB Outlets
MP-3750, MP-3752
User Manual
1. Safety Information
Read all of the instructions in the manual before installation.
DO NOT disassemble or attempt to repair the controller.
Install external fuse or breaker as required.
Do disconnect the solar module and fuse/ breakers near to battery before
installing or moving the controller.
Power connections must remain tight to avoid excessive heating from a
loose connection.
Only charge batteries that comply with the parameters of controller.
Battery connection may be wired to one battery or a bank of batteries.
Risk of electric shock, the PV and load can produce high voltages when the
controller is working.
2. Overview
PWM charge controller with USB output that adopts the most advanced digital
technique. It’s an easy operation and cost efficient controller featured as:
3-Stage intelligent PWM chargingBulk, Boost/Equalize, Float
Support 3 charging options: Sealed, Gel, and Flooded
Battery status LED indicator can indicates battery situation
Battery temperature compensation function
The USB will provide power supply that can charge for electronic equipment
Battery type and load output can be set via button
Extensive Electronic protection
3. Product Features
Mounting Hole Φ4.5
Button
PV Terminals
Battery status LED indicator
Battery Terminals
Load status LED indicator
Load Terminals
Charging status LED indicator
USB Output Port
4. Wiring
(1) Connect components to the charge controller in the sequence as shown
below and pay much attention to the “+” and “-”. Please don’t insert the fuse or
turn on the breaker during the installation.
(2) After power on the controller, check the Battery LED indicator on the
controller, it will be on solid green. Otherwise please refer to chapter 8.
Always connect the battery first, in order to allow the controller to recognize
the system voltage.
(3) The battery fuse should be installed as close to battery as possible. The
suggested distance is within 150mm.
5. LED Indicators
1) Charging and load status indicator
Indicator
Color
Status
Instruction
Charging status
LED indicator
Green
On Solid
In Charging
Green
OFF
No Charging
Green
Fast Flashing
Battery Over
Voltage
Load status LED
indicator
Green
On Solid
Load ON
Green
OFF
Load OFF
Green
Slowly Flashing
Load over load
Green
Fast Flashing
Load short circuit
2) Battery status indicator
LED2
LED3
LED4
Battery Status
×
×
×
Under voltage
×
×
×
Over discharge
Battery LED indicator status during voltage is up
×
×
12.8V U
bat
13.4V
×
13.4V U
bat
14.1V
14.1V U
bat
Battery LED indicator status during voltage is down
×
12.8VU
bat
13.4V
×
×
12.4VU
bat
12.8V
×
×
×
U
bat
12.4V
NOTE:
Voltage value for 12V system at 25, please use 2× in 24V system ;
""LED indicator on; "×"LED indicator off.
6. Setting Operation
1)Load ON/OFF Setting
When the controller is powered on, press the button to control the load
output.
NOTE: The USB will output when the load is on.
2)Battery Type Setting
Operation:
Step 1: Enter setting mode by pressing button for 5s until the battery status
LEDs are flashing.
Step 2: Select the desired mode by pressing button.
Step 3: The mode will be saved automatically without any operation for 5S and
LED will stop flashing.
Battery Type Indicator
LED1
LED2
LED3
Battery type
×
×
Sealed(Default)
×
Gel
Flooded
NOTE: ""LED indicator on "×"LED indicator off
Figure 1 Product Feature
Figure 2 Connection diagram
LED1
LED2
LED3
LED4
Question and Answer IconNeed help?

Do you have a question about the PowerTech MP-3750 and is the answer not in the manual?

Summary

Safety Information

Overview

Product Features

Wiring

LED Indicators

Charging and Load Status Indicators

Indicates charging status and load operation status via color and flashing patterns.

Battery Status Indicator

Shows battery health and voltage status through LED indicators.

Protection

Battery Over Voltage Protection

Stops charging to protect the battery from overcharging when voltage is too high.

Battery Over Discharge Protection

Stops discharging to protect the battery from deep discharge when voltage is too low.

Load Overload Protection

Switches off load when current exceeds 1.25 times rated current.

Load Short Circuit Protection

Switches off load if a short circuit occurs, protecting the controller.

Troubleshooting

Technical Specifications

Disclaimer

Package Contents

Overview

The Powertech Solar Charge Controller with 2 USB Outlets, available in MP-3750 and MP-3752 models, is a sophisticated device designed to manage power flow in solar energy systems. It utilizes advanced digital techniques to ensure efficient and reliable operation, making it an ideal choice for various off-grid applications.

Function Description

At its core, the controller acts as an intermediary between solar panels, batteries, and connected loads. Its primary function is to regulate the charging process of batteries from solar modules, preventing overcharging and over-discharging, which can significantly extend battery lifespan. The controller employs a 3-Stage intelligent PWM (Pulse Width Modulation) charging algorithm, which includes Bulk, Boost/Equalize, and Float stages. This ensures that batteries are charged optimally, maximizing their capacity and longevity.

The device supports three common battery types: Sealed, Gel, and Flooded, offering flexibility for different battery chemistries. Users can select the appropriate battery type via a simple button-press operation, ensuring the charging parameters are tailored to the specific battery in use.

Beyond battery management, the controller also provides power supply through its integrated USB output. This feature allows users to charge electronic equipment directly from the solar system, adding versatility to its applications. The USB output is active when the load is turned on, providing convenient access to power for small devices.

The controller incorporates extensive electronic protection features to safeguard both the device and the connected components. These include battery over-voltage protection, which stops charging when the battery reaches a set over-voltage disconnect threshold, and battery over-discharge protection, which disconnects the load when the battery voltage drops below a critical level. Load overload protection automatically switches off the load if the current exceeds 1.25 times the rated current, while load short-circuit protection immediately disconnects the load if a short circuit is detected. High voltage transients protection is also built-in to protect against small high voltage spikes, with recommendations for additional external suppression in lightning-prone areas.

The device is designed to automatically recognize the system voltage (12V or 24V) upon initial connection, simplifying setup. It also includes a battery temperature compensation function, which adjusts charging parameters based on ambient temperature, further optimizing battery health and performance.

Usage Features

The Powertech Solar Charge Controller is designed for ease of operation and cost-efficiency. Its user interface is straightforward, featuring LED indicators that provide clear visual feedback on the system's status.

LED Indicators:

  • Charging Status LED: A green LED indicates the charging status. A solid green light signifies that the battery is currently charging. If the LED is off, it means there is no charging activity. A fast flashing green light indicates battery over-voltage, prompting the user to check the battery condition.
  • Load Status LED: Another green LED communicates the load's status. A solid green light means the load is ON. If the LED is off, the load is OFF. A slowly flashing green light indicates a load overload, while a fast flashing green light signals a load short circuit.
  • Battery Status LEDs (LED1, LED2, LED3, LED4): These LEDs provide detailed information about the battery's voltage level. Different combinations of lit and unlit LEDs correspond to specific voltage ranges, indicating whether the battery is fully charged, partially charged, or experiencing under-voltage or over-discharge conditions. For instance, all three LEDs lit (LED1, LED2, LED3) indicate that the battery voltage is above 14.1V (for a 12V system), while LED1 flashing slowly or fast indicates under-voltage or over-discharge, respectively.

Setting Operation:

  • Load ON/OFF Setting: Users can easily control the load output by pressing a single button once the controller is powered on. This provides immediate control over connected devices.
  • Battery Type Setting: To select the battery type, the user enters a setting mode by pressing and holding the button for 5 seconds until the battery status LEDs begin flashing. Subsequent presses of the button cycle through the available battery types (Sealed, Gel, Flooded). The selected mode is automatically saved after 5 seconds of inactivity, and the LEDs stop flashing, confirming the setting.

Wiring: The wiring process is critical and must be followed carefully. Components should be connected in a specific sequence: first the battery, then the solar modules, and finally the load. This sequence is important for the controller to correctly recognize the system voltage. Attention to polarity (positive and negative terminals) is paramount to prevent damage. Fuses or breakers should be installed near the battery and solar modules for safety and should only be engaged after all connections are secure. The battery fuse, in particular, should be installed as close to the battery as possible, ideally within 150mm.

Maintenance Features

The Powertech Solar Charge Controller is designed for robust performance with minimal maintenance, but certain aspects contribute to its longevity and troubleshooting.

Troubleshooting: The manual provides a comprehensive troubleshooting guide to address common issues indicated by the LED status.

  • No Charging During Daytime: If the charging indicator turns off when there is sunshine, it suggests a PV array disconnection. The recommended action is to confirm that PV and battery wire connections are correct and tight.
  • No LED Indicator: If no LEDs are lit, the battery voltage might be below 8V, which is the minimum required to start the controller. The user should measure the battery voltage with a multi-meter; the controller requires at least 8V to power on.
  • Charging Status LED Fast Flashing: This indicates battery over-voltage. The user should check if the battery voltage is higher than the Over Voltage Disconnect (OVD) threshold and disconnect the PV array if necessary.
  • LED1 Fast Flashing: This signals battery over-discharge. When the battery voltage is restored to or above the Low Voltage Reconnect (LVR) point, the load will recover automatically.
  • Load Status LED Slowly Flashing: This indicates a load overload. Users should reduce the number of connected electrical equipment and then press the button or repower the controller to reset.
  • Load Status LED Fast Flashing: This indicates a load short circuit. Users must carefully check the load connections to clear the fault and then press the button or repower the controller.

Protection Mechanisms: The built-in electronic protections are key maintenance features as they prevent damage to the system. By automatically disconnecting loads or stopping charging under fault conditions, the controller protects the battery, solar panels, and connected devices from potential harm. Understanding these protection mechanisms helps users diagnose and resolve issues efficiently.

Environmental Considerations: The controller is designed to operate within a wide temperature range (-35°C to +55°C) and with high humidity (≤95% N.C.), making it suitable for various environments. Its IP20 enclosure provides basic protection against solid objects but does not offer water resistance, so it should be installed in a dry location.

General Safety: Users are advised to read all instructions before installation, avoid disassembling or attempting to repair the controller, and ensure all connections are tight to prevent excessive heating. Disconnecting the solar module and fuses/breakers before installing or moving the controller is a crucial safety measure.

By adhering to the usage guidelines and understanding the troubleshooting steps, users can ensure the long-term reliability and optimal performance of their Powertech Solar Charge Controller.
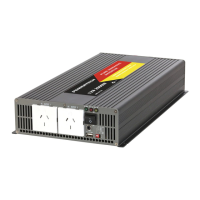
PowerTech MP-3750 Specifications

General IconGeneral
Output Wave FormPure Sine Wave
Efficiency>90%
CoolingFan Cooling
Continuous Power3000W
Peak Power3750W
Protection FeaturesOverload, Over Temperature, Short Circuit
Frequency50Hz/60Hz

Related product manuals