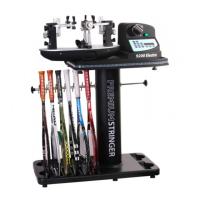
The 9200 Stringing Machine is a computerized device designed for stringing racquets. It is shipped in two cartons, one containing the electronic tension head and the other the racquet mount and accessories.
Function Description
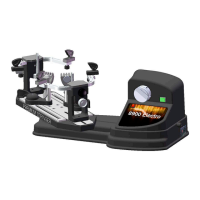
The primary function of the 9200 Stringing Machine is to precisely tension and string racquet frames. It features an electronic tension head that allows for accurate and consistent string pulling. The machine supports various racquet types, including tennis and badminton, through adjustable side supports and mounting stocks. The computerized control panel provides a user-friendly interface for setting tension, speed, and pre-stretch values, ensuring optimal stringing performance.
Important Technical Specifications
- Input Voltage: 100V-120V 50HZ-60HZ (for the US market). Voltage between 220V and 230V (50 Hz to 60 Hz) is also acceptable for other regions.
- Fuse: 2A, located in the power cord receptacle.
- Tension Range: Displayed in KG or LB, adjustable in increments of +/-1.0 or +/-0.1.
- Pre-Stretch Settings: 0%, 10%, and 20%.
- Speed Settings: High, Mid, and Low.
- Stringing Patterns: Knot, Main, and Cross.
Usage Features
Installation:
- Tension Head Placement: Carefully lift the tension head assembly from its carton and place it on a hard surface or table.
- Racquet Mount Attachment: Remove the four Allen bolts from the bearing pivot of the tension head assembly using a 5mm wrench. Then, lift the racquet mount assembly from its carton and place its turntable into the bearing pivot. Insert the four Allen bolts into the turntable holes and tighten them evenly with the 5mm wrench.
Mounting the Racquet Frame:
- Side Supports: Insert the four side supports into the holes of the side support arms. Tighten them by turning the knobs, ensuring washers are beneath. The large jaw is for tennis racquets, and the small jaw is for badminton racquets.
- String Clamps: Insert the two string clamps into their respective string clamp bases.
- Mounting Stocks Adjustment: Loosen both mounting stocks by turning their locking handles to the right. Adjust the distance between them to fit the racquet frame. Turn the handles to the left to lock them in place.
- Center Support Adjustment: Select the appropriate adapter and mount it on the center support. Place the racquet frame on both mounting stocks. Turn the knobs at the top of each mounting stock clockwise until snug against the frame, with slight resistance felt.
- Side Support Adjustment: Turn the knobs at the bottom of each mounting stock clockwise to bring the side supports into contact with the racquet frame at all four points.
- Brake Operation: To release the turntable brake, turn the brake knob counterclockwise. To lock the turntable, turn the brake knob clockwise.
Powering the Machine:
- Power Cord Connection: Insert the female end of the power cord into the Power Cord Socket on the side panel. Plug the male end into a grounded power outlet.
- Main Power Switch: The main power switch is located to the right of the machine, next to the power cord receptacle.
Control Panel Operation:
- KG/LB Conversion: Press the "KG/LB" key to toggle the tension display between pounds (LB) and kilograms (KG).
- SPEED Selection: Press the "SPEED" key to enter speed mode. Each press cycles through HI SPEED, MID SPEED, and LOW SPEED. Return to the main screen by pressing "KNOT," "MAIN," or "CROSS." The selected speed will be abbreviated as H, M, or L on the screen.
- PRE-STRETCH Selection: Press the "PRE-STRETCH" key to enter pre-stretch mode. Each press cycles through 0%, 10%, and 20% pre-stretch. Return to the main screen by pressing "KNOT," "MAIN," or "CROSS." The selected pre-stretch value will be abbreviated as 0, 1, or 2.
- Memory Key (M): Press "M" to store the current tension setting. If not pressed, the machine automatically stores the setting after 3 seconds, indicated by a beep.
- Clear Key (C): Press "C" to revert to the previous tension setting. This is only available before the new setting is stored.
- Tension Index Keys (+/- 1.0, +/- 0.1): Use these keys to adjust the tension setting in increments of +/-1.0 or +/-0.1 Lb or Kg. Holding the keys down will scroll the values.
- Start Pulling Key (START): Press "START" to begin pulling the string. Alternatively, press the green tensioning switch next to the string gripper.
- Reversing Key (R): Press "R" to release the string. Alternatively, press the green tensioning switch next to the string gripper.
Tension Setting Modes:
- KNOT Tension: Press "KNOT" to increase the pulling tension by 10% over the selected MAIN or CROSS tension for a single pull. The screen will display "KNOT [tension] lbs" (e.g., "KNOT 66.0 lbs"). After one pull, it reverts to the previous MAIN or CROSS tension.
- MAIN Tension: Press "MAIN" to set the main string tension. Use the +/-1.0 or +/-0.1 keys to adjust the desired tension. Press "M" or wait 3 seconds to store the setting.
- CROSS Tension: Press "CROSS" to set the cross string tension. Use the +/-1.0 or +/-0.1 keys to adjust the desired tension. Press "M" or wait 3 seconds to store the setting.
Tensioner Operation:
- Stringing: Pass the string over the top of the string gripper, wrap it clockwise around the gripper drum, and position it between the gripper jaws.
- Activate Tensioner: Press the green tensioning switch next to the string gripper or the "START" key on the control panel.
- Release String: After clamping, press the green tensioning switch again or the "R" key on the control panel to release the string.
Swivel Clamp Operation:
- Adjustment: Different strings and gauges require adjustment. This is typically done with fingertips. Lift the handle of the swivel clamp before making adjustments.
Swivel Clamp Base Operation:
- Locking/Unlocking: Turn the lever on the swivel clamp base clockwise to lock it and counterclockwise to unlock it.
- Adjustment: If the clamp base does not lock securely or the locking angle is too wide, adjust the nut beneath the clamp base with a 17mm wrench (clockwise or counterclockwise).
Maintenance Features
- Fuse Replacement: A 2 amp fuse is located in the power cord receptacle and can be replaced if needed.
- Swivel Clamp Base Adjustment: The nut beneath the swivel clamp base can be adjusted with a 17mm wrench to ensure proper locking to the turntable.