

U
umarshallSep 23, 2025
How to fit the module into the slot of my Prestan Fitness Equipment?
- MMr. Edward HullSep 23, 2025
If the module will not fit into the slot of your Prestan Fitness Equipment, rotate the module 180 degrees, and it should fit.
How to fit the module into the slot of my Prestan Fitness Equipment?
If the module will not fit into the slot of your Prestan Fitness Equipment, rotate the module 180 degrees, and it should fit.
What to do if Prestan PP-AEDT-101 delivers shock before shock button is pressed?
If your Prestan Fitness Equipment delivers a shock before the shock button is pressed, it is likely in Automatic mode. Change it back to Semi-Automatic Mode.
Why Prestan PP-AEDT-101 Fitness Equipment remote buttons do not work?
If the remote buttons on your Prestan Fitness Equipment do not work, consider the following: * Ensure the AED Trainer is on before using the remote. * Point the remote directly at the AED Trainer. * Operate the remote within the specified distance (9 feet/3 meters). * Check the orientation of the batteries in the remote. * Replace the batteries in the remote.
Why Prestan PP-AEDT-101 lid will not stay closed?
If the lid of your Prestan Fitness Equipment will not stay closed, it might be because the pads case is not placed in the proper position (re-seat the pads case); the wires are not properly stored in the compartment under the case, potentially being caught under the edge of the pads case (re-coil the wires); or the pads case front and back are not properly closed (snap the case together on all 4 corners).
What to do if Prestan PP-AEDT-101 Fitness Equipment prompts 'Replace Batteries'?
If your Prestan Fitness Equipment prompts 'Replace Batteries', replace the batteries within 10 hours, as the device will run for 10 or more hours with low batteries.
Why does Prestan Fitness Equipment start analyzing before both pads are placed on the manikin?
If the Prestan Fitness Equipment device proceeds to analyzing before both pads have been placed on the manikin, re-position the pad in the case to lay completely flat so it is not touching the side walls.
What to do if Prestan PP-AEDT-101 will not advance to analysis even though both pads are attached?
If both pads are attached to the manikin, but the Prestan Fitness Equipment device will not advance to analysis, check the following: * Ensure the pad is not inserted upside down in the cable connector. If it is, push out the black connector pin, flip the pad around, and re-secure it with the black connector pin. * Make sure the pads are pressed on firmly, specifically ensuring that the sensor in the center of the adhesive is touching a surface. * Consider that the adhesive may be worn out. Replace the pad, as they typically last for 50-60 uses.
How to fix Prestan PP-AEDT-101 lid if it will not stay closed?
If the lid of your Prestan Fitness Equipment will not stay closed, try the following: * Re-seat the pads case. * Re-coil the wires neatly. * Ensure you snap the case together on all 4 corners.
What to do if my Prestan PP-AEDT-101 does not turn on?
If your Prestan Fitness Equipment unit doesn't turn on, try the following: * Push the green power button. * Ensure the module is properly inserted or re-insert it. * Check and correct the batteries' orientation. * Replace the batteries with new ones.
Why Prestan Fitness Equipment device proceeds to analyzing before both pads have been placed on the manikin?
If your Prestan Fitness Equipment proceeds to analyzing before both pads have been placed on the manikin, re-position the pad in the case to lay completely flat so it is not touching the side walls, as the pads are not properly positioned in the case.
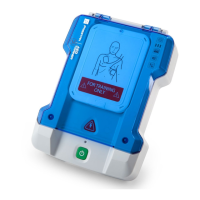
Details contents for Prestan Professional AED Trainer models PP-AEDT-101 and PP-AEDT-401.
Warns against misuse and confusion with real AEDs, emphasizing it does not deliver a shock.
Provides contact information for issues, questions, and ordering additional products.
Highlights voice prompts, manikin detection, training scenarios, metronome, and shock delivery modes.
Details the flip-up lid, illuminated shock button, on/off button, and overall control panel.
Describes the protective pad case, high-performance pads, and unique pad connector.
Covers long battery life and water/splash resistance for enhanced usability.
Details items included in the PP-AED-100 (single) and PP-AED-400 (four pack) models.
Instructions for contacting the distributor if any parts are missing from the package.
Labels the main components on the front of the AED Trainer unit.
Steps for unpacking the trainer, its module, and connector pins from the shipping container.
Guide for assembling training pads and removing connector pins from cables.
Instructions on correctly inserting pads into cable connectors, ensuring proper alignment.
Steps for removing the clear plastic liner from the AED pads and preparing the pad case.
Instructions for adhering pads to the inside of the pad case and coiling/storing cables.
Identifies buttons on the control panel: Language, Indicator Lights, Scenario, Volume, Pause.
Explains how to use the button to toggle between English and Spanish language modes.
Describes the meaning of red/yellow lights for scenario selection and shock delivery modes.
Details how to select one of five training scenarios using the button and indicator lights.
Explains adjusting volume levels and pausing/resuming training scenarios.
Instructions on how to change the trainer between Semi-Automatic and Automatic shock modes.
Explains how to identify the current mode (Semi-Automatic or Automatic) via indicator lights.
Guidelines for cleaning the AED Trainer with a damp cloth, avoiding submersion in water.
Details the functions of the optional remote control, including volume, language, and scenario.
Specifies battery requirements for the PP-AEDT-100-R and PP-AEDT-400-R remotes.
Addresses problems with module insertion and the unit not turning on, with solutions.
Solutions for issues with peeling pad liners, pad detachment, and lid closure.
Troubleshooting for premature analysis and remote control malfunctions.
Addresses device prompts for battery replacement and remote button non-responsiveness.
Details the manufacturer's limited warranty for defects in workmanship or materials.
Specifies the one-year warranty period and the manufacturer's repair/replacement obligations.
Outlines circumstances negating the warranty and limitations on implied warranties and damages.
Provides contact information for warranty service and mentions state-specific rights.
| Audio Instructions | Yes |
|---|---|
| Product Type | AED Trainer |
| Power Source | Battery Powered |
| Languages | English |
| Included | AED Trainer, Adult/Child Training Pads |
| Type | Automated External Defibrillator (AED) Trainer |