2
BEFORE FIRST USE
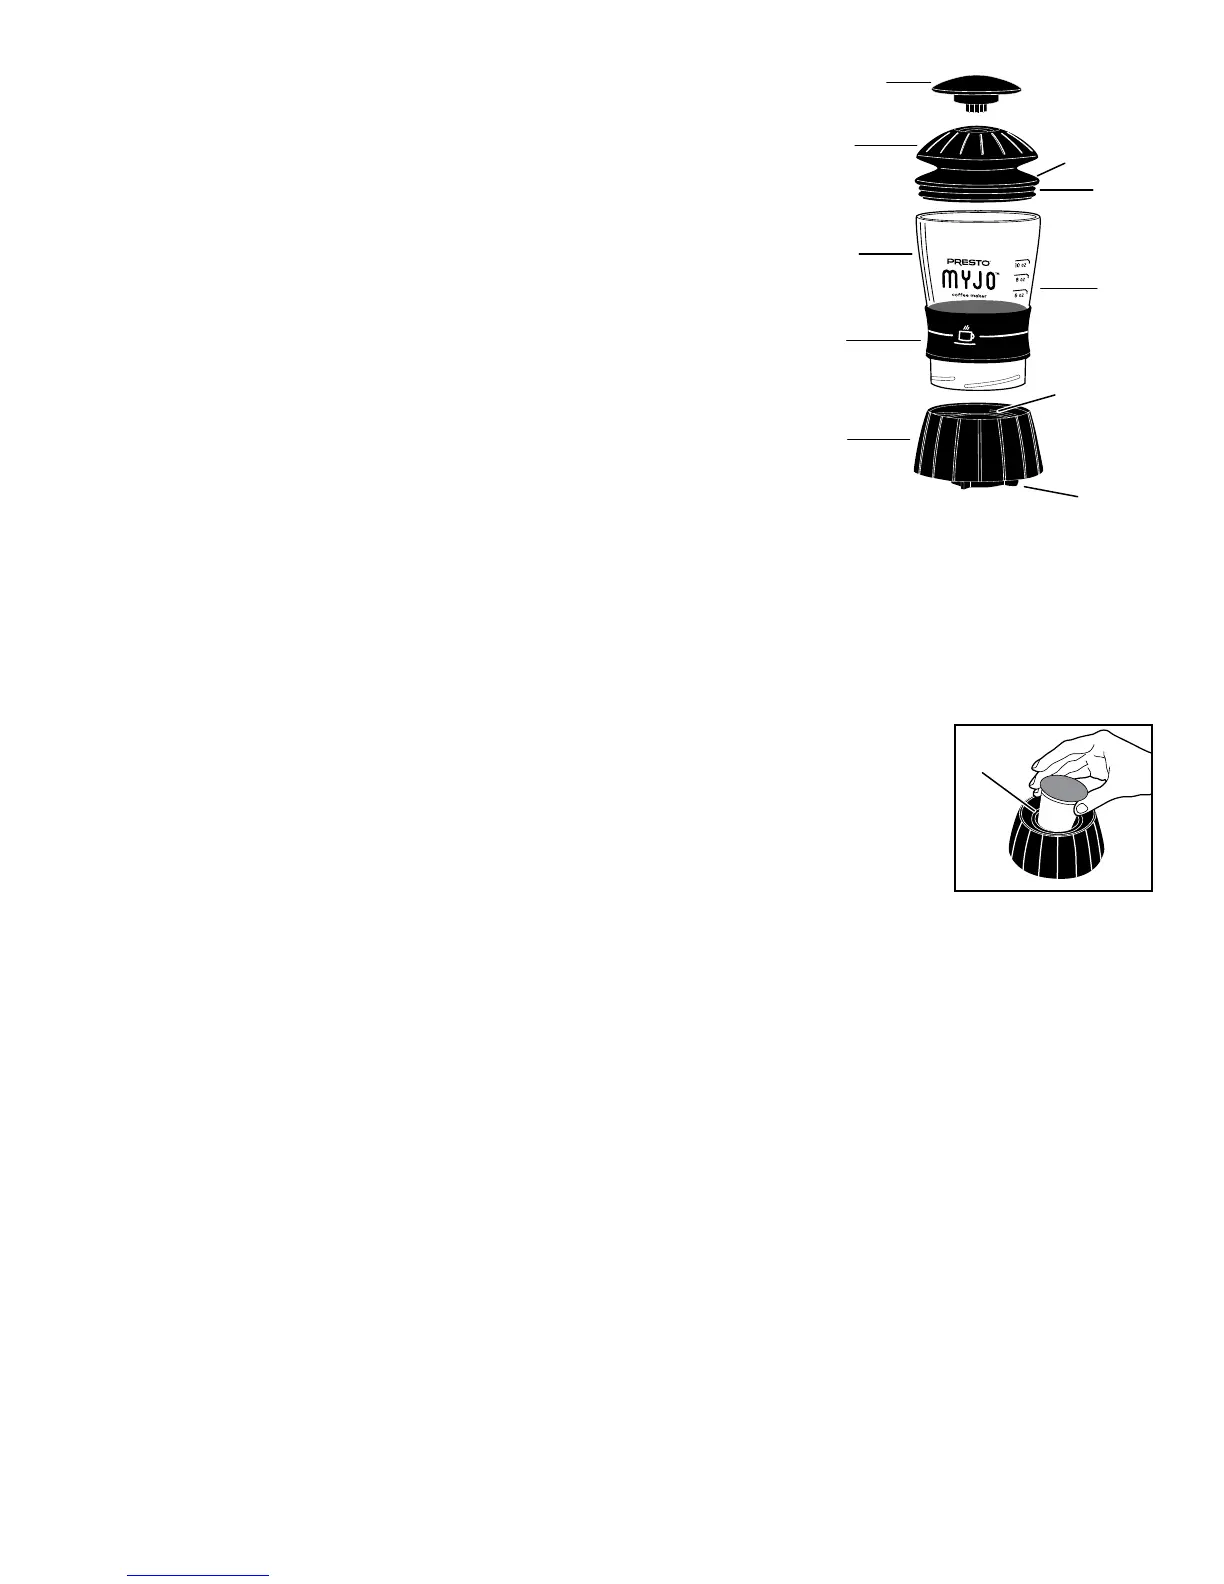
1. BecomefamiliarwiththeMyJo
™
coffeemakerparts(Fig.A)andreadthefollowing
information.
2. Unscrewthebasefromthereservoir.Thenpulloutthepumpfromthereservoirand
removeallcontentsfrominsidethereservoir.
3. Washthecoffeemakerpartsinwarm,soapywater.Rinsethoroughlytoremoveany
soapresidue.Do not wash the MyJo
™
coffee maker in the dishwasher.
Caution!Thereisasharpneedleinthepackholderwhichisdesignedtopuncture
thesingleservepack.Topreventinjury,donotplacengersinthepackholder.
HOW TO USE
To prepare coffee or tea, follow the instructions below.
(To prepare hot cocoa and other beverages, refer to the instructions on page 3 before
beginning.)
TheamountofwaterusedwithyourMyJo
™
coffeemakerwilldeterminethestrength
ofyourcoffeeortea.Fortherstuse,llthewaterreservoirtothelllinessuggested
below:
•Fornormalstrengthcoffeeortea,lltothe8-ouncelinewithwater.
•Forstrongercoffeeortea,lltothe6-ouncelinewithwater.
•Forweakercoffeeortea,lltothe10-ouncelinewithwater.
Forsubsequentuses,adjustthestrength,ifnecessary,bysimplyincreasingordecreasingtheamountofwaterasdesired.
NOTE: Thelllinemarkingsprovidethenecessarywatertoproduce6,8,and10ouncesofbrewedcoffeeortea.
1. Place a single serve pack into the pack holder (Fig. B).Pressdownrmlyonthesingleservepackun-
tilthebottomofthepackispunctured.Caution!Thereisasharpneedleinthepackholder.Toprevent
injury,donotplacengersinthepackholder.
2. Heat the water and assemble the unit using one of the following methods:
A. Microwave:
• Fillthewaterreservoirwiththedesiredamountofwater.
• Placethelledreservoirinthemicrowave.Be sure the base is not attached to the reservoir, as the
base is not microwave safe.Heatthewatertothedesiredtemperature.Caution!Whenhandlingthereservoircontaininghot
water,alwaysgrasptheredgripastheotherportionsofthereservoirwillbeveryhot.
• Pushthepumpcapontothetopofthepump.
• Attachthepumptothereservoir.Inserttheridgedportionofthepumpintothereservoir,pressingaroundthepumpedgeuntil
thepumpisattachedrmlytothereservoir.IMPORTANT:Pressonlythepumpedge.Donotpressthepumpcaporpump.
• Grasptheredgriponthelledreservoirandplacethereservoirontothebase.Screwonclockwiseuntiltight.
B. Tea Kettle:
• Useanelectricorstovetopteakettleandheatwatertothedesiredtemperature.
• Attachthebasetothereservoirpriortollingitwithwater.Screwthereservoironclockwiseuntiltight.Then,placetheunit
onadry,levelsurfaceandcarefullyllthereservoirwiththedesiredamountofheatedwater.Caution!Donotholdontothe
reservoirwhenpouringhotwaterintoit.
• Pushthepumpcapontothetopofthepump.
• Attachthepumptothereservoir.Inserttheridgedportionofthepumpintothereservoir,pressingaroundthepumpedgeuntil
thepumpisattachedrmlytothereservoir.IMPORTANT:Pressonlythepumpedge.Donotpressthepumpcaporpump.
3. Brew
•TheMyJo
™
coffeemakerisdesignedtotonmostcoffeemugs.Verifythatyourmugistherightsizebeforepumpingyourcoffee.
Theribsonthebottomofthebaseshouldtwithintheinsiderimofyourmug.Thediameteroftheinnerrimofthemugshouldbe
atleast2¼˝butnotmorethan3¾˝wide.Youshouldalsomakesureyouselectamugwhichistheappropriatesizefortheamount
ofcoffeeorteayouarebrewing.
Pump cap
Pump
Water
ll lines
Water
reservoir
Base
Fig. A
Reservoir
grip
Pack holder
Ridged
portion
Base ribs
Pump edge
Fig. B
Pack
holder
 Loading...