Do you have a question about the PROAIM Sr. Pan Tilt Head and is the answer not in the manual?
Ensure the head is securely attached with all knobs tightened to prevent damage to equipment and crew.
Proper camera balance is crucial; if unbalanced, both axes will not function correctly.
Manual movement can permanently damage the motor gearbox due to the reduction drives holding each axis.
Leave slack in the cable between head and controller to avoid tension, which can damage it during crane movement.
Keep body parts away from movable elements when the controller is on to prevent injury.
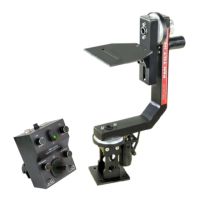
Attach the Sr. Pan Tilt Head to the mounting plate, aligning screw holes, and tighten securely.
Connect the 12V DC power (4-pin XLR) to the joystick controller socket. Ensure correct polarity.
Connect the 4-pin power cable to the controller and then attach the motor cables.
Connect the 4-pin male head cable connector to the 4-pin female head connector for panning and tilting.
The power control knob adjusts speed; turning right increases power, left decreases it for precise movements.
Explains linear and logarithmic joystick taper, allowing fine slow movements or quick full range.
Reverses tilt direction, useful when shifting the head between tripod and jib mounting.
Reverses pan direction, useful when shifting the head between tripod and jib mounting.
Controls the damping effect of the joystick interface with the head's pan/tilt action.
After camera setup, switch on the power on the Joystick Controller to begin operation.
For inverted use, disconnect motor leads, rotate the control box 180°, and reinstall.
Always monitor cables during operation to prevent binding, which can damage them or the equipment.
| Pan Range | 360° |
|---|---|
| Construction | Aluminum |
| Material | Aluminum |
| Bubble Level | Yes |
| Quick Release Plate | Yes |
| Tilt Range | 360° |
| Control Type | Wired Remote |
| Power Supply | 12V DC |