EasyManua.ls Logo

Promaster 2016 User Manual

Promaster 2016
14 pages
To Next Page IconTo Next Page
Page #1 background imageLoading...
Page #1 background image
2016 & 2017 PROMASTER REAR SPEAKER
INSTALLATION
Speaker Installation
Rear speakers can be added to the ProMaster. There are different requirements for
adding rear speakers depending on the radio that the vehicle is equipped with. Sales
code BC3 (up fitter interface connector) is required regardless of the radio. It provides
a way to connect the speakers to the electrical system. The up fitter connectors can be
found at the base of the passenger side B pillar behind a trim panel. See ProMaster
BBG “UPFITTERS RADIO CONNECTOR” document under the
“ELECTRICAL/WIRING INFORMATION” heading for more detail regarding the
connections. To add rear speakers to a vehicle with UA1 (2017 only) or RA2 radios,
the vehicle must have been built with sales code RED. (Rear speaker wiring prep)
RED will ensure proper configuration of the vehicle electronics that will allow the
speaker outputs to be enabled. RED is packaged with BC3. BC3 is included when
RED is ordered.
Standard AM, FM, MP3 Radio - RH3
ProMaster vans equipped with the RH3 radio are shipped from the factory with the
fader control set to full front as the vehicle does not come equipped with rear speakers.
If the fade is set to the rear with no rear speakers connected, little to no sound would be
heard. To add rear speakers to vehicles with this radio option, connect the speakers to
the vehicle’s electrical system and shift the fade setting more towards the rear until the
desired front/rear bias is achieved.
Optional AM, FM, UConnect 3.0 - UA1
(2017 Only)
ProMaster vans equipped with the UA1 radio are shipped from the factory with the
rear speakers turned off as the vehicle does not come equipped with rear speakers. If
the speakers were turned on with no speakers connected, diagnostic routines in the
radio would set rear speaker faults. If rear speakers are added, they must be enabled by
accessing the Loudspeaker Setting screen in Engineering Mode menu in the radio.
Page 1 of 14
Question and Answer IconNeed help?

Do you have a question about the Promaster 2016 and is the answer not in the manual?

Promaster 2016 Specifications

General IconGeneral
BrandPromaster
Model2016
CategoryCar Speakers
LanguageEnglish

Summary

Rear Speaker Installation Overview

Standard AM, FM, MP3 Radio (RH3)

RH3 Initial Setup and Connection

Explains initial fader setting and speaker connection advice for RH3 radio.

Entering Engineering Mode for RH3

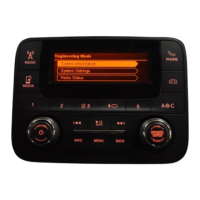
Press RADIO, MEDIA, BROWSE/ENTER buttons to access the Engineering Mode menu.

Navigating RH3 System Settings

Use the Tuning Dial to scroll down and highlight SYSTEM SETTINGS.

Accessing Loudspeaker Settings (RH3)

Press BROWSE/ENTER, then scroll to and highlight LOUDSPEAKER SETTINGS.

Selecting Speaker Base Configuration (RH3)

Highlight and select "Crew Cab 6 speaker base" for rear speaker enablement.

Confirming Speaker Configuration (RH3)

Press BROWSE/ENTER to check the "Crew Cab 6 speaker base" option.

Finalizing RH3 Rear Speaker Enablement

Exit Engineering Mode, power cycle, and verify FADE option is available.

Optional AM, FM, CD, Nav, Sirius/XM, UConnect 5.0 Radio (RA2)

RA2 Initial Setup and Enabling

Outlines need to enable rear speakers via alternate engineering menu for RA2 radio.

Entering Alternate Engineering Mode (RA2)

Press RADIO, MEDIA, then BROWSE/ENTER to enter the Engineering Mode.

Accessing AUD Eng Menu (RA2)

Navigate to and select the AUD Eng Menu option.

Selecting Car Layout for RA2

Scroll to find and select layout 8(0x08) for Front and Rear Speakers.

Confirming RA2 Speaker Configuration

Confirm the selection by touching the OK line.

Finalizing RA2 Rear Speaker Enablement

Exit Engineering Mode, power cycle, and verify Balance/Fade screen.