Cam 1
Adjust Cam 3 (SW3 -- CW auxiliary switch)
1. The THIRD cam is Cam 3, the CW auxiliary switch (SW3) cam. When the
actuator is in its CW position set this cam. Use a 2.5mm hex key to free up the
cam set screw. Once it is free, rotate the hex key to the RIGHT 10-15 degrees
to reset the switch roller arm. Then snug the set screw up against the camshaft
(CW) until slight pressure is felt. Then SLOWLY rotate the hex key and cam to
the LEFT until you hear the “click” on the third switch. Continue to rotate the
cam between 3 and 5 degrees to the LEFT to make sure the auxiliary cam
switch changes state before the actuator reaches its end of travel electrically.
Tighten the cam set screw.
Adjust Cam 4 (SW4 -- CCW auxiliary switch)
1. The FOURTH cam is Cam 4, the CCW auxiliary switch (SW4) cam. When the
actuator is in its CCW position set this cam. Use a 2.5mm hex key to free up
the cam set screw. Once it is free, rotate the hex key to the LEFT 10-15 degrees
to reset the switch roller arm. Then snug the set screw up against the camshaft
(CW) until slight pressure is felt. Then SLOWLY rotate the hex key to the RIGHT
until you hear the “click” on the fourth switch. Continue to rotate the cam between
3 and 5 degrees to the RIGHT to make sure the auxiliary cam switch changes
state before the actuator reaches its end of travel electrically. Tighten the cam set
screw.
Cam 3
Cam 4
COM
NO
NC
CLOSED
LIMIT
SWITCH
LESS
CLOSED
FURTHER
CLOSED
COM
NO
NC
OPEN
LIMIT
SWITCH
LESS
OPEN
FURTHER
OPEN
COM
NO
NC
CW LIMIT SWITCH
LESS
CW
FURTHER
CW
COM
NO
NC
CCW LIMIT SWITCH
LESS
CCW
FURTHER
CCW
COM
NO
NC
CLOSED
LIMIT
SWITCH
LESS
CLOSED
FURTHER
CLOSED
COM
NO
NC
OPEN
LIMIT
SWITCH
LESS
OPEN
FURTHER
OPEN
COM
NO
NC
CW LIMIT SWITCH
LESS
CW
FURTHER
CW
COM
NO
NC
CCW LIMIT SWITCH
LESS
CCW
FURTHER
CCW
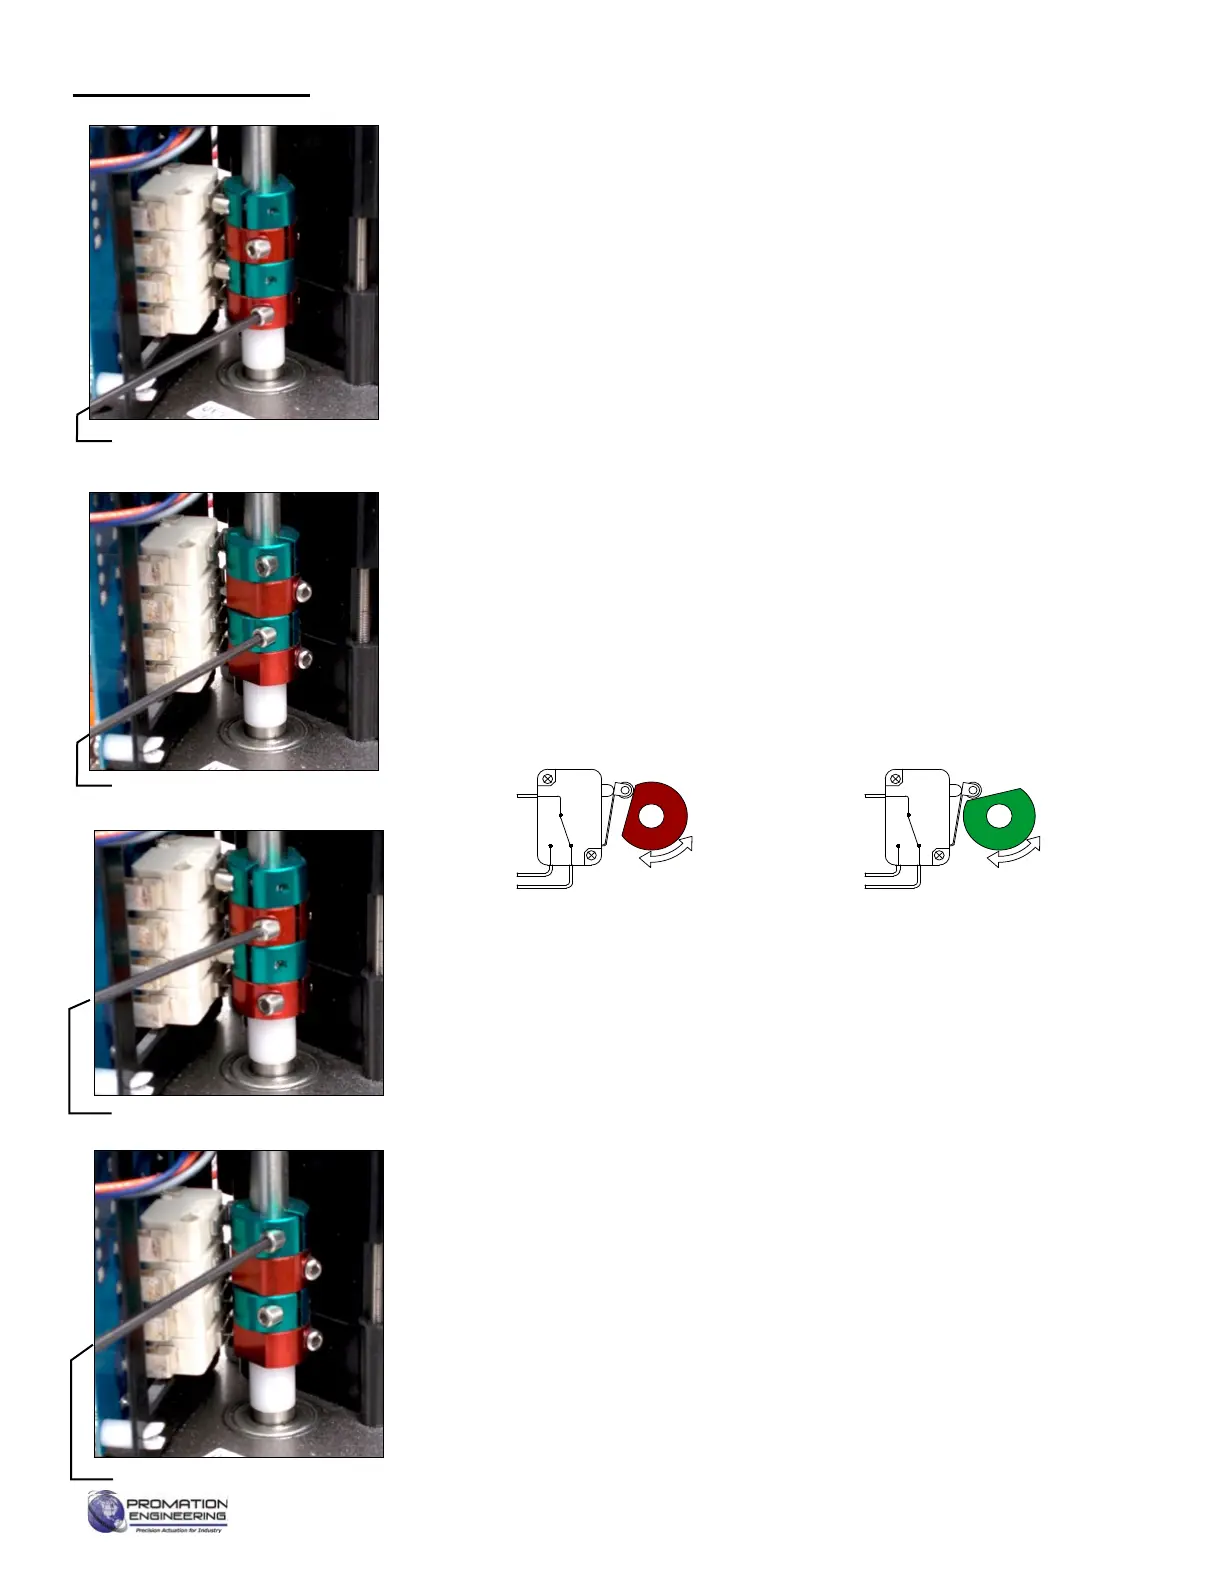
Adjust Cam 1 (SW1 -- CW limit switch)
1. The lowest cam is Cam 1, the CW limit switch (SW1) cam. Once the actuator is
at its required CW position turn POWER OFF. Use the handwheel to drive more
CW by 1-2°. Use a 2.5mm hex key to free up the cam set screw. Once it is free,
rotate the hex key to the RIGHT 10-15 degrees to reset the switch roller arm.
Then snug the set screw up against the camshaft (CW) until slight pressure is
felt. Then SLOWLY rotate the hex key pushing the cam to the LEFT until you
hear the “click” on the bottom switch indicating that correct adjustment has been
achieved. Tighten the set screw.
2. Use the handwheel to
check to be sure this is the correct CW position you require
(refer to Page 6). Repeat step 1 if further adjustment is needed.
Adjust Cam 2 (SW2 -- CCW limit switch)
1. The second cam is Cam 2, the CCW limit switch (SW2) cam. Once the actuator
is at its required CCW position turn POWER OFF. Use the handwheel to drive
more CCW by 1-2°. Use a 2.5mm hex key to free up the cam set screw. Once
it is free, rotate the hex key to the LEFT 10-15 degrees to reset the switch roller
arm. Then snug the set screw up against the camshaft (CW) until slight pressure
is felt. Then SLOWLY rotate the hex key pushing the cam to the RIGHT until you
hear the “click” on the second switch indicating that correct adjustment has been
achieved. Tighten the set screw.
2. Use the handwheel to
check to be sure this is the correct CCW position you
require (refer to Page 6). Repeat step 1 if further adjustment is needed.
Listed here for reference. Mechanical stops must be out before
changing cam settings. Proceed ONLY if adjustments are required.
Cam 2
Cam Adjustments
Page 7 of 17 P2/3 12 24 VDC Proportional Series
FM_P28 24 PN4-DC Ver E 080223
 Loading...