English - 18 -
Now/Next Schedule
In this layout option, only the current and next events
of the listed channels will be displayed. You can use
the directional buttons to scroll through the list of the
events.
Press Back/Return button to use available tab options.
Highlight Filter tab and press OK
options. To change the layout highlight Timeline
Schedule and press OK.
Event Options
Use the directional buttons to highlight an event
and press OK button to display Options menu. The
following options are available.
Select Channel: Using this option, you can switch
to the selected channel in order to watch it. The
programme guide will be closed.
More Info: Display detailed information on the selected
event. Use up and down directional buttons to scroll
through the text.
Set Timer on Event / Delete Timer on Event: Select
Set Timer on Event option and press OK. You can set
timers for future events. To cancel an already set timer,
highlight that event and press the OK button. Then
select Delete Timer on Event option. The timer will
be cancelled.
Record / Delete Rec. Timer:
Select the Record
option and press the OK button. If the event is going
to be broadcasted at a future time, it will be added
to Timers list to be recorded. If the selected event is
being broadcasted at the moment, recording will start
immediately.
To cancel an already set record timer, highlight that
event and press the OK button and select the option
Delete Rec. Timer. The record timer will be cancelled.
IMPORTANT: Connect a USB disk to your TV while the TV
is switched o. You should then switch on the TV to enable
the recording feature.
Notes: You cannot switch to any other channel while there is
an active recording or timer on the current channel.
It is not possible to set timer or record timer for two or more
individual events at the same time interval.
Teletext Services
Press the Text button to enter. Press again to activate
mix mode, which allows you to see the teletext page
and the TV broadcast at the same time. Press once
more to exit. If available, sections in the teletext pages
will become colour-coded and can be selected by
pressing the coloured buttons. Follow the instructions
displayed on the screen.
Digital Teletext
Press the Text button to view digital teletext information.
Operate it with the coloured buttons, cursor buttons
and the OK
depending on the contents of the digital teletext. Follow
the instructions displayed on the digital teletext screen.
When the Text button is pressed again, the TV returns
to television broadcast.
Software Upgrade
automatically via the broadcast signal.
Software upgrade search via user interface
On the main menu select Settings>System and then
More. Navigate to Software upgrade and press the
OK button. Then select Scan for upgrade and press
OK button to check for a new software upgrade.
If a new upgrade is found, it starts to download the
upgrade. After the download is completed, a warning
will be displayed, press OK button to complete software
upgrade process and restart TV.
3 AM search and upgrade mode
if Automatic scanning option is set to Enabled and
if the TV is connected to an aerial signal. If a new
software is found and downloaded successfully, it will
be installed at the next power on.
Note: Do not unplug the power cord while led is blinking during
the reboot process. If the TV fails to come on after the upgrade,
unplug, wait for two minutes then plug it back in.
All updates are automatically controlled. If a manual search
is carried out and no software is found then this is the current
version.
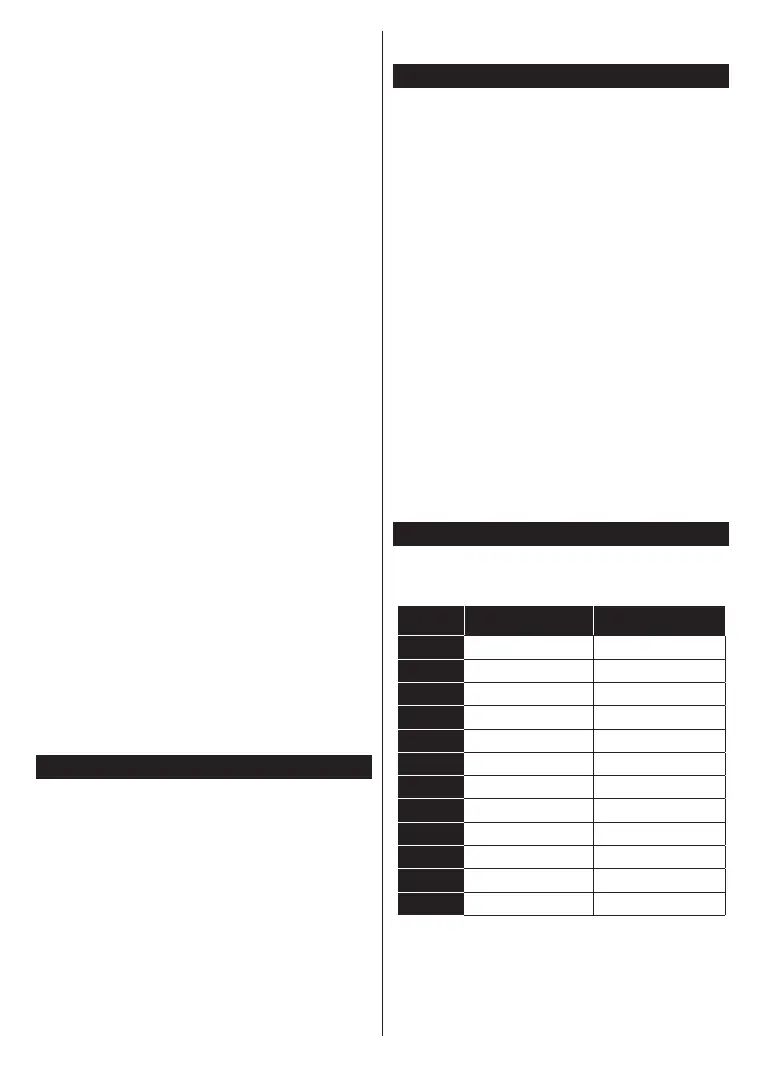
PC Input Typical Display Modes
The following table is an illustration of some of the
typical video display modes. Your TV may not support
all resolutions.
Index Resolution Frequency
1 640x480 60 Hz
2 800x600 56 Hz
3 800x600 60 Hz
4 1024x768 60 Hz
1024x768 66 Hz
6 1280x768 60 Hz
7 1280x960 60 Hz
8 1280x1024 60 Hz
9 1360x768 60 Hz
10 1400x1050 60 Hz
11 1600x1200 60 Hz
12 1920x1080 60 Hz