EasyManua.ls Logo

Proteco Q60S User Manual

Proteco Q60S
6 pages
To Next Page IconTo Next Page
Page #1 background imageLoading...
Page #1 background image
ButtonBButtonBButtonBButtonBButtonB
PC
P
C
Showstoredcodes
New remote control
code acquisition
Remotecontrolcode
acquisitionwith
STOPfunction
Remotecontrolcode
acquisitionwith
PEDESTRIANfunction
DeleteALLremote
controlcodes
FUNCTIONSCODE
DISPLAY
8. 8.
Decrease time
or change to NO
BUTTON A
BUTTON B
BUTTON C
BUTTON D
A
B
SI
NO
C
D
_
+
Move from the top
level menu to the lower
level menu
Cycle round the top
level menu
Increase time
or change to YES
I
IF
I
F
ButtonB
Motorworkingtime
099
21
Motortorque
819
14
Motor
Decelerationtime
0(N1-2”)
6
19Motorpowerduring
Deceleration
1019
ButtonBButtonB ButtonB
VALUESTIMES
FUNCTIONS
CODE
P
Delaytimebefore
automaticclosing
099
3
ButtonB
P
Pedestrian
openingtime
099(N1-1)
7
ButtonB
Photocellstest
SOFTSTART
YES
YES
Motor test YES
Multioccupation NO
Decelerationon YES
Automaticclosing
stepbystep
YES
Preblinking NO
2P
ButtonB
ButtonB
E
P
ButtonB
4P
ButtonB
6
6
P
Button B
7P
ButtonB
8P
P
ButtonB ButtonB
US
ButtonB
P
A
A
ButtonA
ButtonAButtonA
PARAMETERS
STAND BY
RADIO
DEFAULT
SEQUENTIAL
PROGRAMMING
A
S
ButtonA
ButtonA
P
Press&holdbuttonC
tosetdefaults
FUNCTIONSCODE
ButtonB
ButtonB
Only
1Motore
FUNCTIONSCODE
I
PARAMETERS
B use button B to move to next parameter
C use button C to INCREASE a numeric value or change NO to YES
D use button D to DECREASE a numeric value or change YES to NO
To save changes and to ensure that they are not lost when power is
removed, use button B to step through parameter, the press and hold
button C until the display reverts to idle display .
US
RESTORABLE FUSE 24V
IMPORTANT: If a temporary short circuit occurs the fuse will
restore itself after few seconds.
In case of a permanent short circuit, cut the main power
off, remove the terminal blocks 2A and 2B, wait few
seconds and then power the unit again.
The fuse will be automatically restored.
Find and remove the short circuit cause before plugging
the terminal blocks in.
DISPLAY SIGNALS
Opening
Closing
Delay time before
automatic Closing
Press & hold button
C to SAVE changes
Press buttonD
toABANDONchanges
standard
default
values
A B
A toplevelmenubutton
B lowerlevelmenubutton
C buttontoincreaseorchangetoyes(si)
D buttontodecreaseorchangetono
F1 230Vfuse5A
F2 24Vfuse(restorable)0,6A
F3 24Vfuse(restorable)1,6A
DISPLAY 7SEGMENTSDisplay
M1 radio/aerialterminalblock
M2A/M2B Controlsandsafetydevicesterminal
blocks
M3 motorterminalblock
M4 mainpowerterminalblock
earthconnections
MR radiounit
CN notusedconnector
Z2 filter
K1/K2 motorrelay
K3 blinkerrelay
VI PrimaryVaristor
V2 SecondaryVaristor
CONTROL UNIT COMPONENTS
08_gb_prof_17
Q60S
F
Magneticlimitswitch NO
Proteco S.r.l. Via Neive, 77
12050 Castagnito (CN) ITALY
Tel. +39 0173 210111 - Fax +39 0173 210199
www.proteco.net - info@proteco.net
AB
CONTROL UNIT
FOR SLIDING GATES
230V
Q60S/R
Morsettiera2
1920
131415
Morsettiera4Morsettiera3
123456 789101112
A
24V
AC
AC
V1
F1
K3
Z2
230V
N
L
B
K2
K1
Red
Red
Black
Black
DISPLAY
V2
8. 8.
A
B
SI
NO
C
D
_
+
Transformer
230V/23V
F2F2
F3
CN
Q60S
Red
Black
White
Aerial
EXTERNAL RADIO PANEL
EXTERNAL
RADIO
PANEL
THE RADIO PANEL CAN ALSO BE PLACED
INSIDE THE BLINKER TO FURTHER IMPROVE
THE RADIO RANGE
Question and Answer IconNeed help?

Do you have a question about the Proteco Q60S and is the answer not in the manual?

Proteco Q60S Specifications

General IconGeneral
Lifting Capacity600 N
Voltage230 V
Battery BackupOptional
Warranty2 years
Speed0.2 m/s
Safety FeaturesObstacle detection
Remote ControlIncluded

Summary

Q60S/R Control Unit Overview

External Radio Panel

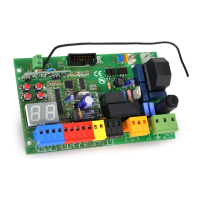
Details the external radio panel and its connection to the main unit.

Control Unit Components

Identifies and briefly describes key components of the control unit.

Parameter Navigation

Guides users on navigating and modifying control unit parameters.

Display Signal Indicators

Explains the visual signals displayed by the unit during operation.

Restorable 24V Fuse

Describes the purpose and self-restoring nature of the 24V fuse.

Operational Modes

Overview of parameter modes like PA, FA, DE, and AS for operation.

Remote Control Code Functions

Details functions for managing remote control codes.

Key Operational Times and Values

Lists key operational times and their standard default values.

Radio Programming

Initial Radio Setup Warning

Crucial step to delete existing codes before first-time radio programming.

Transmitter Programming Notes

Instructions for programming DIP-switch and HIT type transmitters.

Stored Code Management

Procedures for displaying, erasing single, and erasing all stored codes.

Storing New Remote Control Codes

Process for acquiring and storing new remote control codes with function options.

Q60S W Parameter Programming

Pre-Commissioning Warning

Pre-commissioning warning regarding limit switch type selection.

Parameter Adjustment Example

Illustrative example of adjusting the motor working time parameter.

Standard Programming Method

Detailed step-by-step explanation of the standard programming process.

Sequential Programming Method

Detailed step-by-step explanation of the sequential programming process for sliding gates.

Self-Diagnosis Display Messages

Photocell Test Errors

Indicates a failure during the photocell test procedure.

Photocell/Safety Edge Issues

Problems with photocell or safety edge during opening or closing phases.

Limit Switch Errors

Indicates a limit switch problem in either the opening or closing phase.

Start/Pedestrian Signal Faults

Faults due to short circuits or wiring in start or pedestrian signals.

Stop Button Status

Indicates that the stop button has been pressed.

Motor and Other Status

Indicates motor issues or radio continuous transmission.

Special Functions

Automatic Closing Function

Configures automatic closing behavior, including stop/reverse on impulse.

Multi-User Function

Controls command acceptance during the opening phase for multi-user mode.

Terminal Block Connections

Earth Terminal Connections

Instructions for connecting motor and network cables to earth terminals.

Terminal Block 2 Connections

Details connections for start, stop, photocell, safety edge, and radio receiver.

Terminal Block 3 Connections

Details motor output connections and capacitor placement.

Terminal Block 4 Connections

Details power input and accessory power supply connections.

Wiring Schemes

Start and Pedestrian Start Wiring

Wiring diagrams for start and pedestrian start inputs.

Permanent Start and Emergency Stop Wiring

Wiring diagrams for permanent start command and emergency stop button.

Motor and Limit Switch Wiring

Wiring diagrams for electromechanical motor and limit switches.

Motor Wiring for Gate Sides

Schemes for motor wiring on right/left side and gate closing direction.

Magnetic Limit Switches Fixing

Diagrams illustrating the correct fixing positions for magnetic limit switches.

Photocell and Road Barrier Connections

Motor and Limit Switch Wiring (Left Gate)

Wiring schemes for motor and limit switches on the left gate side.

Connecting Photocell in Closing Phase

Diagram and instructions for connecting photocells in the closing phase.

Connecting Photocell in Opening Phase

Diagram and instructions for connecting photocells in the opening phase.

Motor and Limit Switch Wiring (Road Barrier)

Wiring for motors and limit switches when used with a road barrier.

Related product manuals