This document describes the HH-G01 Engraving Machine, a dual-head engraving device designed for precision work.
Function Description
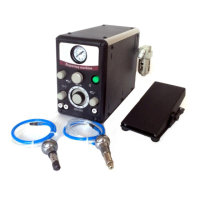
The HH-G01 is an engraving machine that operates using compressed air to power its handpieces. It is designed for various engraving tasks, offering adjustable control over impact force and speed. The machine features two quick-connect fittings for impact handpieces and an auxiliary air outlet for other pneumatic tools like rotary handpieces. A foot throttle provides variable control over the engraving force, similar to an automobile accelerator, allowing for precise adjustments during operation. The machine also incorporates a BIAS control knob, which enables fine-tuning of the foot throttle's activation point, making it suitable for delicate work such as bulino or shading, and even continuous engraving without foot pedal depression for tasks like stippling.
Important Technical Specifications
- Item No.: HH-G01
- Power Supply: 220V 50Hz / 110V 60Hz
- Handpiece Working Speed: 400-8000 RPM
- Range of Pressure Regulation: 0-60 PSI
- Machine Dimension: 29*13*21 (CM)
- Shipping Dimension: 35*31*39 (CM)
- Shipping Weight: 9.5KG
- Air Supply Requirements: The machine requires clean, dry, oil-free air. A minimum of 1.4 CFM (40 liters/min.) at 45 psi (3.1 bar) is necessary. The maximum input pressure is 125 psi (8.6 bar). It is recommended to reduce the air pressure from a regulator to 45-60 psi (3.1-4.1 bar) for stable supply. An oil-free compressor is suggested. If an oil-type compressor is used, a coalescing oil removal filter MUST be installed in the air supply line to prevent damage to the engraving machine.
Usage Features
Initial Setup
- Air Filter Installation: The supplied air filter should be installed on the right side of the machine (pic.3). The external air input hose connects to interface 17, and the black soft hose connects interface 18 to interface 11 (pic.2, pic.3). The filter's location should be easily accessible for daily water drainage.
- Foot Throttle Connection: The foot throttle connects to interface 12 (pic.2) on the back of the machine. Ensure the hose is not pinched or kinked.
- Handpiece Connection: The machine has two handpiece interfaces (8 and 9, pic.1). Connect the desired impact handpieces to these. A selector knob (5, pic.1) allows switching between the two. The auxiliary air outlet (10, pic.1) is for other pneumatic tools and is controlled by knob 7 (pic.1), which adjusts air flow.
Tuning the Engraving Machine (HH-G01)
Proper tuning is crucial for optimal performance.
- Compressor: Turn on the air compressor and allow the tank to fill, then wait for it to cycle off.
- Machine Power & Initial Settings: Turn on the HH-G01. Set the stroke per minute dial (6, pic.1) to 2300. Using the pressure control knob (3, pic.1), reduce the air pressure to 2-5 psi (0.1-0.4 bar).
- Handpiece Vibration Test: Hold the selected handpiece with the tool holder end up, next to your ear.
- Pressure Adjustment: Without depressing the foot throttle, slowly increase the air pressure until the handpiece vibrates. Continue increasing pressure until it knocks. Then, slowly reduce pressure until the knocking barely stops. This is the ideal operating pressure range for that handpiece.
The foot throttle functions like an automobile accelerator. The engraving force is controlled by the degree to which the pedal is depressed. For deeper cuts, press the throttle more; for lighter cuts, reduce pressure. Always position the tool before depressing the foot throttle. Coordinate foot action with the required power for the work.
Using the BIAS Control
The BIAS control knob (2, pic.1) allows adjustment of the foot throttle's activation point. Turning it counter-clockwise reduces the pressure needed to activate the handpiece. This feature is useful for fine detail work (bulino, shading) or for continuous engraving (stippling) without constantly depressing the foot throttle. By opening the BIAS control fully, the handpiece will start working without any foot throttle pressure.
Maintenance Features
Keeping the Handpiece Clean
If the handpiece's performance becomes sluggish or erratic, cleaning is required.
- Disassembly: Unscrew the handpiece, remove the piston and spring.
- Cleaning: Clean the piston and spring with soft, lint-free paper or cloth. Avoid paper towels, tissue, or newsprint. Fold the paper to clean between piston grooves and the spring space.
- Internal Cleaning: Twist a piece of writing or copier paper into a point, insert it into the handpiece, and rotate to buff and polish the inside.
- Reassembly: Reassemble the handpiece after cleaning.
- Important Note: DO NOT LUBRICATE THE PISTON, SPRING, OR BORE.
Foot Throttle Maintenance
Keep the floor clean to prevent debris from entering the foot throttle. Periodically, place a drop of oil on the throttle hinges. When not in use, place the foot throttle on your workbench or chair.
Air System Maintenance
Regularly check and clean the air filter (16, pic.3).
- Draining Water: Press the needle at the bottom of the air filter to drain accumulated water.
- Internal Reservoir: Unscrew the internal hex screw at the bottom of the machine to drain water from the internal air reservoir. Replace the plug after draining.
- Filter Element: The filter element should be cleaned and/or replaced frequently.
- Moisture in Hoses: If moisture is observed in the handpiece or throttle hoses, immediately shut down the unit and drain the filter bowl. Then, disassemble and clean the impact handpiece(s), reduce the pressure setting to 10 psi, and turn the unit ON to purge moisture from valves and hoses.
- Addressing Contamination: If large amounts of water or contaminants are consistently present, additional filter(s) or water traps may be needed in the air line. Oil or water contamination will damage the engraving machine and is not covered by warranty.