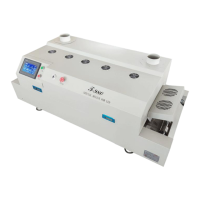
The LED SMT Reflow Oven T-980 is a sophisticated piece of equipment designed for the uninterrupted soldering of LED and BGA components. It utilizes a combination of IR and hot air heating technology, ensuring precise and uniform temperature control for optimal soldering results.
Function Description:
The T-980 operates on a crawler-type system with eight temperature zones, each independently controlled by PID (Proportional-Integral-Derivative) for accurate and well-proportioned heating. This design allows the oven to reach its working temperature from room temperature in approximately 20 minutes. It features intelligent temperature wave heating with eight distinct temperature waves, catering to a variety of welding technological requirements. The device incorporates programmable technology, allowing users to preset and store temperature waves for automated welding processes.
Temperature measurement is handled by thermocouples with a compensation circuit, enhancing accuracy. The PID intelligent temperature control technology ensures precise temperature regulation. The use of imported large current solid-state relays for non-contact output prevents damage to ICs or circuit boards from rapid or uninterrupted warming.
The transmission system is driven by a stepping motor and driver, providing stable operation with an adjustable speed range of 0-600mm/min (2mm/s-12mm/s). An independent wheel structure with special stainless steel struts ensures smooth, durable, and wear-resisting operation, with a speed precision of ±10mm/min. A dedicated cooling zone ensures that PCBs exit the oven at a low temperature.
The oven is equipped with advanced touch screen control technology, which integrates machine operation, function display, and monitoring. This interface provides an intuitive display of the working state, a clear view of the heating process, and convenient operation, facilitating product upgrades. The ergonomic design prioritizes practicality and ease of use, reflecting a constant focus on build quality and technology.
The T-980 offers two preheating modes:
- Sequential preheating: Heating zones are switched on in turn. This mode offers small instantaneous power and low machine load, making it suitable for 220V power supplies. However, it results in a longer preheating time.
- Synchronous preheating: All heating zones are switched on simultaneously. This mode provides a shorter preheating time but requires a larger power input, making a 380V industrial electricity supply recommended.
Important Technical Specifications:
- Model: T-980
- Heating Zone Quantity: Upper 5 / Down 3
- Length of Heating Zone: 1160mm
- Heating Type: IR and hot air heating
- Cooling Zone Quantity: 1
- Maximum Width of PCB: 400mm
- Operation Direction: Left to right
- Delivery Options: Net transmission + chain transmission
- Conveyor Belt Speed: 0-600mm/min
- Power Supply: (220/380V) 50/60Hz
- Peak Power: 13.2KW
- Average Power: 7.0KW
- Heating Up Time: Around 20 min
- Temperature Control Range: Room temperature ~ 350°C
- Temperature Control Mode: PID closed-loop control
- Temperature Control Accuracy: ±1°C
- PCB Temperature Distribution Deviation: ±2°C
- Overall Dimensions: 1600mm × 734mm × 567mm
- Net Weight: 130KG
Main Parts:
- Complete machine: 1
- Power line (4m): 1
- User manual: 1
Usage Features:
The device's main body includes an exhaust pipe joint, an emergency stop button, a cooling fan, and a status indicator lamp. The status indicator is green when heating and red when all temperature zones are not heating.
The control panel features a touch screen interface with options for "RT Setting" (room temperature setting), "Time Setting," "Temp Curve," and "Start Heating," along with language selection (Chinese/English).
Operating Instructions:
- Connecting Line: Remove the sealing plate of the power wiring cabinet at the back of the machine. Connect the power line to the terminal block according to L, N, and PE requirements (L1, L2, L3 for three-phase power, N for neutral, PE for ground). After connecting, power on the circuit breaker.
- Room Temperature Setting: Access the "RT Setting" interface. Input the current room temperature when the machine's internal temperature matches the room temperature. Click "Save" to calibrate.
- Temperature Curve Setting: In the "Temp Curve" interface, users can select from 8 default solder paste welding curves. After selecting a curve, choose between "Sequential" or "Synchronous" preheating mode. "Sequential" avoids excessive starting current by activating zones in turn, while "Synchronous" starts all zones simultaneously for faster preheating.
- Start Heating: From the main interface, click "Start Heating" and select the desired preheating mode. The machine will then run the selected curve.
- Monitoring and Adjustment: During operation, if the actual temperature exceeds the set temperature by 20°C, the temperature alarm indicator will flash red and green. During normal heating, it shows green. Users can modify curve parameters, including temperature and belt running speed, by clicking the preset temp dialog box.
- Time Setting: In the "Time Setting" interface, users can adjust the PCB run time by dragging a ruler slider, which in turn changes the belt's running speed.
- Test Data: The "Test Data" interface allows users to turn individual temperature zones on or off for fault detection. Green indicates on, red indicates off. To end the heating state, click "Finish."
Special Reminders:
- Select the appropriate welding curve based on chip size and welding process requirements.
- If the touch screen crashes, the machine automatically cuts off heating to prevent chip burnout.
- Touch screen alarms indicate a single-chip computer crash or communication line damage.
- If the touch screen shows an over-temperature alarm, cut off power to prevent damage to the circuit board and chip. Adjust the temp curve when the temperature is stable.
- The machine offers 8 preset curves, each with 8 sections, allowing users to adjust heating temperature and time based on solder requirements.
Foundation for Wave Set:
The reflow soldering process involves several stages:
- Heat Up Area (Dry Area): Solvent and gas in the solder paste evaporate. Flux wets the pad and component tips. Solder paste melts, covers the pad, and insulates oxygen.
- Heat Preservation Area: PCB and components are preheated to prevent damage from rapid temperature increases in the welding area.
- Welding Area: Temperature rises, and solder paste melts.
- Cooling Area: Liquid solder paste solidifies at the soldering points.
Temperature is crucial for welding quality. The actual and set temperature warming slope and peak temperature should match. Below 160°C, the heat-up speed should be controlled to about 1°C/S to prevent PCB and component damage, board deformation, and tin ball formation. The peak temperature should be 20°C-40°C higher than the solder paste melting point, with a reflow time of 10-60 seconds. Incorrect peak temperature or reflow time can lead to poor welding quality, incomplete melting, oxidation of metal powder, or damage to components and PCBs.
Temperature Area Set:
- Set initial temperature and belt speed (usually provided by the manufacturer).
- Preheat the cooling oven for 20-30 minutes.
- Once the temperature is stable, pass a PCB board through the heat reflow system. If no reflow occurs, adjust by increasing or reducing temperature proportionally. If reflow is too fast, adjust similarly.
- If no reflow, reduce belt speed (e.g., from 500mm/min to 460mm/min). A 10% speed reduction can increase reflow temperature by about 16°C. Alternatively, increase temperature directly based on the standard temperature wave, ensuring it doesn't exceed PCB and component bearing capacity.
- Pass the PCB through the system again with new speed or temperature. Repeat adjustments if no reflow.
- The heat temperature wave is adjustable. Reducing belt speed increases product heat temperature; increasing speed reduces it.
- If reflow is incomplete, adjust and reflow again. This typically does not damage components.
- Set temperature from low to high. If the heat range exceeds the reflow temperature, increase transmission speed or reduce set temperature.
Equipment Installation:
- Set Up Field:
- Ensure a clean environment.
- Avoid placing the machine near electromagnetic interference sources.
- Do not position oven exits and entrances towards fans or windows.
- Power Supply: Use a five-wire 380V system. Ensure proper grounding and professional electrician operation.
- Adjust Reflow Oven Height: Adjust the machine legs using an industrial or alcohol level to ensure the machine is completely horizontal on all sides.
- Caution:
- Maintain a clean working environment for good welding quality.
- Do not use or store the machine outdoors, in high temperatures, or humid conditions.
- Exercise caution during operation due to high temperatures to avoid scalding.
- Cut off power during overhaul to prevent electric shock or short circuits. Turn on the machine at room temperature as much as possible.
- After moving the machine, check all parts, especially the net-belt position, to ensure it is not locked or falling off.
- Ensure the machine is stable and horizontal to prevent PCB shifting during transmission.
- Avoid placing excessively large or heat-absorbing components into the oven to prevent net-belt damage and temperature fluctuations.
- Apply lubricating oil to the transmission chain every 7 days.
- Do not place flammable or explosive materials near the reflow oven.
- Do not reach hands into the reflow oven during normal operation.
Daily Maintenance:
- Keep the electrical control cabinet clean.
- Check the fan shaft sleeve for good condition.
- Listen for abnormal sounds from the fan and motor.
- Ensure the fan operates flexibly.
- Check air holes for abnormal materials.
- Verify the transmission net-belt is in good condition.
- Check the electrical chest and equipment for abnormal sounds.
- Check the transmission part for good condition and abnormal sounds.
- Before turning on, check that the working voltage is safe and stable. Ensure all parts work safely. When turning on, verify parameters match the last shutdown. When turning off, allow the temperature to cool down and stop the transmission belt before shutting off the temperature.
- Lubricate the driving rolls every two months.
- Lubricate the motor twice a week or more, especially during long periods of high-temperature operation, to ensure normal function.
- Clean residual goods from the fan blade and motor promptly to prevent circuit aging, short circuits, and fan damage.
- Ensure the machine is properly grounded when using a five-wire system.
Statement: Images and screenshots in this manual may differ slightly from the actual purchased product. Actual products shall prevail.