4
WARNING: Do not hold the positive and negative
lugs at the same time while the unit is active (receiv-
ing sunlight). It may cause a slight electric shock.
The SolarPulse unit is now ready. Once the panel is exposed to
sunlight, SolarPulse will begin charging your battery and pre-
venting/removing the buildup of lead-sulfate deposits on the
battery plates. Note: For the most effective results, we suggest
you install SolarPulse permanently. However, if your vehicle or
equipment does not allow for a permanent install, a temporary
placement will not affect the performance of SolarPulse.
(800) 580-7554www.pulsetech.net
998XM000 07/20
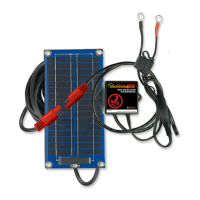
The circuit box can be mounted using any of the
following methods: Two round-head screws, industrial
adhesive, heavy-duty dual lock or double-sided tape
(not included). After cleaning the install area, mount
the box close to the battery so that the lugs can reach
the terminals. DO NOT attach it to the battery itself.
Also make sure the box is located in a location where
it won’t be disturbed and the LED is visible.
Circuit box includes an LED on top. LED will light
when lugs are attached to the battery terminals
and solar panel is installed and receiving
sunlight. It shines steady in full sunlight and dims
in indirect sunlight.
Connect the positive (+) wire to the positive (+)
battery terminal. After removing the nut from
the bolt securing the battery clamp to the posi-
tive terminal, slip the round metal lug at the end
of the positive red SolarPulse wire onto the bolt
until it sits next to the clamp.
Slip a round washer (not included) onto the bolt
until it sits next to the lug. Replace the nut onto the
bolt and tighten it until it secures the lug and wash-
er against the clamp. Do not over tighten. Repeat
steps 4-5 above to connect the negative (-) black
SolarPulse wire to the negative (-) battery terminal.
Feed the solar panel cable through any existing
opening in the vehicle or equipment into the
battery compartment. Connect the quick discon-
nect plugs on the solar panel and the circuit box
cables.
Mount the solar panel using any of the following
methods: Four round-head screws, industrial
adhesive, heavy-duty dual lock or double-sided
tape (not included). It should be mounted where
it will have direct sunlight.
If needed, use plastic cable ties (not included) to
secure the circuit box wires to the battery cable
or other secure area near the battery. This will
keep the wires from being damaged or interfer-
ing with any moving engine parts.
WARNING: Any solvents that may be harmful to
plastic should not be used on or near the unit.
Installation Instructions For Models SP-3, SP-7, SP-12 & SP-25
1 2
3
5 6
7
 Loading...