EasyManua.ls Logo

Pye Video PY90DG User Manual

Pye Video PY90DG
82 pages
To Next Page IconTo Next Page
Page #1 background imageLoading...
Page #1 background image
TO TVCHANNEL VIDEO INAUDIO IN
RL34
ANT IN
AC 120V
STEREO AUDIO/VIDEO
RF Modulator
(commercially available)
(Back of TV)
Antenna in jack
(commercially available)
ANTENNA
AUDIO IN
VIDEO IN
L
R
AUDIO OUT
VIDEO OUT
(E1)
IN
IN
OUT
OUT
S-VIDEO
COMPONENT
VIDEO OUTPUT
L
Y
P
B
/C
B
P
R
/C
R
R
(Back of This Unit)
Audio/Video cables
(supplied)
RF cable
RF cable
(supplied)
Antenna
Cable
TV signal
3
4
6
5
2
1
Set channel 3 or 4.
Turn on your TV
and select channel
3 or 4.
or
Note
• The quality of
picture may
become poor if this
unit is connected to
an RF modulator.
Recording Playing discs EditingBefore you start Connections Getting started
Changing the
Setup menu
Others Español
Please read before using this equipment.
If you need additional operating assistance after reading this owner’s manual or
to order replacement accessories, please call
TOLL FREE : 1-800-789-4230
or visit our web site at http://www.funai-corp.com
INSTRUCCIONES EN ESPAÑOL INCLUIDAS
Owner’s Manual
PY90DG
Connection to a TV (
Before you use this unit, you need to complete connections.)
If your TV has AUDIO/VIDEO input jacks, see the section “Connections” on pages 13–15. If not, it is still possible to connect this unit to
your TV by using a STEREO AUDIO/VIDEO RF modulator (commercially available). In this case, follow the instructions below.
1) The antenna input jack of your TV may have been already occupied. If so, disconnect the RF cable from your TV, and then
connect the RF cable to the ANTENNA IN jack of this unit.
2) Connect the ANTENNA OUT jack of this unit to your RF modulator (usually marked “ANT IN”) by the RF cable.
3) Connect your RF modulator to your TV by another RF cable.
4)
Connect the AUDIO/VIDEO output jacks of this unit to the AUDIO/VIDEO input jacks of your RF modulator by audio and video cables.
5) Set your RF modulator’s channel 3/4 switch to either 3 or 4, whichever the TV channel is least used in your area. If your
RF modulator has a Modulator/Antenna switch, set it according to your RF modulator’s manual.
6) Turn on your TV and choose the same channel as you set the RF modulator’s channel 3/4 switch to.
For more details, follow the instructions supplied with the RF modulator.
DVD Recorder
To record a program easily, refer to “Easy DVD recording” on pages 16-17 after connections are completed.
(You CANNOT record on any copyright protected DVD disc with this unit.)
Recordable disc
We strongly recommend for good recording quality:
TDK DVD+R 4x/8x/16x, SONY DVD+R 4x/8x/16x, MAXELL DVD+R 4x/8x/16x, SONY DVD+RW 4x,
MAXELL DVD-R 8x/16x, MAXELL DVD-RW 4x
Discs that have been tested and are proven to be compatible with this recorder:
VERBATIM DVD+R 8x, VERBATIM DVD+RW 4x, VERBATIM DVD-R 8x, VERBATIM DVD-RW 2x, MAXELL DVD-R 16x, JVC DVD-RW 4x
E7A02UD_PY90DG_p1-37.indd.indd 1E7A02UD_PY90DG_p1-37.indd.indd 1 2006/04/24 18:43:432006/04/24 18:43:43

Table of Contents

Other manuals for Pye Video PY90DG

Question and Answer IconNeed help?

Do you have a question about the Pye Video PY90DG and is the answer not in the manual?

Pye Video PY90DG Specifications

General IconGeneral
BrandPye Video
ModelPY90DG
CategoryDVD Recorder
LanguageEnglish

Summary

Before you start

Precautions

Safety precautions and warnings for using the equipment.

Important Safeguards

Essential safety instructions for appliance operation and user protection.

Hazards of Electrical Shock and Fire

Warnings and advice to prevent electrical shock and fire hazards.

Connections

Connection to a TV

Detailed instructions for connecting the DVD recorder to a television set.

Getting started

Easy DVD Recording

Step-by-step guide for performing basic DVD recording operations.

Initial Setting

Procedures for the first-time setup of the unit, including language and channel preset.

Setting the Clock

Instructions for setting the unit's clock, including Auto and Manual modes.

Recording

Information on DVD Recording

Explains disc types, recording modes, and quality factors for DVD recording.

Making Discs Playable on Other Players

How to finalize discs or make them compatible for playback on other DVD players.

Basic Recording

Step-by-step guide for performing a basic recording of TV programs.

One-Touch Timer Recording

Simple method to set recording times in 30-minute blocks.

Timer Recording

How to program the unit to record up to 8 programs in advance.

Overwriting an Existing Title

How to overwrite an existing title from the beginning or middle.

Settings for External Source

How to connect and configure external sources for recording.

Setting a Disc to Protect

How to protect discs from accidental editing or erasing.

Finalizing a Disc

Process to make recorded discs playable on other DVD players.

Playing discs

Information on DVD Play

Info on playable discs, region codes, color systems, and DVD playback hints.

Basic Playback

Steps for basic playback of discs, including title list navigation.

Editing

Information on Disc Editing

Overview of available disc editing functions and their limitations.

Deleting Titles

How to delete unwanted titles from a disc.

Changing the Setup menu

Tour of the Setup Menu

Overview of the setup menu options and their default settings.

Language Setting

How to set the language for disc menus, audio, and subtitles.

Language Setting (Continued)

Continued language settings, including OSD language and angle icon display.

Display Setting

How to configure OSD language, screen saver, and display brightness.

Others

Troubleshooting

Common problems and their solutions for power, picture, sound, and remote control.

Troubleshooting (Continued)

Troubleshooting for recording errors related to chapters, control info, and disc finalization.

Español

Limited Warranty

Limited Warranty

Details of the product's warranty, coverage, limitations, and service information.
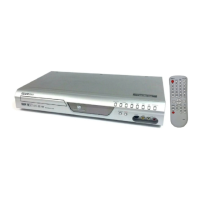
Related product manuals