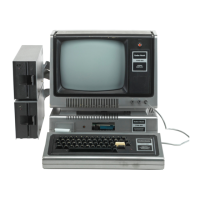
TROUBLESHOOTING (Continued)
SCHEMATIC NOTES
~
Circuitry
not
used in some versions
Circuitry used in some versions
8 See parts
list
....
Ground
Item numbers in rectangles appear in the alignment/adjust-
ment instructions.
Supply voltage maintained as shown at input.
Voltages measured
with
digital
meter.
Voltages and Waveforms taken
with
computer
in Power Up
mode (Main
title
screen displayed) unless otherwise
noted. Waveforms taken
with
triggered scope and
SweeplTime
switch
in Calibrate position, scope
input
set for
DC
coupling on
"0"
reference voltage waveforms.
Switch
to
AC
input
to view waveforms
after
DC
reference
is measured when necessary. Each waveform is 9 cm
width
with
DC
reference voltage given at the
bottom
line
of
each waveform. Time in
JLsec.
per cm, given
with
pop
reading at the end
of
each waveform.
Terminal
identification
may
not
be found on unit.
Resistors are
'hW
or
less, 10% unless noted.
Value in ( ) used in some versions.
check IC Z59 by
substitution.
If pulses are missing at pin
9,
check
IC
Z25 by
substitution.
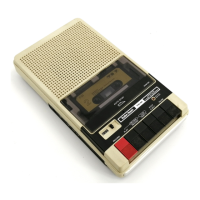
If the Cassette
Motor
runs all the time, check for
sticking
relay
contacts
and check
for
possible shorted Zener Diodes
CR9 and CRW.
If the Computer will not save programs
onto
tape, check for
the waveform shown in Figure 1 at pin 2
of
IC
Z59.
If
the
waveform is present, check Resistors
R53,
R54
and
R55
and
check pin 5
of
Connector J3 for good connection.
if
the
waveform is missing at pin 2
of
IC
Z59, check for pulses at
pin 9
of
IC Z59. If pulses are missing, check
IC
Z25 by
substitution.
If pulses are present at pin 9
of
IC Z59, check
IC
Z59 by
substitution.
If the Computer
will
not load a program from tape, connect
a
2V
pop,
1kHz sinewave audio signal
to
pin 4
of
Connector
J3. Type and run the
following
Basic program.
10
X = INT(255)
20
PRINT
"X
= "; X
30
OUT 255,0: GOTO 10
The number X that appears on the
Monitor
screen should be
255
when the 1kHz signal is injected at pin 4
of
Connector
J3 and
127
with no signal injected. If the numbers are incor-
rect, check for pulses at pin
10
of
IC
Z4.
If pulses are miss-
ing, check the voltages and components associated
with
pins 1 thru
14
of
IC
Z4.
If pulses are present at pin 10
of
IC
Z4
and the cassette
modification
Counter
IC
(Z1C)
and IC Z2C has been added,
check
for
pulses at pin 9 of IC Z24. If pulses are missing at
pin
9,
check Diodes CR200 and CR201, Resistor
R200
and
check ICs Z1C and Z2C by
substitution.
If pulses are pres-
ent at pin 9 of
IC
Z24, check for pulses at pins 8 and
13
of
IC
Z24
and pins 9 and
10
of
IC
Z25. If pulses are missing from
pin 9
of
IC Z25, check Tri-State
Buffer
IC
(Z22),
Micro-
processor IC
(Z40)
and ICs Z23 and
Z52
by
substitution.
If
pulses are missing at pin
10
of
IC
Z25,
check ICs Z36,
Z52
and
Z54
by
substitution.
If
pulses are present at pins 9 and
10
of
IC Z25 and missing
at pin
13
of
IC Z24, check IC Z25 by
substitution.
If pulses
are present at pin
13
of
IC
Z24
and
missing
at pin 8
of
IC
Z24,
check IC
Z24
by
substitution.
If pulses are present at pin 8
of
IC
Z24,
check for pulses at
pin 6
of
IC Z25.
If
pulses are present at pin 6
of
IC
Z25,
check Tri-State
Buffer
IC
(Z44)
by
substitution.
If pulses are
missing at pin 6
of
IC
Z25, check for pulses at pin 4
of
IC
Z25. If pulses are present at pin 4
of
IC
Z25, check IC Z25 by
substitution.
If pulses are missing at pin 4
of
IC Z25, check
ICs Z22, Z23,
Z52
and Z40 by
substitution.
If Relay
K1
on the Expansion Interface Board is
not
oper-
ating, refer
to
the
"Cassette"
section
of the Trouble-
shooting
guide in the Expansion Interface Folder CSCS3-A.
(")
en
(")
en
(,,)
::D
~~
oS!
cO
mC/)
'-z
-~
'-0
m"
<-I
~::D
_C/)
-eo
o
NOTE: Logic probe readings taken
with
computer in Power
Up mode (Main
title
screen displayed) unless other-
wise noted.
Logic Probe Display
L=
Low
H = High
P= Pulse
'"
= Open (no
light
on)
9
 Loading...