8
Gas Leak Testing
The gas leak testing procedure must be preformed every
time the tank is connected to the cooker!
• Gas Leak Testing must be preformed in a well ventilated area.
• During the Gas Leak Testing procedure, always keep the unit away from
open flames, sparks or lit cigarettes.
• Never use a flame to check for gas leaks.
• If the burner does not light within 3 seconds, turn the propane tank valve and
adjustable regulator off immediately. Always wait at least 5 minutes for gas
fumes to dissipate before repeating procedure.
• Always use the propane tank and adjustable regulator to turn the unit “ON”
and “OFF.”
• Never use a unit that has a gas leak.
Warning
!
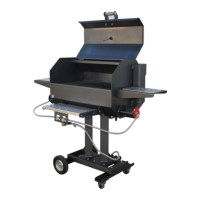
Step 1: Make sure the propane tank valve and adjustable regulator are turned
“OFF.”
Step 2: Make sure the POL Nut is securely fastened to the bottle and the SAE
Fitting is tightened to the Boiler.
Step 3: Prepare a soapy water solution (one part dishwashing liquid to three
parts water) to test for gas leaks in the hose and all connections. Apply
a generous amount of the soapy mixture to the regulator, POL Nut, hose
and all SAE Fittings. (There are several below the burner assembly as
well as one attaching the hose to the adjustable regulator.)
Step 4: With the adjustable regulator completely “OFF”, open the propane tank
about 1/2 way to fully open (should turn counter clockwise.) Next open
the adjustable regulator and check for bubbles at the adjustable regula
tor, along the entire length of the hose, and all the SAE fitting attached
to the burner as well as the connecting stainless steel tubing. DO NOT
LEAVE THE GAS ON FOR MORE THAN 10 SECONDS! If soapy mixture
starts bubbling, gas is leaking through the connection or the hose. Turn
the regulator “OFF” and close the propane tank valve. And retighten all
connections that failed test. If the hose is leaking replace it!
NEVER OPERATE BOILER WITH A LEAKING HOSE OR CONNECTIONS.
Repeat procedure with soapy mixture until no more bubbles are creat
ed. NEVER USE A FLAME TO CHECK FOR GAS LEAKS. Turn the ad
justable regulator “OFF” and close the propane tank valve after each
test
STEP 5: Once all gas leaks have been sealed, WAIT ATLEAST 5
MINUTES FOR GAS FUMES TO DIAAIPATE BEFORE LIGHTING THE
BOILER.
Propane Tank Valve
Red Control Knob
Adjustable Regulator
POL Nut
SAE Fitting
13
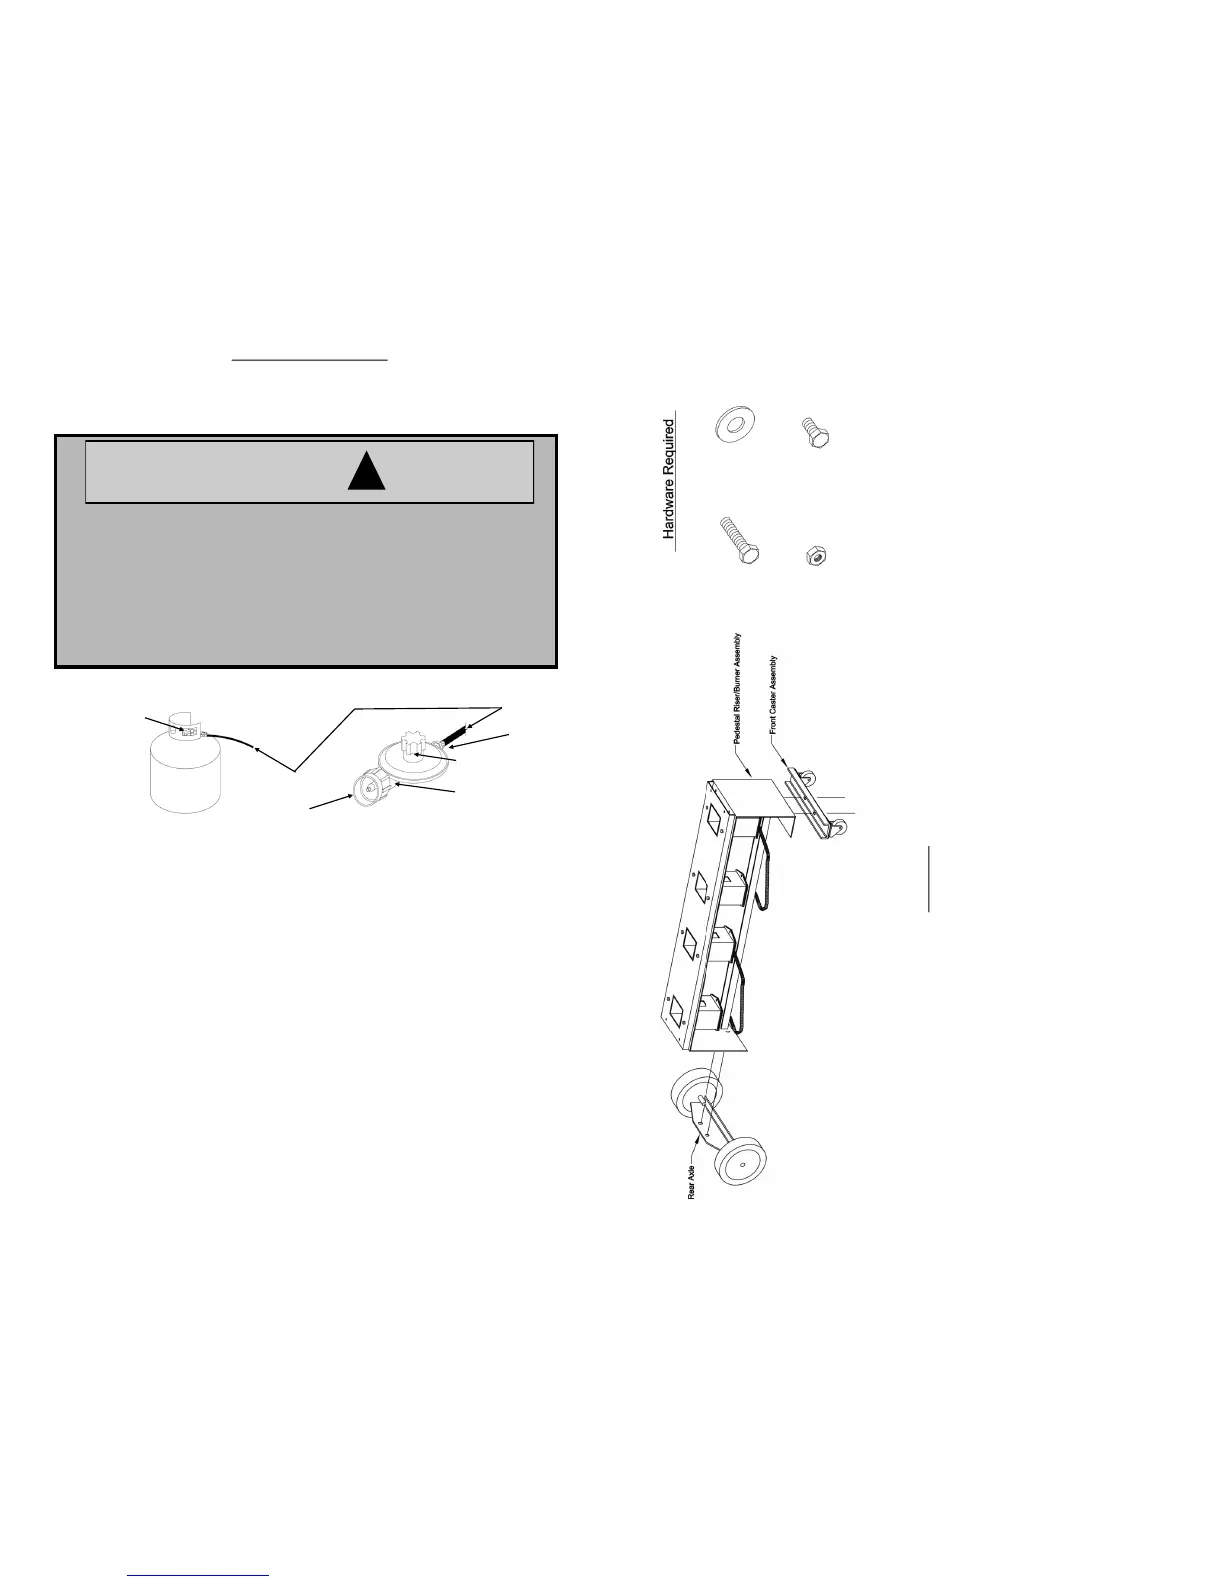
Step 2
1) Place the Rear Axle onto the Pedestal Riser/Burner Assembly and attach using
5/16” x 3/4” Bolts (2 ea.), 5/16” Washers (2 ea.) and 5/16” nuts (2 ea.). Tighten
these screw and nuts temporarily.
2) Attach front castor assembly to the skid weldment using 5/16” x 2” Bolts
(2 ea.), 5/16” flat washers (4 ea.) and 5/16” nuts (2 ea.), There should be one flat
washer on top of the flange on the skid and one flat washer under the front axle
assembly. Note: The Front Axle will need to set completely on the horizontal
flange. Do not allow either edge of the axle to fall of this surface. Be sure the
tighten these bolt to prevent the axle from moving.
3) Check to make sure the burner/riser set level. If it is not, loosen the nuts on the
rear axle and adjust until the units sets as level as possible. Tighten these nuts
securely to lock the leveling into place.
2 ea.5/16” x 2”
Bolts
6 ea. 5/16”
Washers
2 ea. 5/16” x
3/4” Bolts
6 ea. 5/16”
Nuts
 Loading...