EasyManua.ls Logo

Raychem H910 - User Manual

Raychem H910
8 pages
Print Icon
To Next Page IconTo Next Page
Loading...
Description
The WinterGard H910 Splice and Tee Kit is for use with WinterGard
self-regulating heating cables to make splice, tee, and end seal
connections. The kit contains materials for one splice and one end
seal, or one tee connection and one end seal. This kit does not
provide a power connection; use an H900, H908, or H911 power
connection kit for complete installation.
Applications
Use the H910 kit with the following WinterGard heating cables:
H311, H611, H612, H621, and H622. All are designed for pipe
freeze protection in dry locations, but H612 and H622 cables are
designed for both wet and dry areas, as well as for roof and gutter
de-icing. The cable type is printed on the outer jacket of the cable.
Installation and Support
The minimum installation temperature for this kit is 0°F (–18°C).
See the WinterGard Application and Design Guide (H53585) or the
H900, H908, or H911 installation instructions for design information.
For additional technical support call Raychem at (800) 542-8936.
Approvals
Desig. 3A, 3B, 3C, 2E
718K Pipe Heating Cable or
877Z De-icing and Snow
Melting Equipment
R
WinterGard Splice and Tee Kit with End Seal
Kit Contents
Item Qty Description
A 2 Insulated wire bus crimps
B 1 Uninsulated braid crimp
C 3 Cable ties
D 6 Mastic strips
E 1 Heat-shrinkable cap
F 1 Heat-shrinkable tube (6" long, 1" in diameter)
G 2 Black cloth tapes (6" long)—for use with H311,
H611, and H621
H 1 Clamp tie—for use with gutter/downspout
applications
I 1 Gel-filled end seal—for tee connection only
These components are electrical devices. They
must be installed correctly to ensure proper
operation and to prevent shock or fire. Carefully
follow all of the installation instructions and read
these important warnings.
To minimize the danger of fire from sustained
electrical arcing if the heating cable is damaged
or improperly installed, and to comply with the
requirements of Raychem and the 1996
National Electrical Code, ground-fault equipment
protection must be used on each heating cable
branch circuit. Arcing may not be stopped by
conventional circuit protection.
Component approvals and performance are
based on the use of specified parts only. Do
not substitute parts or use vinyl electrical tape.
The black heating-cable core is conductive
and can short. It must be properly insulated
and kept dry.
Keep components and heating cable ends dry
before and during installation.
Damaged bus wires can overheat or short.
Do not break braid or bus wire strands when
scoring the jacket or core.
Bus wires will short if they contact each other.
Keep bus wires separated.
Heat-damaged components can short.
Use a heat gun or a torch with a soft, yellow,
low-heat flame, not a blue focused flame.
Keep the flame moving to avoid overheating,
blistering, or charring the heat-shrinkable tubes.
Avoid heating other components. Replace any
damaged parts.
Use only fire-resistant insulation materials
such as fiberglass wrap.
Leave these installation instructions with the
user for future reference.
Charring or burning the heat-shrinkable tubes
in this kit will produce fumes that may cause
eye, skin, nose and throat irritation. Consult
Material Safety Data Sheet RAY/3122.
CHEMTREC 24-hour emergency telephone:
(800) 424-9300.
Nonemergency health and safety information:
(650) 361-4907.
WARNING: CAUTION:
H910
Installation Instructions
Tools and Materials Required
• Diagonal cutters • Needle nose pliers
• Utility knife • Screwdriver
• Crimp tools (Ideal 30-425 and T&B WT112M or WT2000)
• Heat gun or torch (Raychem H40 or equivalent)
• Hammer and nail ( for roof and gutters only)
• WinterGard H904 kit (for downspout installations)
Question and Answer IconNeed help?

Do you have a question about the Raychem H910 and is the answer not in the manual?

Summary

Product Description and Applications

Description of WinterGard H910 Kit

Details the H910 Splice and Tee Kit for making splice, tee, and end seal connections with WinterGard heating cables.

Applications for WinterGard Cables

Lists compatible WinterGard heating cables (H311, H611, H612, H621, H622) and their usage for pipe freeze protection and de-icing.

Installation and Support Information

Installation Temperature and Support

Specifies minimum installation temperature and provides contact for technical support.

Safety Warnings and Precautions

Highlights critical safety warnings regarding electrical hazards, proper installation, and material usage.

Required Tools and Kit Contents

Tools and Materials for Installation

Lists necessary tools like cutters, knives, pliers, screwdrivers, crimp tools, and heat guns.

WinterGard H910 Kit Contents

Details the components included in the H910 kit, such as crimps, ties, mastic, and heat-shrinkable parts.

Installation Procedure: Cable Preparation

Identify Heating Cable Type

Guides on distinguishing between H311/H611/H621 (braid, no outer jacket) and H612/H622 (braid and outer jacket).

Prepare Cable Ends for All Types

Instructions for allowing extra cable length and trimming as needed for all heating cable types.

Prepare H612;H622 Outer Jacket

Step-by-step process to score and peel off the outer jacket for H612 and H622 cables.

Prepare H311;H611;H621 Braid

Instructions on pushing back and spreading the braid for H311, H611, and H621 heating cables.

Installation Procedure: Core Preparation

Manage Braid for H612;H622 Cables

Unraveling and positioning the braid for H612 and H622 heating cables, twisting into a pigtail.

Prepare Inner Jacket for All Cables

Scoring and removing the inner jacket, then peeling it off for all heating cable types.

Prepare Bus Wires from Core

Notching the core and twisting/peeling bus wires away from the core for all cable types.

Installation Procedure: Mastic and Connections

Apply Mastic to H612;H622 Cables

Wrapping mastic strips around the outer jacket of H612 and H622 cable sections.

Apply Mastic to All Cable Ends

Applying mastic to the end of each cable section and pinching it to seal the core.

Align and Secure Cable Sections

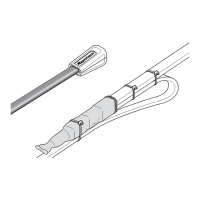
Aligning cable sections, pressing mastic strips, and fastening with cable ties.

Twist and Crimp Braid Pigtails

Twisting braid pigtails together, sliding on uninsulated crimp, and crimping the braid.

Installation Procedure: Insulation and Sealing

Fold and Tape Braid for H612;H622

Folding crimped braid back and wrapping with black cloth tape for H612 and H622 cables.

Connect Bus Wires

Twisting bus wires from different cables together and crimping them with insulated crimps.

Apply Heat-Shrinkable Cap

Sliding the heat-shrinkable cap over the bus wire crimps; shrinking is not required.

Apply Heat-Shrinkable Tube

Positioning the 6-inch heat-shrinkable tube over the connection for H612/H622 and H311/H611/H621 cables.

Installation Procedure: Final Sealing and Mounting

Shrink Tube and Seal Ends

Shrinking the heat-shrinkable tube completely and pinching the ends to seal.

Secure Connection (General)

Securing the connection to the heating cable and folding it over, fastened with a third cable tie.

Secure Connection (Gutter;Downspout)

Securing the cable with a hanger, fastening a clamp tie, and using tools to keep it off the gutter bottom.

End Seal Installation

Prepare Cable for H612;H622 End Seal

Cutting the cable end, scoring, and removing the outer jacket for H612 and H622 cables.

Prepare Cable for H311;H611;H621 End Seal

Cutting the cable end for H311, H611, and H621 cables.

Install End Seal

Pushing the end seal firmly onto the cable and securing the braid with tape.

Raychem H910 Specifications

General IconGeneral
Accessory TypeHeat Shrink Tubing
MaterialPolyolefin
ColorBlack
Flammability RatingUL VW-1
StandardsUL
Product TypeTubing