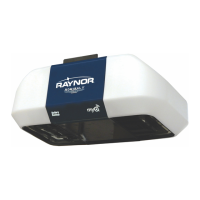
Do you have a question about the Raynor Sergeant II STANDARD Series and is the answer not in the manual?
Write down the myQ Serial Number for future reference.
Explains safety symbols and signal words used in the manual to alert users to hazards.
Details safe use of unattended operation features with sectional doors only.
Lists requirements and steps to connect the opener to a smartphone via the myQ app.
Guide on how to test Wi-Fi signal strength at the installation location.
Instructions for checking garage door balance, binding, and ensuring proper safety.
Lists all necessary tools for installation.
Lists all items included in the garage door opener package.
Lists hardware required for installation, categorized by type.
Lists compatible accessories for Security+ 2.0 systems.
Step-by-step instructions for attaching the rail to the opener unit.
Instructions on how to properly tension the chain on the trolley.
Crucial safety warnings and general instructions before starting installation.
Guidance on selecting the correct location for the header bracket.
Detailed instructions for installing the header bracket, with options for wall or ceiling mounting.
Steps to connect the opener rail to the previously mounted header bracket.
Instructions on how to position the opener unit for installation, including using a 2x4.
How to securely hang the opener unit to structural supports using brackets.
Guidance on selecting and installing appropriate light bulbs for the opener.
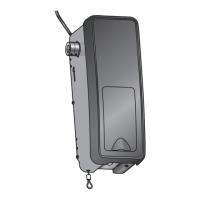
Instructions for attaching the emergency release mechanism.
Steps for installing the bracket onto the garage door, with notes on reinforcement.
Instructions for connecting the door arm to the trolley mechanism, including correct orientation.
Detailed steps for mounting and wiring the wall-mounted door control unit.
Instructions for connecting the door control wiring to the main opener unit.
Placement instructions for essential warning and safety labels.
Introduction to the safety reversing sensors and their importance.
Key information on sensor operation, alignment, and function.
Detailed instructions for installing the safety reversing sensors, with options for track, wall, or floor mounting.
Specific steps for installing safety sensors on the floor.
Instructions for wiring the safety reversing sensors to the opener, with and without pre-wiring.
Instructions for wiring safety reversing sensors using pre-existing wiring.
Provides options for connecting power to the garage door opener, typical and permanent wiring.
How to check and align safety sensors for proper operation and troubleshooting LED indicators.
Verifies the correct wiring of the door control and its command LED status.
Introduces adjustments for travel limits and safety reversal system testing.
Identifies the location and function of programming buttons on the opener.
Detailed steps for programming the door's open and close travel limits.
How to perform monthly tests of the safety reversal system.
Tests the functionality of the safety reversing sensors.
Step-by-step guide to installing the battery backup unit.
Procedures for testing the battery backup functionality and indicators.
Information on charging the battery and its expected lifespan.
Explains the meaning of different LED colors and patterns for the battery status.
Comprehensive safety warnings for operating the garage door opener.
Overview of features like Alert2Close, Timer-to-Close, and myQ.
Compatibility details for remote controls and door controls.
How to operate the opener using various controls and understanding safety sensor behavior.
Explains the function and importance of the safety reversing sensors during closing.
Steps to connect the opener to a smartphone via Wi-Fi and the myQ app.
Instructions for downloading and setting up the myQ app for remote control.
How to synchronize, use the push bar, light button, and access advanced features.
Steps to pair the door control with the garage door opener.
Function of the push bar for opening and closing the door.
How to operate the opener's lights using the light button.
Explains the LOCK and LIGHT features, and how to adjust light duration.
How to activate and deactivate the LOCK feature for remote control disabling.
How to adjust the duration the garage door opener lights stay on.
Details on the Maintenance Alert System and how to activate/deactivate it.
Information on factory programming and compatibility of remote controls.
Steps to program remotes or keyless entry using the door control.
Steps to program remotes using the LEARN button on the opener.
Instructions for erasing remote control, keyless entry, Wi-Fi, and myQ account data.
Steps for manually opening the garage door using the emergency release.
Provides a schedule for monthly, yearly, and multi-year maintenance tasks.
Instructions and warnings for replacing the remote control battery.
Correlates diagnostic codes (flashes) with symptoms and solutions.
Addresses Wi-Fi connectivity issues, LEARN mode activation, and other operational problems.
Lists and describes various compatible accessories for the garage door opener system.
Details the limited warranty terms, coverage, and duration for the product.
Emphasizes safety precautions and the importance of proper operation.
Advice on discussing garage door safety with children and keeping them away from controls.
Instructions for visual inspection of the door and opener system for wear or damage.
How to test the door's balance, movement, and overall operability.
Steps to test the opener's safety reversal and photoelectric sensor functions.
Lists part numbers for rail assembly components.
Lists part numbers for various installation components.
Lists part numbers for individual garage door opener components.
Provides contact details for ordering parts and getting service information.
| Horsepower | 1/2 HP |
|---|---|
| Drive Type | Chain Drive |
| Warranty | 5-year motor warranty, 1-year parts warranty |
| Battery Backup | No |
| Max Door Height | 7 feet |
| Remote Control | Yes |
| Voltage | 120V |