Do you have a question about the Razor CRAZY CART SHUFFLE and is the answer not in the manual?
Direct adult supervision is required. Riders must understand warnings and instructions for safe use.
Ride defensively in controlled areas, obey laws, and avoid traffic hazards and unsafe surfaces.
Always wear protective gear, including a helmet, elbow pads, and closed-toe shoes.
Remove all contents from the box and inspect for any damage that may have occurred during shipping.
Assembly by an adult is recommended and typically takes 15-20 minutes.
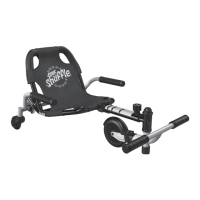
Locate the Product I.D. code and familiarize yourself with the different parts of the Crazy Cart Shuffle.
Slide seat back frame tubes onto bottom frame tubes until spring-loaded buttons engage securely.
Connect the front and rear frame halves using the provided bolts and tighten securely.
Secure the rear caster wheels to the frame tubes using the provided screws and Allen wrench.
Loosen the adjustment knob, slide the frame to the desired length, and then lock it in place.
Assemble the flag and insert it into the fixed hole located behind the seat.
Inspect wheels, frame, fork, drift bars, and hardware for wear, damage, or looseness before riding.
Always wear proper safety gear and be aware of and obey all local laws and regulations.
Sit, grasp drift bars, use foot bar to propel, and drift bars to spin and drift for movement.
Place feet on the ground and lower drift bars to slow down and stop. Ensure unit is completely stopped.
Wipe with a damp cloth. Avoid industrial cleaners, solvents, alcohol, or ammonia-based products.
Inspect wheels and bearings for wear, tightness, and play. Replace with genuine Razor parts.
Frequently requested replacement parts are available at retail partners or on www.razor.com.
Find authorized Razor repair centers online at www.razor.com or contact Customer Service.
Product is warranted against manufacturing defects for 6 months, excluding normal wear and tear.
Contact Razor customer service for product support, service centers, and warranty assistance.
| Brand | Razor |
|---|---|
| Model | CRAZY CART SHUFFLE |
| Category | Utility Vehicle |
| Language | English |