Do you have a question about the Razor E225 and is the answer not in the manual?
Guidelines for rider age, maturity, skill, and parental oversight for safe scooter operation.
Rules for safe riding environments, defensive riding, and avoiding dangerous situations.
Recommended protective gear and footwear for safe scooter operation.
Instructions and warnings for safely charging the scooter battery using the provided charger.
Provides an estimate for assembly duration and initial charging time required for the scooter.
Lists the necessary tools for assembling and maintaining the electric scooter.
Step-by-step instructions for securely attaching the handlebars to the scooter's fork.
Guidance on properly inflating the rear tire to the correct pressure before first use.
Instructions for inflating the front tire to the correct pressure as indicated on the sidewall.
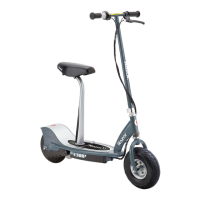
Steps for attaching the seat post and seat to the scooter deck.
Procedures and important information for charging the scooter's battery correctly.
Checking brake function, ensuring positive action, and verifying motor cut-off.
Instructions for inspecting the scooter's frame, fork, and handlebars for cracks or damage.
Guidelines for periodically checking tires for wear and maintaining correct pressure.
Emphasizes wearing proper safety gear, including helmets and athletic shoes, for riding.
Advice on proper storage temperatures and precautions to prevent battery damage.
Step-by-step guide to adjusting the brake cable tension for optimal stopping power.
Detailed instructions for replacing the chain and the rear tire, including hardware sequence.
Step-by-step instructions for replacing the front tire, listing required tools and hardware.
Guide to adjusting chain tension, with warnings about over-tightening and proper alignment.
Information on proper battery storage, handling, and environmentally sound disposal of lead-acid batteries.
Guidance on charger inspection, use of replacement parts, and locating repair centers.
Details the 90-day warranty against manufacturing defects and conditions that void the warranty.
| Charge Time | Up to 12 hours |
|---|---|
| Frame | Steel |
| Grips | Soft rubber |
| Throttle | Twist-grip |
| Max Speed | 10 mph |
| Max Range | 8 miles |
| Run Time | 40 minutes |
| Battery | 12V sealed lead-acid |
| Front Tire | 8" (200 mm), pneumatic |
| Rear Tire | 8" (200 mm), pneumatic |
| Brake | Hand-operated rear brake |
| Kickstand | Retractable |
| Age | 8+ |
| Handlebar | Steel |