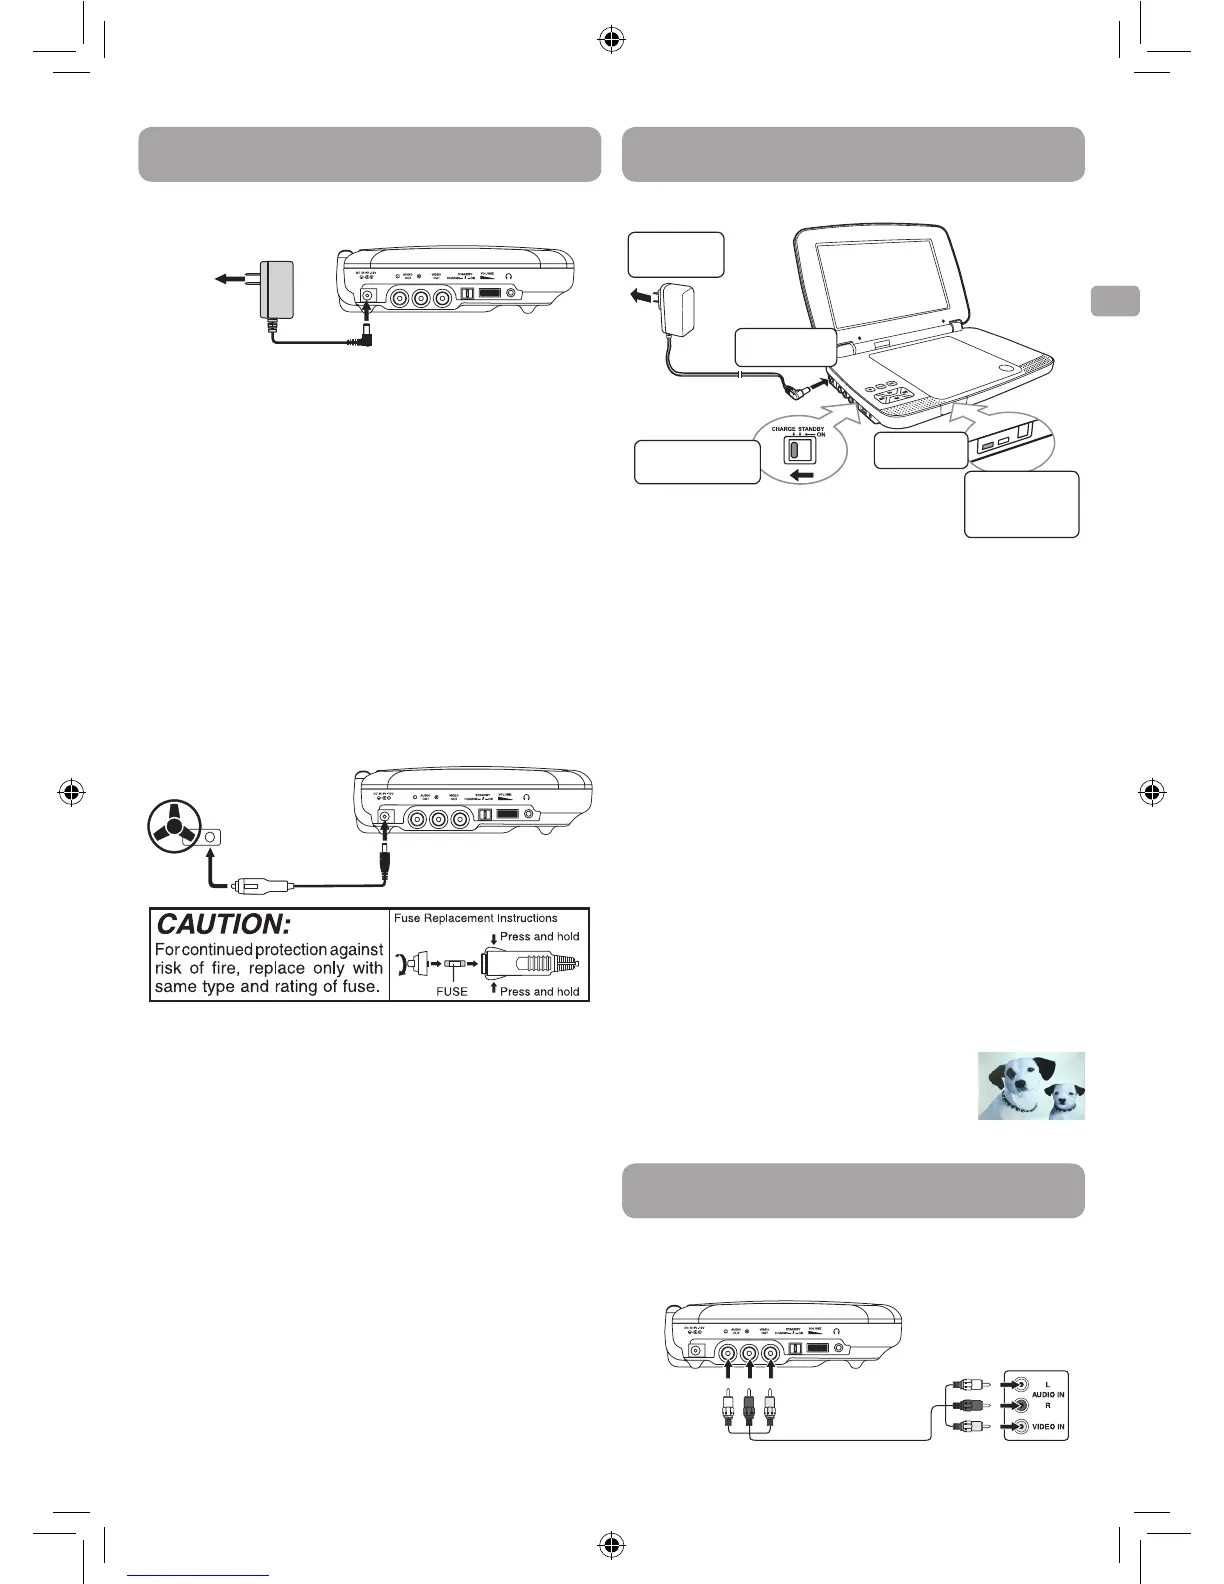
To DC IN 9V - 12V Jack
2
Car power adapter
To cigarette
lighter socket
1
B. Using the Car Power Adapter
The 12V car power adapter allows the unit to be used with vehicles that
have a 12V, negative ground electrical system.
Warning:
Disconnect the car power adapter when not in use. Not for use in 24V
vehicles.
Caution:
• Usetheprovided12Vcarpoweradapteronly.Usewithothercar
power adapters could damage the unit.
• The12Vcarpoweradapterincludedwiththisunitisforitsuseonly.
Do not use it with other equipment.
• In theinterest oftrafficsafety,donotoperatethisunitorview
videos while driving a vehicle.
• Makesuretheunitissecurelyfastenedtopreventitfromfallingor
flying through the air in the event of an accident.
• Whentheinsideofthecigarettelightersocketisdirtywithashesor
dust, the plug section may become hot due to poor contact. Be sure
to clean the cigarette lighter socket before use.
• Afteruse,disconnectthe12Vcarpoweradapterfromboththeunit
and cigarette lighter socket.
C. Using the Built-in Battery
The unit has a built-in, non-replaceable, rechargeable battery. Charge
the built-in battery before using it for the first time. Complete charging
typically takes approximately 4-5 hours. The charging light will go out
when the built-in battery becomes fully charged.
To recharge the built-in battery
1
To AC power
outlet
2
To DC IN 9V
- 12V Jack
3
Slide the switch
to CHARGE
4
Charging
light ON
5
Recharging
is completed
when charging
light goes out
AC power
adapter
Power Supply
Power Supply
Warning:
• Thebuilt-inbatterycanonly berechargedwhentheunit isin
CHARGE mode while using the AC power adapter.
• The built-inbatterycannotberechargedwhenthe unit isinON
mode.
• DoNOT rechargethebuilt-inbatteryinavehicleusing thecar
power adapter.
• Batteriesshouldnotbeexposedtoexcessiveheatsuchassunshine,
fire or the like.
Note:
• Whenthebuilt-inbatterypowerislow,"BatteryLow"willdisplayon
the screen and the unit will stop playing.
• Rechargethebuilt-inbatterywhenyouarereadytouseitagain.
• Whileusingthe built-inbattery,the environmentaltemperature
should be 41°F (5°C) to 95°F (35°C).
• Togetthelongestservicelifeofthebuilt-inbattery,charge at
indoor-temperature.
• Thebuilt-inbatteryin thisdevicemaypresentariskoffire or
chemical burn if mistreated. Do not disassemble, heat above 212
o
F
(100
o
C), or incinerate.
• Theunitshouldnotbeexposedtoexcessiveheatsuchassunshine,
fire or the like.
• Whendiscardingtheunit,environmentalproblemsmustbe
considered and local rules or laws governing the disposal of such
products must be strictly followed.
Turning on the Unit
1. Slide the CHARGE / STANDBY / ON switch on the
left side of the unit to the ON position.
2. The start-up picture will appear on the screen.
3. After use, slide the CHARGE / STANDBY / ON
switch to the STANDBY (power off) position.
Connections
A. Connecting a TV
If your TV has audio/video inputs, you can connect the unit to your TV
using standard Audio/Video cables.
To AUDIO /
VIDEO OUT
jacks
Audio / Video cable
(not included)
TV
White Red Yellow
White Red Yellow
A. Using the AC Power Adapter
The supplied AC power adapter operates on AC 100-120V.
AC power adapter
2
1
To DC IN 9V - 12V Jack
To wall outlet
Caution:
• TheACpoweradapterincludedwiththisunitisforitsuseonly.Do
not use it with other equipment.
• Whentheunitisnotgoingtobeusedforlongtime,disconnectthe
AC power adapter from the wall outlet.
• WhentheAC poweradapterispluggedin,theapparatusisnot
completely disconnected from the main power supply, even when
the power is turned off.
Warning:
The AC/DC adaptor is used as disconnect device. The AC/DC adaptor of
apparatus should not be obstructed OR should be easily accessed dur-
ing intended used. To be completely disconnect the power input, the
AC/DC adaptor of apparatus shall be disconnected from the mains.