EXISTING PANEL
0.125-0.250"
13.18 -
6.•MM)
GASKET
0.10"
( 2.54 MMI
THICK
MOUNTING
CLIP
GROOVE
MOUNTIN
G
CLIP
LYNX
COUNTER
BEZEL
MOUNTING
SCREWS
2 PLACES
•
•
SELF-TEST
This unit has a built-in self-test feature, which can be activated without
losing counts or preset values, missing preset points or timed output dura-
tions, or interfering with control functions. With this test, all digits are
cycled through, then the mode select switch settings are displayed. At this
point, the outputs can also be tested.
To enter self-test, press the two left-hand digit buttons
(located on the
front panel)
simultaneously. At this time, whatever count value was dis-
played will disappear and be replaced by a string of six zeros. This will be
shown for about half a second, then a string of ones will appear for the
same time duration. Following these, a string of twos and so on, up to nine
will be displayed. After the nines are shown, five decimal points will
appear. After this portion, an interlace pattern of 1,0,1,0,1,0, then
1,2,1,2,1,2, and so on, until all digits from zero to nine have been displayed.
The next portion of self-test will display a group of four ones and zeros.
These ones and zeros are the settings of the mode select switches
(the four
DIP switches located along the side of the unit).
The 5th DIP switch on the
Dual Preset Lynx Counter
(S9)
will not be displayed. This pattern directly
corresponds to the number representing the mode of operation. If the
switches are changed while at this point in the self-test, the settings can be
seen to change. These changes will not affect counter operation immedi-
ately, but any changes will take effect when self-test is exited. When the
switch is
'DOWN",
the LCD will show a one. When the switch is "UP", the
LCD will show a zero. If no testing of the outputs is required, press the
"E"
button until the unit exits self-test
(the unit will go back to the counter
display mode).
Also, if no activity occurs on the switches or the front panel
button within 18sec. after the unit pauses at the mode switch display, the
unit will automatically exit the self-test.
During the time the mode switch settings are displayed, the outputs can
be tested. To activate the outputs, press the
'PI"
button
(for dual preset
version, "1
3
1" or
T2"
is pressed.)
NOTE: The "PGM. DIS." terminal must be deactivated (open or at + 5VDC
maximum) for the outputs to be activated. Also, caution should be used
when testing the outputs, so as not to cause any undesirable or hazardous
conditions in the system. (To turn
off
the outputs, release the button.)
If the outputs are not tested the state(s) of the outputs will remain the same
as they were prior to self-test. If the outputs are tested in self-test, the out-
puts will be
off
after exiting self-test.
Rapid advance of the self-test routine can be done by pressing and releas-
ing any of the front panel buttons except for the "R" button. (Pressing "R"
at any time, except when entering the timed output mode, will reset the
unit.)
INITIAL POWER-UP
&
FACTORY SETTINGS
When the unit is shipped from the factory, the values and the following
modes are set as shown.
Preset I
= 500
Preset 2
=
1,000 (if
a
dual preset version)
Prescale Value
=
1.00000 (if a dual preset version)
Count Value
= 0
Timed Output Value(s)
= .1 second
DIP SWITCH SETTINGS
All switches are moved to the
"UP"
position except for the reset enable
switch, which is moved
'DOWN".
With the switches set in these positions,
the unit is operating in mode zero
(latch-on at preset, manual reset to zero).
The input is set for sinking type inputs, high frequency, and high bias oper-
ation.
PRESCALE ENABLE/DISABLE SWITCH
The Dual Preset Lynx Counters have an extra switch next to the four
mode DIP switches which is labeled TS.
EN./DIS." (S9).
When this switch
is in the
"ENABLE"
position (UP), the Prescale information can be
changed as detailed
in 'To Enter A New Prescale Value".
When this switch
is in the
'DISABLE"
position
(DOWN),
any change in the Prescale Value is
inhibited. The Program Disable input will override the
"PS. EN./DIS."
switch. The prescale value can not be changed if Program Disable is
activated even though the
"PS. EIV./DIS."
switch is in the Enable position.
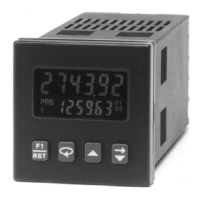
INSTALLATION
The Lynx counters are designed to be panel-mounted with a gasket
to provide a water-tight seal. One mounting clip and two screws are
provided for easy installation. Consideration should be given to the
thickness of the panel. Too thin of a panel may distort and not pro-
vide a water-tight seal.
(Recommended minimum panel thickness is
0.125")
After the panel cut-out has been completed and deburred, carefully
apply the gasket to the panel.
DO NOT APPLY THE ADHESIVE
SIDE OF THE GASKET TO THE COUNTER BEZEL.
Insert the
unit into the panel. As depicted in the drawing, install the two tin-
nerman nuts and two self-tapping screws onto the mounting clip. To
install the mounting clip; hold the mounting clip with both hands so
that the top corners rest on the index finger of each hand and the bot-
tom corners rest on the middle finger of each hand. While doing this,
place the thumb of each hand over the mounting screws. By pressing
on the screws, flex the clip enough to slide it over the back end of the
Lynx case until the clip snaps into the groove of the bezel. Tighten the
two mounting screws.
CAUTION: Only minimum pressure is required
to seal panel. Do NOT overtighten mounting screws.
•
 Loading...