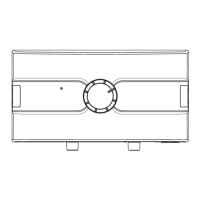
Replacing the Front Cover (see Diagram 5)
Please Note:-
We recommend that the front cover is replaced before the unit is filled with water.
1. To aid assembly, ALL the weekly mechanical programmer tappets should be pushed
to the inner edge of the dial to the “OFF” period (see Diagram 6).
2. Offer up the front cover to the main body, aim to fit the mechanical programmer
through the bezel keeping the front cover square to the wall.
3. Once the mechanical programmer is engaged into the bezel, adjust the position so
that it is a snug fit over the appliance Backplate.
4. Replace the top fixing screws (x2), then press the cover at the base while tightening
the bottom fixing screws (x2).
5. Check that the mechanical programmer is free to spin, and the switch is in its
aperture.
6. The appliance can be programmed as described in the “Setting up the weekly
mechanical programmer” section and shown in Diagrams 6 and 7
7. Fasten the door with the screw provided.
5
Usage
The Redring WS7-EcoT contains an integrated weekly mechanical programmer.
This facility allows the user to set the heater “ON” and “OFF” periods for each separate
day of the week.
“ON” periods are settable by sliding the timer segments to the outer position.
The minimum selectable “ON” period is 2 hours and 20 minutes.
A major benefit of the Redring WS7-EcoT heater is the energy saving possibilities of
controllability and the facility in a commercial installation to set a programme to cover a
weekly usage pattern including weekends.
However, the thick insulation contained in the Redring WS7-EcoT heater also ensures
economic running costs if the heater is left on at all times.
Setting up the weekly mechanical programmer
The dial should be set to the current time and day.
Rotate the dial slowly in the clockwise direction, until the correct time and day segment
on the dial is approaching the arrowhead shown at the top of the dial.
Note the dial is printed with the 24 hour clock.
6.00 am = 6 on the dial and 6.00 pm = 18 on the dial.
Programming switching times (see Diagram 6)
Set the tappets between the desired “ON” and “OFF” period
required.
ALL the tappets must be pushed to the outer edge of the dial for
an extended “ON” period.
Each tappet switches the output for a 2 hour and 20 minute
period.
Setting the selector switch (see Diagram 7)
“ ” setting.
The heater will operate and heat water as programmed.
The separate water temperature thermostat will control the water
temperature.
“ ” setting.
The weekly programmer is over-ridden.
The water heater is “OFF” and the water will not be heated.
“ ” setting.
The weekly programmer is over-ridden.
The water heater is “ON” and the separate water temperature
thermostat will control the water storage temperature.