EasyManua.ls Logo

REDSHIFT DUAL-POSITION SEATPOST - User Manual

REDSHIFT DUAL-POSITION SEATPOST
2 pages
Print Icon
To Next Page IconTo Next Page
Loading...
DUAL-POSITION SEATPOST
INSTRUCTIONS
WARNING
!
• Failure to follow these instructions and warnings may result in malfunction or breakage of this component,
possibly causing serious injury or death.
• Always use a torque wrench when installing or adjusting fasteners, and always tighten to Redshift torque
specications (or the bike manufacturer’s torque specication). Periodically check all fasteners for tightness
using a torque wrench, since fasteners can loosen under the inuence of road vibration.
• This seatpost is designed for use in a 27.2 mm diameter seatpost. It may be used with larger seat tube diameters
by using an appropriate diameter shim longer than 100mm (4 in.) in length.
• When moving the seatpost between the road and aero positions, be careful not to pinch your ngers or hands
between the moving linkages.
• Do not raise the post beyond the minimum insertion line.
• Periodically clean and inspect all surfaces of this component for hairline cracks or signs of damage. If you nd
any cracks or damage, immediately cease using the part and contact Redshift Sports customer service.
• This seatpost is intended for road use only. O-road use may lead to slippage or breakage of the component,
possibly causing serious injury or death.
• Using the forward (aero) seatpost position can aect a bicycle’s handling characteristics. Following installation,
practice using the seatpost at low speed in a safe area to get used to the bicycle’s handling and steering.
• Ensure that the post and the inside of the seat tube are covered with a thin layer of bicycle grease prior to
installation. Failure to do so may cause the post to seize inside the bicycle frame.
Thanks for buying Redshift Sports Dual-Position Seatpost. The
seatpost lets you switch on-the-y between road and aero positions,
letting you choose the best position for every part of every ride.
This seatpost is dierent than other seatposts, so please read these
instructions and warnings completely before installing or using the
seatpost. If you are unfamiliar with bike maintenance or seatpost
installation, or if you lack the required tools, please visit your local
bike shop or contact Redshift Sports customer service for assistance.
Improper installation or use may void the product’s warranty policy.
Check out www.redshiftsports.com for instructional videos and
additional resources.
INSTALLING THE SEATPOST
1. WARNING! This seatpost is designed for bicycle frames with a 27.2mm diameter seat tube.
The seatpost may be used with larger diameter seat tubes by using the correct diameter
seatpost shim. in order to reduce stresses on the post and frame, only use seatpost shims
greater than 100 mm (4 in.) in length. Using the seatpost in a dierent diameter seat tube
without an appropriate shim may cause damage or failure of the seatpost or bicycle frame.
2. Prior to removing your existing post, you may wish to measure the existing height, fore-aft
position, and angle of your saddle for future reference.
3. Remove your existing seatpost and saddle. Clean the inside of the bicycle’s seat tube and
ensure that the inside of the seat tube is free of burrs and sharp edges. Apply a thin layer of
grease to the inside of the seat tube.
4. With the seatpost linkage in the rearward road position, loosen the rear saddle clamp bolt (#6b) until the
top of the bolt is threaded approximately halfway out of the rear saddle clamp nut (#4).
5. Grasp the seatpost tube (#1) and press rmly on the rear of the linkage to shift the seatpost linkage
forward into the aero position. WARNING! When moving the seatpost linkage between the road and
aero positions, be careful not to pinch your ngers or hands between the linkages.
6. Loosen the forward saddle clamp bolt (#6a) until the top of the bolt is threaded approximately halfway
out of the forward saddle clamp nut (#4).
7. Position your saddle between the lower saddle clamp (#2) and upper saddle clamp (#3).
4
3
2
5
6a
1
www.redshiftsports.com
5
6
3
FRONT
ADJUSTING SADDLE TILT
WARNING! DO NOT OVER TIGHTEN SADDLE CLAMP BOLTS! OVERTIGHTENING
MAY LEAD TO SEATPOST FAILURE, POTENTIALLY CAUSING SERIOUS INJURY OR
DEATH. ALWAYS USE A TORQUE WRENCH WHEN ADJUSTING SADDLE CLAMP
BOLTS.
12. Saddle tilt is adjusted by loosening and tightening the two saddle clamp
bolts (#6). To access the rear saddle clamp bolt, shift the seatpost linkage
rearward into the road position (see Figure). To access the forward saddle
clamp bolt, shift the seatpost linkage forward into the aero position (see
Figure).
13. To tilt the saddle forward, using a 4mm hex wrench, rst loosen the
rear saddle clamp bolt, then lightly tighten the forward saddle clamp bolt.
14. To tilt the saddle backward, using a 4mm hex wrench, rst loosen the
forward saddle clamp bolt, then lightly tighten the rear saddle clamp bolt.
15. Using a torque wrench, tighten the rear saddle clamp bolt (#6b) to 4.0
N-m (35 in-lb).
16. Using a torque wrench, tighten the forward saddle clamp bolt (#6a) to 4.0
N-m (35 in-lb).
17. Repeat steps 12-16 as necessary until the desired saddle angle is achieved.
If you experience any saddle slippage during riding, repeat steps 12-16
tightening the bolts to a maximum of 5.0 N-m (45 in-lb).
SEE OTHER SIDE FOR ADDITIONAL ADJUSTMENT INSTRUCTIONS
AERO POSITION
ROAD POSITION
4mm Hex
4mm Hex
8. Loosely nger-tighten the forward saddle clamp bolt (#4) to hold the saddle in place temporarily.
9. Insert the seatpost into your bicycle seat tube to the desired height. Do not twist the seatpost during
insertion. Ensure that the seatpost is inserted far enough into the seat tube that the minimum insertion
line on the seatpost is not visible above the frame’s seatpost clamp.
10. Tighten the bicycle’s seatpost clamp bolt according to the bicycle manufacturer’s torque specication.
11. Position the saddle in the desired fore-aft position within the saddle clamp and follow steps 12 through
20 below to set the saddle tilt.
6b
# QTY PART NAME
1 1 Seatpost & Linkage
2 1 Lower Saddle Clamp
3 1 Upper Saddle Clamp
4 2 Saddle Clamp Nut
5 2 Saddle Clamp Spherical Washer
6a 1 Saddle Clamp Bolt (Front 35 mm)
6b 1 Saddle Clamp Bolt (Rear 30 mm)

Other manuals for REDSHIFT DUAL-POSITION SEATPOST

Question and Answer IconNeed help?

Do you have a question about the REDSHIFT DUAL-POSITION SEATPOST and is the answer not in the manual?

Summary

DUAL-POSITION SEATPOST INSTRUCTIONS

INSTALLING THE SEATPOST

Provides step-by-step instructions for mounting the seatpost to bicycle frames.

ADJUSTING SADDLE TILT

Details how to adjust the saddle tilt using the clamp bolts and hex wrench.

SAFETY WARNINGS

Alerts users to critical safety precautions during installation and use.

NOTES ON SEATPOST ASSEMBLY

SEATPOST ASSEMBLY DETAILS

Specific guidelines for orienting saddle clamp parts and spherical washers.

SWITCHING BETWEEN POSITIONS

SAFETY DURING POSITION SWITCH

Critical warnings and precautions for safely switching between road and aero positions.

PERFORMING POSITION SWITCH

Step-by-step instructions for transitioning the seatpost between road and aero positions.

TROUBLESHOOTING & MAINTENANCE

SEATPOST LINKAGE ISSUE

Guidance on resolving difficulty in shifting the seatpost linkage.

WARRANTY INFORMATION

PRODUCT WARRANTY COVERAGE

Details warranty terms, coverage, and return procedures for the product.

Overview

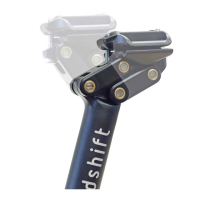
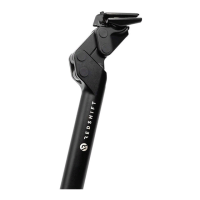
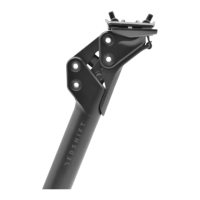
The Redshift Sports Dual-Position Seatpost is an innovative bicycle component designed to enhance riding versatility by allowing cyclists to switch between road and aero positions on the fly. This feature enables riders to optimize their position for different parts of a ride, whether they need an upright, comfortable road stance or a more aerodynamic, aggressive aero posture. The seatpost's core functionality revolves around a linkage mechanism that facilitates this quick adjustment, providing a dynamic riding experience.

Function Description:

The primary function of the Dual-Position Seatpost is to provide two distinct saddle positions: road and aero. In the road position, the saddle is set further back, offering a traditional, comfortable riding posture suitable for general cycling, climbing, and relaxed cruising. This position typically allows for better power transfer during climbs and a more upright body position for improved visibility and control in traffic.

Conversely, the aero position shifts the saddle forward, effectively steepening the rider's effective seat tube angle. This forward shift places the rider in a more aggressive, aerodynamic stance, which is highly beneficial for time trials, triathlons, or any situation where minimizing wind resistance is crucial. By moving the rider's center of gravity forward, the aero position helps to open up the hip angle when using aero bars, allowing for more efficient power output in a tucked position. The linkage mechanism is engineered to provide a noticeable "click" when transitioning between positions, confirming that the saddle is securely locked into place.

The seatpost is designed for use with bicycle frames that have a 27.2mm diameter seat tube. For frames with larger diameter seat tubes, an appropriate seatpost shim, specifically one greater than 100mm (4 inches) in length, must be used to ensure proper fit and to prevent damage to both the seatpost and the bicycle frame. The design emphasizes secure saddle clamping, utilizing two saddle clamp bolts that allow for precise adjustment of saddle tilt.

Usage Features:

The Dual-Position Seatpost offers several user-friendly features that enhance its practicality and performance:

  • On-the-Fly Position Switching: The most significant feature is the ability to switch between road and aero positions while riding. This is achieved by grasping the nose of the saddle and either pulling it forward (for aero) or pushing backward with the legs and buttocks (for road). This dynamic adjustment allows riders to adapt to changing terrain, wind conditions, or riding goals without stopping.
  • Intuitive Shifting Mechanism: The shifting process is designed to be straightforward. To move from road to aero, the rider pulls the saddle firmly forward until a "click" is heard. To return to the road position, the rider pushes backward against the saddle until it clicks into place.
  • Saddle Tilt Adjustment: The seatpost allows for precise saddle tilt adjustment. This is done by loosening and tightening the two saddle clamp bolts. To access the rear bolt, the linkage is shifted to the road position, and for the forward bolt, it's shifted to the aero position. This ensures that the saddle can be perfectly leveled or angled to the rider's preference, optimizing comfort and power transfer.
  • Secure Saddle Clamping: The saddle is held in place by upper and lower saddle clamps, secured by two saddle clamp bolts. Spherical washers are used to ensure proper alignment and secure clamping of the saddle rails, preventing slippage during rides.
  • Compatibility: While primarily designed for 27.2mm seat tubes, the seatpost can be adapted to larger diameters with the correct shim, broadening its compatibility with various bicycle frames.
  • Visual Cues for Assembly: The manual provides clear instructions and diagrams for proper assembly, including the correct orientation of the upper saddle clamp and spherical washers, which are critical for preventing damage and ensuring safe operation.

Maintenance Features:

Proper maintenance is crucial for the longevity and safe operation of the Dual-Position Seatpost. The manual outlines several key maintenance practices:

  • Regular Fastener Checks: All fasteners, especially the saddle clamp bolts and the seatpost clamp bolt, should be periodically checked for tightness using a torque wrench. Road vibrations can cause fasteners to loosen over time, so regular checks are essential to maintain the specified torque settings.
  • Lubrication of Linkage: If the seatpost linkage becomes difficult to shift, a drop of lightweight oil (such as 3-in-1 oil) should be applied to both ends of the four pivot shafts and each of the eight bushing flanges. After applying oil, the linkage should be cycled forward and backward several times to distribute the lubricant, and any excess oil should be wiped away. This ensures smooth operation of the shifting mechanism.
  • Greasing the Seatpost: Before installation, a thin layer of bicycle grease must be applied to the inside of the bicycle's seat tube and the exterior of the seatpost. This prevents the seatpost from seizing inside the frame, making future adjustments or removal easier.
  • Cleaning and Inspection: Periodically, all surfaces of the seatpost should be cleaned and inspected for hairline cracks or other signs of damage. Any visible damage warrants immediate cessation of use and contact with Redshift Sports customer service to prevent potential failure and injury.
  • Proper Installation Practices: The manual emphasizes the importance of cleaning the inside of the bicycle's seat tube to remove burrs or sharp edges before installation. This prevents damage to the seatpost during insertion and ensures a smooth fit.
  • Torque Wrench Usage: The consistent use of a torque wrench is highlighted for all installation and adjustment procedures. This prevents overtightening, which can lead to component failure, and ensures that all bolts are tightened to the manufacturer's specified torque, enhancing safety and performance.

By adhering to these usage and maintenance guidelines, riders can ensure the safe, reliable, and long-lasting performance of their Redshift Sports Dual-Position Seatpost, maximizing their cycling enjoyment and efficiency across various riding conditions.

REDSHIFT DUAL-POSITION SEATPOST Specifications

General IconGeneral
MaterialAluminum
Travel100 mm
Length400 mm
Offset0 mm
ColorBlack
Diameter30.9 mm
Adjustment/ActuationRemote lever
Weight560g (30.9mm)

Related product manuals