6 | Grandview® G800C Gas Fireplace
safety decal
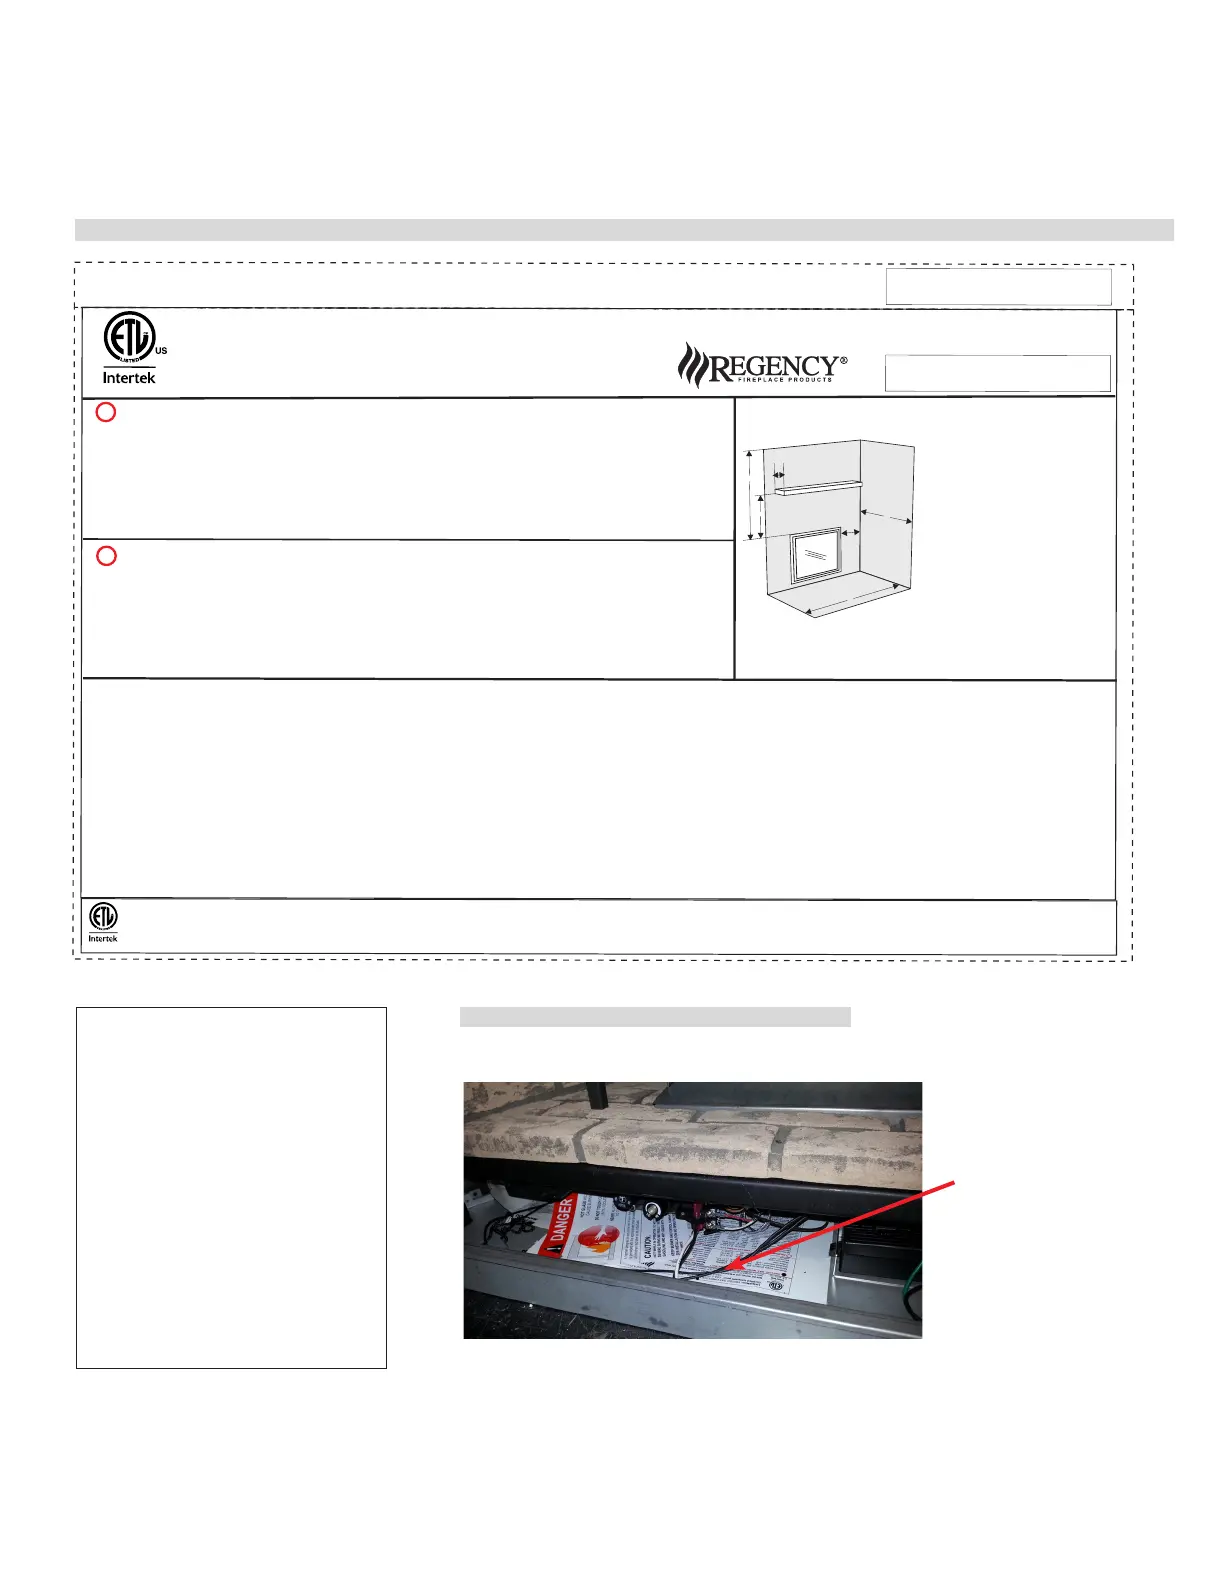
This is a copy of the label that accompanies each Grandview™ G800C Direct Vent Gas Fireplace. We have printed a copy of the contents here for your review.
NOTE: Regency
®
units are constantly being improved. Check the label on the unit and if there is a difference, the label on the unit is the correct one.
Copy of Safety Decal
For the State of Massachusetts, installation
and repair must be done by a plumber or
gas fitter licensed in the Commonwealth of
Massachusetts.
For the State of Massachusetts, flexible con-
nectors shall not exceed 36 inches in length.
For the State of Massachusetts, the appli-
ances individual manual shut-off must be a
t-handle type valve.
The State of Massachusetts requires the
installation of a carbon monoxide alarm in
accordance with NFPA 720 and a CO alarm
with battery back up in the same room where
the gas appliance is installed.
Decal location
DO NOT REMOVE DECAL FROM UNIT.
Remove bottom cover—decal will
be on the floor of the unit
Part #: 920-184a - Side A
Colours: Black on white, except for parts indicated as being Red.
Punch out .25" hole top right corner where indicated.
Size: 100%
W- 6.045" x L- 9.18"
Nov. 1, 2020: Created decal
Jan. 6, 2020: Removed reference to CSA Standard
Material: Printable white polyester 7mm
Start serial sequence @ 000001
NOTE: This is a double sided decal (made from decals 920-168a and 920-181).
Part #: 920-184a - Side B
Colours: Black on white, except for parts indicated as being Red.
Punch out .25" hole top right corner where indicated.
Size: 100%
w- 6.52"
h- 11.13"
Nov. 5/19: Created decal
DO NOT REMOVE THIS LABEL / NE PAS ENLEVER CETTE ÉTIQUETTE
536
536
DOOR SEAL: Please
check that the door is
properly sealed
FPI Fireplace Products International Ltd. Delta, BC, Canada
Minimum Clearances to Combustibles / Rear Vent—Clean Finish
Dégagements minimaux par rapport aux matériaux combustibles
Serial No./ No de série
920-168a
Electrical supply/Alimentation électrique 115VAC, 1.5A, 60Hz.
NOT FOR USE WITH SOLID FUELS /
NE PAS UTILISER AVEC UN COMBUSTIBLE SOLIDE
Made in Canada/ Fabriqué au Canada
Duplicate S/N
0" Clearance to
combustibles from /
Top, sides, bottom and rear of unit
Mantel Clearances from
Fireplace Opening /
(A) 20-1/2" (521 mm) at max. depth
Side Wall Clearance
from Fireplace Opening /
B) Min. 26-1/2" (673mm)
(on one side)
Ceiling from Top of
Fireplace Opening:
C) Min. 36-1/2" (927 mm)
Mantel Depth:
D) Max. 19" (483 mm)
Alcove Clearances:
E) Min. Width 84" (2134 mm),
F) Max. Depth 36" (914 mm)
Minimum Vent Clearances:
Horizontal Top 2" (51 mm)
Horizontal Side 1-1/2" (38 mm)
Horizontal Bottom 1-1/2" (38 mm)
Vertical Vent 1-1/2" (38 mm)
(See Instruction Manual for detailed instructions)
APPAREIL
FONCTIONNANT AU
GAZ PROPANE
Modèle -LPG800C
PROPANE GAS: Model G800C-LP
NATURAL GAS: Model G800C-NG
Minimum supply pressure
Manifold pressure high
Manifold pressure low
Orifice size
Minimum input
Maximum input
Altitude
Pression d'alimentation minimale
Pression manifold - haute
Pression manifold - basse
Taille de l'orifice
D bit calorifique minimal é
D bit calorifique maximalé
Altitude
5.0" WC/C.E. (1.25 kPa)
3.8" WC/C.E. (0.94 kPa)
1.1" WC/C.E. (0.27 kPa)
# 42 DMS
15,000 Btu/h (4.4 kW)
27,000 Btu/h (7.91 kW)
0-4500 ft/pi (0-1372 m)
Part #: 920-168a
Colour: Everything black on grey except what is highlighted is printed red.
Size: File@100% 9.117’’W x 6.045’’H
Nov. 1/19 : Created Draft
Jan 6, 2020: Removed reference to CSA standard
*Printer:Start serial sequence @ 000001
Pression d'alimentation minimale
Pression manifold - haute
Pression manifold - basse
Taille de l'orifice
D bit calorifique minimalé
D bit calorifique maximalé
Altitude
11" WC/C.E. (2.74 kPa)
10.5" WC/C.E. (2.61 kPa)
2.9" WC/C.E. (0.72 kPa)
# 53 DMS
14,500 Btu/h (4.25 kW)
26,500 Btu/h (7.77 kW)
0-4500 ft/pi (0-1372 m)
Minimum supply pressure
Manifold pressure high
Manifold pressure low
Orifice size
Minimum input
Maximum input
Altitude
This appliance must be installed in accordance with local codes, if any; if none, follow the National Fuel Gas Code, ANSI Z223.1.
This appliance must be installed in accordance with the Manufactured Home Construction and Safety Standard, Title 24 CFR, Part 3280, in the United States, or when such a standard is not applicable,
ANSI/NCSBCS A225.1/NFPA 501A, Manufactured Home Installations Standard or ANSI A119.2 ou NFPA 501C Standard for Recreational Vehicles
This appliance is only for use with the type of gas indicated on the rating plate and may be installed in an aftermarket, permanently located, manufactured (mobile) home where not prohibited by local codes. See
owner's manual for details. This appliance is not convertible for use with other
gases, unless a certified kit is used. (Kit #761-977). Fan Part # 761-979.
Installer l'appareil selon les codes ou règlements locaux, ou, en l'absence de tels règlements, selon les codes d'installation ANSI Z223.1. Installer l'appareil selon la norme 24 CFR, Part 3280, Manufactured Home
Construction and Safety Standard. Si ces normes ne sont pas pertinentes, utilisez la norme ANSI/NCSBCS A225.1/NFPA 501A, Manufactured Home Installations Standard, ou ANSI A119.2 ou NFPA 501C
Standard for Recreational Vehicles. Cet appareil doit être utilisé uniquement avec le type de gaz indiqué sur la plaque signalétique. Cet appareil peut être installé dans une maison préfabriquée ou mobile (É.-U.
seulement) installée à demeure si les règlements locaux le permettent. Voir la notice de l'utilisateur pour plus de renseignements. Cet appareil ne peut pas être utilisé avec d'autres gaz sauf si une trousse de
conversion certifiée est fournie.
This vented gas fireplace heater is not for use with air filters. Ne pas utiliser de filtre à air avec ce foyer au gaz à évacuation.
FOR USE WITH GLASS DOORS CERTIFIED WITH THE APPLIANCE ONLY
POUR UTILISATION UNIQUEMENT AVEC LES PORTES EN VERRE CERTIFIÉES AVEC
L'APPAREIL
For Use Only with Barrier (Part #761-038/P ) Utiliser uniquement avec l’écran ( n ° 761-038/P )
E
B
A
C
D
F
C #: 4001172
MAY BE INSTALLED IN MANUFACTURED (MOBILE) HOMES AFTER FIRST SALE.
Listed/Nom: Vented Gas Fireplace Heater / Foyer au Gaz à Évacuation
Certified to/Certifi pour: é ANSI Z21.88-2017
Refer to Intertek's Directory of Building Products for detailed information.
Pour plus de détails , se reporter au Répertoire des produits de construction de Intertek.
APPAREIL
FONCTIONNANT AU
GAZ NATUREL
Modèle G800C-NG
CSA P.4.1 Fireplace Efficiency (FE) /
Efficacité énergétique des foyers (EEF) CSA P.4.1
Natural Gas / Gaz naturel 51.86%
Propane Gas / Gaz propane 53.64%
CANADIAN ENERGY
PERFORMANCE
VERIFIED
RENDEMENT
ÉNERGÉTIQUE
VÉRIFIÉ
EP5011169
920-181
Part #: 920-181
Colours: Black on Grey, except for parts indicated as being Red.
Punch out .25" hole top right corner where indicated.
Size: 100%
w- 6.52"
h- 11.13"
Nov 04/19: Created decal
w- 6.5"
h- 11"
DO NOT REMOVE THIS INSTRUCTION PLATE
NE PAS ENLEVER CETTE ÉTIQUETTE D’INSTRUCTIONS
TO TURN OFF GAS APPLIANCE / POUR ÉTEINDRE UN APPAREIL AU GAZ
This appliance must be installed in accordance with local codes, if any; if none, follow the National Fuel Gas Code, ANSI Z223.1/NFPA 54,
or Natural Gas and Propane Installation Codes, CSA B149.1.
Cet appareil doit être installé conformément aux codes locaux, s’il y a lieu. En l’absence de tels codes, suivre le National Fuel Gas Code,
ANSI Z223.1/NFPA 54, ou les Natural Gas and Propane Installation Codes, CSA B149.1.
CAUTION: Hot while in operation. Do not touch. Severe burns may result. Due to high surface temperatures keep
children, clothing and furniture, gasoline and other liquids having ammable vapors away. Keep burner and control
compartment clean. See installation and operating instructions accompanying appliance.
ATTENTION : Surfaces chaudes lorsque l’appareil est en marche. Ne pas toucher. Risque de brûlures graves. En raison
des températures élevées, les enfants, les vêtements et le mobilier, le carburant et tout autre liquide aux vapeurs
inammables doivent être tenus éloignés de l’appareil. Nettoyer régulièrement le brûleur et le compartiment des
commandes. Voir les consignes d’installation et d’utilisation fournies avec l’appareil.
LIGHTING INSTRUCTIONS / CONSIGNES D’ALLUMAGE
FOR YOUR SAFETY READ BEFORE LIGHTING
POUR VOTRE SÉCURITÉ – À LIRE AVANT LA MISE EN MARCHE
WARNING: If you do not follow these instructions exactly, a fire or explosion may result causing property damage,
personal injury or loss of life. Improper installation, adjustment, alteration, service or maintenance can cause
injury or property damage. Refer to the owner’s information manual provided with this appliance. For assistance
or additional information consult a qualified installer, service agency or gas supplier.
AVERTISSEMENT. Quiconque ne respecte pas à la lettre les instructions dans la présente notice risquede déclencher un
incendie ou une explosion entraînant des dommages, des blessures ou la mort.
Une installation, d'ajustement, de modication, de service ou d'entretien peut provoquer des blessures ou des dommag-
es matériels. Reportez-vous au manuel du propriétaire de l'information fournie avec cet appareil. Pour obtenir de l'aide
ou des informations supplémentaires consulter un installateur qualié, une agence de service ou fournisseur de gaz.
A) This appliance has a pilot that must be lighted by hand. When lighting the pilot, follow these instructions exactly.
B) BEFORE LIGHTING smell all around the appliance area for gas. Be sure to smell next to the oor
because some gas is heavier than air and will settle on the oor.
WHAT TO DO IF YOU SMELL GAS
- Do not try to light any appliance.
- Do not touch any electric switch, do not use any phone in your building.
- Leave the building immediately.
- Immediately call your gas supplier from a neighbours phone. Follow the gas supplier’s instructions.
- If you cannot reach your gas supplier, call the re department.
C) Use only your hand to push in or turn the gas control knob. Never use tools. If the knob will not push in or turn by hand, do not try to repair it; call
a qualied service technician. Force or attempted repair may result in a re or explosion.
D) Do not use this appliance if any part has been under water. Immediately call a qualied service technician to inspect the appliance and replace
any part of the control system and any gas control which has been underwater.
A) Cet appareil est muni d’une veilleuse qui doit être allumée manuellement. Respectez les instructions ci-dessous à la lettre.
B) AVANT LA MISE EN MARCHE, reniez tout autour de l’appareil pour déceler une odeur de gaz. Reniez au niveau du plancher, car certains gaz
sont plus lourds que l’air et peuvent s’accumuler au niveau du sol.
QUE FAIRE SI VOUS SENTEZ UNE ODEUR DE GAZ :
• Ne tentez pas d’allumer l’appareil
• Ne touchez à aucun interrupteur; n'utilisez pas de téléphones se trouvant dans le bâtiment.
• Sortez du bâtiment immediatement
• Appelez immédiatement votre fournisseur de gaz depuis un téléphone extérieur. Suivez les instructions du fournisseur.
• Si vous ne pouvez pas rejoindre le fournisseur, appelez le service incendie.
C) Ne pousser ou tourner la manette d'admission du gaz qu'à la main. Ne jamais employer d'outil à cette n. Si la manette reste coincée, ne tentez
pas de la réparer; appelez un technicien qualié. Quiconque tente de forcer la manette ou de la réparer peut provoquer une explosion ou un
incendie.
D) N’utilisez pas cet appareil s’il a été plongé dans l’eau, même partiellement. Faites inspecter l’appareil par un technicien qualié et remplacez tout
élément du système de contrôle ou de commande qui a été plongé dans l’eau.
ARRÊTEZ ! Lisez les instructions de sécurité sur la portion supérieure de cette étiquette.
STOP! Read the safety information above on this label.
1) Push in gas control knob slightly and turn clockwise to “OFF”. Knob cannot be turned from "PILOT" to "OFF" unless knob is pushed in
slightly. Do not force.
2) Wait ve (5) minutes to clear out any gas. If you then smell gas STOP! Follow step "B" in the Safety Information above on this label. If you don't
smell gas, go to the next step.
3) Push in gas control knob slightly and turn counterclockwise to "PILOT" position.
4) Push in control knob all the way and hold in until the pilot lights. Continue to hold the control knob in for about 20 seconds after the pilot lights.
Release the knob.
5) Push in gas control knob slightly and turn counterclockwise to "ON" position.
6) Turn on the ame switch.
1) Enfoncez légèrement le bouton de commande de gaz et tournez dans le sens horaire en position OFF. Le bouton ne peut pas être tourné
du PILOT à OFF à moins que le bouton soit enfoncé légèrement. Ne forcez pas.
2) Attendre cinq (5) minutes pour laisser échapper tout le gaz. Si vous sentez une odeur de gaz, ARRÊTEZ! Passez à l'étape "B" des instructions de
sécurité sur la portion supérieure de cette étiquette. S'il n'y a pas d'odeur de gaz, passez à l'étape suivante.
3) Enfoncez légèrement le bouton de commande de gaz et tournez dans le sens antihoraire en position PILOT.
4) Poussez le bouton de commande de gaz à fond et maintenez-le enfoncé jusqu'à ce que la veilleuse s'allume. Maintenez le bouton de commande
de gaz enfoncé pendant environ 20 secondes après l'allumage de la veilleuse. Relâchez le bouton de commande de gaz.
5) Enfoncez légèrement le bouton de commande de gaz et tournez dans le sens antihoraire en position 'ON'.
6) Actionnez l’interrupteur de amme.
1) Turn o the ame switch.
2) Push in the gas control knob slightly and turn clockwise
to “OFF”. Do not force.
3) Turn o all electric power to the appliance if service is to be
performed.
You may shut off the pilot during prolonged non use periods to
conserve fuel.
1) Fermez l’interrupteur de amme.
2) Enfoncez légèrement le bouton de commande de gaz et tournez
dans le sens horaire en position OFF. Ne forcez pas.
3) Avant d’eectuer des opérations d’entretien, coupez l’alimentation
électrique de l’appareil.
Pour économiser le carburant, vous pouvez éteigner la veilleuse
lorsque l’appareil reste longtemps inutilisé.



 To Next Page