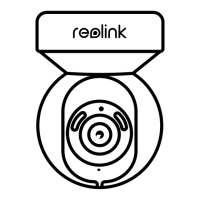
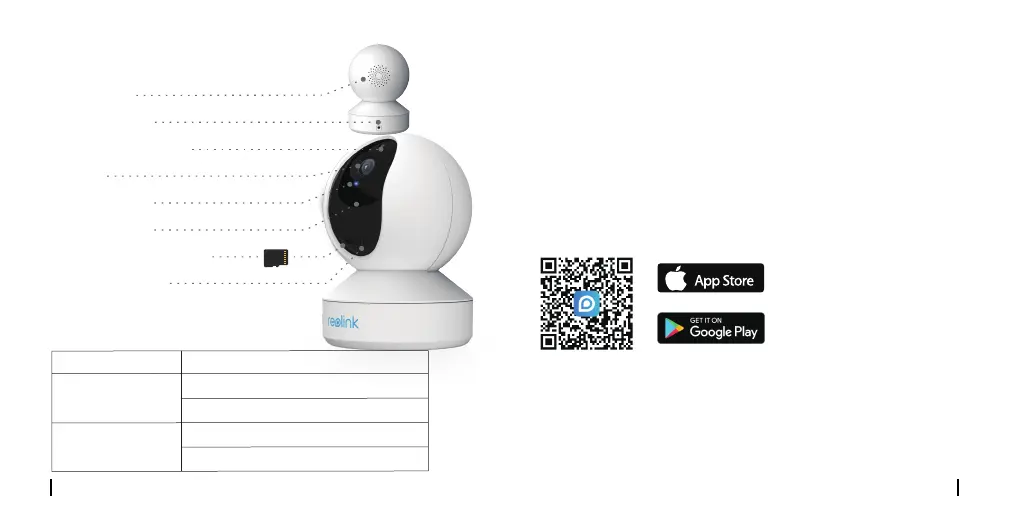
EasyManuals Logo

Reolink E1 Quick Start Guide

Reolink E1
10 pages
To Next Page IconTo Next Page
To Previous Page IconTo Previous Page
Page #3 background imageLoading...
Page #3 background image
Speaker
Power Port
Micro SD Card Slot
Daylight Sensor
Camera Introduction
Built-in Mic
Status LED
Lens
Reset Button
*Rotate the lens to find the reset
button and the SD card slot.
4English3 English
Meaning of the Status LED:
On Smartphone
Download and Launch the Reolink App or Client software
and follow the onscreen instructions to finish initial setup.
Scan to download the Reolink App.
Set up the Camera
• On PC
Download path of the Reolink Client: Go to
https://reolink.com > Support > App & Client.
Available on the
WiFi connection failed
Status/LED LED in Blue
WiFi is not configured
Camera is starting up
WiFi connection succeeded
On
Blinking

Other manuals for Reolink E1

Questions and Answers:

Question and Answer IconNeed help?

Do you have a question about the Reolink E1 and is the answer not in the manual?

Reolink E1 Specifications

General IconGeneral
Pan & Tilt355° Pan, 50° Tilt
AudioTwo-way audio
StoragemicroSD card slot (up to 128GB)
Image Sensor1/2.7" CMOS Sensor
Wireless StandardIEEE 802.11b/g/n
Wireless SecurityWPA-PSK/WPA2-PSK
EthernetNo
Operating Temperature-10°C to 55°C (14°F to 131°F)
Weight200g
Motion DetectionYes
Resolution2304x1296 (3MP)
Night Vision40 ft (12m)
ConnectivityWi-Fi
PowerDC 5V/1A
IR Distance40 ft (12m)
Day/Night ModeAuto-switching
Viewing AngleHorizontal: 87.5°, Vertical: 47°, Diagonal: 100°

Related product manuals